Oblique cutting pliers, suitable for extracting parts from the sprues with precision and cutting soft wire (copper or alpaca) of maximum 1mm thick. The design of its handle allows a comfortable grip.
AK Wet palette replacement, 40 units.
High quality interchangeable special paper to keep your acrylic colors wet and ready at all times.
It is made of 40 gr/m2 paper with a thin film that allows moisture transfer but prevents water transfer and dissolving of paints.
It does not shed fibres or hairs when working with brushes.
The paper resists friction and does not break apart when blending colors on the palette.
Cut to the right size so you can quickly exchange a new one and continue working without wasting time.
Work and enjoy hours and hours without the worry of losing colors and mixtures.
Mod Podge mat.
vernis dat kleurloos en transparant opdroogt
Lijm, vernis en sealer voor alle ondergrond in tabletop, diorama en scenery
Geschikt voor gebruik op alle materialen.
Samenstelling op waterbasis.
Inhoud per pot 473ml.
Mod Podge is een transparante decoupagelijm en lak in één. De lijm is gemakkelijk in het gebruik en geschikt voor de meest uiteenlopende materialen en ondergronden zoals papier, stof, hout enz. Daarnaast heeft Mod Podge een snelle droogtijd en is het makkelijk om meerdere lagen aan te brengen. Mod Podge is op waterbasis en dus gemakkelijk schoon te maken (wacht hier niet mee tot de lijm is opgedroogd). Daarnaast is Mod Podge ook vrij van schadelijke materialen en dus geschikt voor kinderen. Mod Podge matt geeft een mat eindresultaat. Met een glimmende verf kun je je project ook glazend afronden.
Hot Glue Sticks for glue gun are made from a thermoplastic material designed to be melted in hot glue guns. When heated, the glue stick turns into a liquid form, allowing it to be applied easily to various surfaces. As it cools, the glue solidifies, creating a strong bond between the materials being joined.
They are the perfect solution for all your crafting, DIY, and repair needs and they are designed to fit most standard hot glue guns, ensuring a smooth and reliable flow for quick and durable adhesion on various materials such as fabric, plasticard, wood, ceramics, metal, foams, cork, and more. Available in both transparent and black, they offer versatile options depending on the nature of your project.
Transparent color: they are ideal for general use, allowing for discreet bonding without leaving visible marks. Whether you're working on crafts, home decor, or repairs, the clear adhesive blends seamlessly into your materials, providing a strong hold while maintaining the appearance of your project.
Black color: they are perfect for tasks where you want the adhesive to either blend into dark materials or stand out as part of your design. They’re a popular choice for cosplay, electronics, automotive repairs, and any creative project that involves darker color schemes. They provide a clean, and polished look for professional results, making it a favorite for artists, designers, and hobbyists alike.
These glue sticks heat up quickly and bond strongly, providing a fast-setting adhesive that ensures your projects stay in place. Perfect for beginners and experts, these hot glue sticks are non-toxic and safe to use with proper handling.
Each pack contains 30x hot glue sticks 11mm in diameter and 190 mm in length offering excellent value for money. Whether you're fixing, crafting, or creating, these are the ideal tool to help bring your ideas to life!
"Arcanite is the main source for all magical power in ArcWorlde. It acts as a natural conduit, storing and unleashing it at the whim of the user, if they know how to control it. Raw Arcanite is usually a translucent crystal with a distinctive blue/green glow, which gets brighter if charged with power."In games of ArcWorlde Characters may have access to Arcanite Tokens. These can be used by players to try and swing fate their way during the game, using the magical power stored within them.Look snazzy on the battlefield with these official ArcWorlde accessories! Made from finest Arcanite, these babies are sure to grant you that little extra magical luck.This pack contains five ArcWorlde dice and 10 Arcanite Tokens for use in your games of ArcWorlde, cast in translucent resin.
Textured Rolling Pins capable of pressing a continuous repeated pattern on clay and putties. Made of clear PMMA plastic with amazing non-stick properties. Non-toxic. They come in several different textures that you can purchase based on your specific needs.
Length: 14'50 cm (5’5 inches)Diameter: 2’5cm (1 inch)
USE INSTRUCTIONS:
1st - Properly mix the putty/clay until ready according to the manufacturer's recommendations.
2nd - Extend the putty/clay on a surface to be textured. For optimal results, make sure you have got a smooth and even surface before impressing with the Rolling Pins. *** We recommend using a plain Rolling Pin for this.
3rd - Depending on the type of putty/clay, it is advisable to wet the Rolling Pin to prevent any sticking.
4th - Slowly move the Rolling Pin applying equal pressure at all points for an even texture.
5th - Trim any excess putty/clay with a sharp knife. It is recommended to do this once it has dried to avoid any deformations in the putty/clay.
MATERIALS:
There are plenty of different putties and clays on the market and all of them can be textured using the proper technique.
Usually polymer clay (Fimo or Sculpey type) are quite simple to work with these Rolling Pins as they allow for an easy correction of mistakes before they are baked. If the aim is to make textured bases, we recommend using MDF bases, because you can texture the polymer clay directly onto an MDF base, and then put it all in the oven, including the base. The cooking time of these clays are around 15 minutes at 150ºC. MDF Wood may leave a slight scent similar to that of toasted bread, but don't worry it won’t burn!
In the case of epoxy putties, there are a variety of techniques which achieve similar results. Good thing is. you do not need to bake them, so they may be applied directly onto plastic bases.
For Green Stuff putty, which is particularly sticky, it is required to slightly wet either the putty or the Rolling Pin with some water before texturing. You may also reduce the stickiness by applying talcum powder, or using (Sculptor) Vaseline.
Other epoxy putties like the Milliput putty, for example, are also suitable, but we wouldn't recommend to wet them much since it will hinder your work. Furthermore, if the mixture is too sticky, it is better to continue kneading until the stickiness is gone.
*** For this type of epoxy putties, it is very important to clean the rolling pins properly after use.
CARE INSTRUCTIONS:
After working with the Rolling Pins, use a Scratch Brush and plenty of water to clean off any residue on the Rolling Pins if required.
SAFETY:
To ensure safety, children should be closely monitored by a responsible adult.
Miniature bases with Skill Rings 40 mm
Enhance your Blood Bowl and fantasy football games with our complete pack of 10 versatile Blood Bowl Bases and 100 colored skill rings to represent all possible equipment options. They have been designed to accommodate up to 4 different skill rings per miniature. These bases feature fittings that allow for quick and easy exchange of skill rings between games or even during play.
Our innovative system includes nine different interchangeable skill rings, allowing you to add both functionality and visual flair to your game. By mixing and matching various colors, you can give your miniatures a vibrant and engaging look. Whether you're playing a casual match with friends or competing in a league, this basing system will elevate your gameplay experience.
The 32mm are perfect for standard player models, such as linemen, throwers, catchers, and blitzers. These core players fit well on the standard-sized squares of the game board. In contrast, the 40mm are designed for larger models, like Ogres, Trolls, Minotaurs, and Treemen. The larger ones provide stability for bigger figures and help distinguish them from regular players, enhancing both gameplay clarity and visual distinction.
Additionally, this product includes two pre-drilled holes to fit 5x2mm magnets, or you can glue other sizes directly onto the inner supports. These neodymium magnets offer two key benefits:
Magnetize Your Miniatures for Easy Transport: Secure your miniatures in a miniature carry case with ease.
Interchangeable skill rings: Use the same Blood Bowl bases with skill rings on different miniatures without needing to change all the bases. Simply attach a coin or piece of metal to the miniature, allowing the neodymium magnet to hold it securely on the new base, making it easily interchangeable.
Upgrade your Blood Bowl and fantasy football games with our 10-pack of versatile bases + 100 colored skill rings, designed for both functionality and aesthetic appeal.
Content:
x10 miniature bases 40mm (thickness 5mm)
x20 Black arches
x10 Red arches
x10 Blue arches
x10 Yellow arches
x10 White arches
x10 Grey arches
x10 Green arches
x10 Orange arches
x10 Purple arches
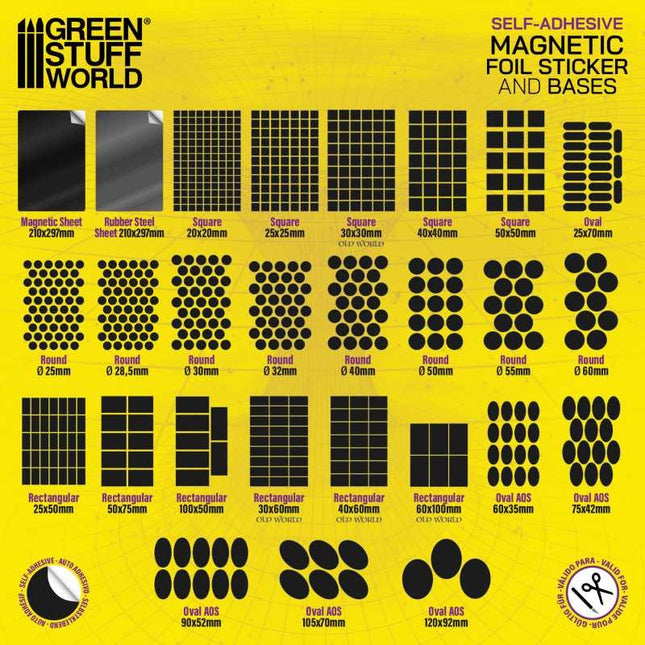
Magnetic Sheet - SELF ADHESIVE
Self-adhesive flexible magnetic sheets provide a quick and simple way of magnetizing your wargames units without the necessity of drilling bases and gluing magnets. Square, rectangular, round, and oval most common shapes are available in a variety of sizes, but also as complete sheets to be cut to convenience with a pair of scissors or a craft knife.
Use them alone, together with our rubber steel sheets, or together with our Neodymium Magnets depending on the attraction strength needed. Using magnetically-based figures allows you to field large units on the tabletop on their movement trays as one item. This removes the time spent moving figures one-by-one across the table. Even if the trays are knocked or tipped, you have a good chance of your figures staying attached and undamaged. Applying is very easy. Simply take the protective paper off the underside of the magnetic foil and stick it to the bottom of the bases.
The thickness of the stickers is 0,9mm.
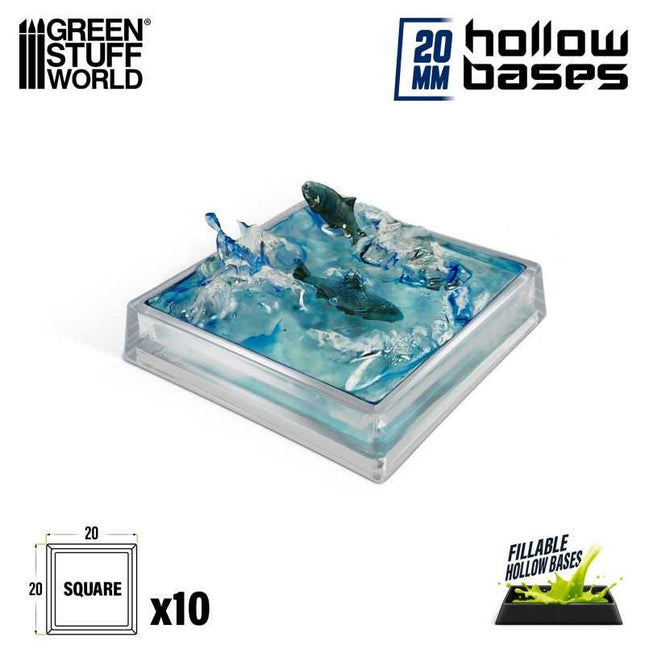
Hollow Plastic Bases -TRANSPARENT
Top-quality plastic bases for mounting wargame figures. These bases allow you to place your model in multiple directions to create infinite possibilities and movements.
Shape: Square
Thickness: 3mm
Color: Transparent
Bases: 20 per pack
Hollow Plastic Bases -TRANSPARENT
Top-quality plastic bases for mounting wargame figures. These bases allow you to place your model in multiple directions to create infinite possibilities and movements.
Shape: Square
Thickness: 3mm
Color: Transparent
Bases: 20 per pack
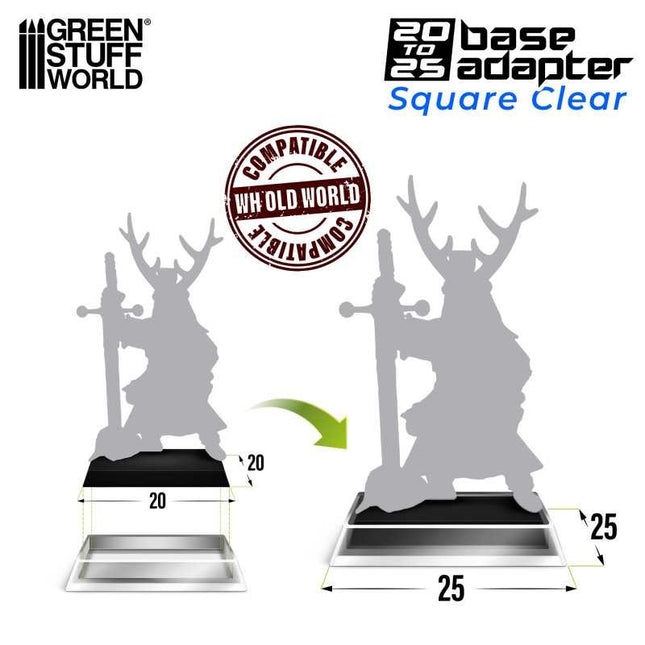
MDF Base adapter - Oval 35x60mm to Square 40x60mm
Green Stuff World's shape shifting base adapters offer a unique and creative solution for using your miniatures in multiple games without having to overrun your entire army. An example would be adapting your AOS bases with Warhammer Old World bases.
Cut in 3mm MDF wood with high precision laser with pre-cut holes to be able to magnetize with 5x2 or 5x3mm neodymium magnets. They require assembly of the top pieces for which we recommend PVA glue or cyanoacrylate glue.
They are designed to be compatible with various wargames and board games, so they are suitable for a wide range of gaming systems. Whether you play fantasy, science fiction, history or other genres, they can add a touch of realism to your miniatures.
In addition, they can serve as 50mm round to square base adapters. This feature is particularly useful as AOS adapters to Warhammer Old World bases, where the need to use old miniatures becomes a reality.
The adapters have a normal MDF coloured part and a whitish part. The off-white part is created for better adhesion when gluing.
Contains 6x adapters + 6x bases
The Era of the Beast sees armies clash across all manner of terrain, from fetid bogs and ancient ruins to wind-blasted plains and snow-capped mountains. The nigh-endless expanses of the Mortal Realms play host to constant warfare, and no two battlefields are ever alike. As surely as there are men and monsters to fight, the forces of Order, Chaos, Death, and Destruction will find new corners of the world to soak in each others' blood.Begin your adventures upon the battlefields of Ghur with these double-sided, fold-out boards, featuring murky swamps on one side and dry wastelands on the other. When placed together, these boards make a battlefield measuring 44.8" x 30", perfect for 1,000-point games of Warhammer Age of Sigmar, and they are the ideal foundation for a wide range of Citadel scenery products. Due to the easily expandable rules available in the Warhammer Age of Sigmar Core Book, two or more sets of these boards can produce battlefields suitable for games of 2,000 points or more.The boards are made of thick, durable card with reinforced folds to ensure excellent condition even after frequent use. Each board measures 22.4" x 30" and can be folded into eighths for easy storage in the included sleeve.
#age #sigmar #realmscape #ghurish #expanse
Designed to match and complement the Realm of Battle: Shattered Dominion gameboard, these awesome, highly detailed plastic bases are ideal for the foot-soldiers in your Warhammer Age of Sigmar collection. You’ll receive 40 25mm Round bases and 30 32mm Round bases, with 16 extra skulls for decoration – these moulded bases will help you achieve a stunning look for your miniatures!
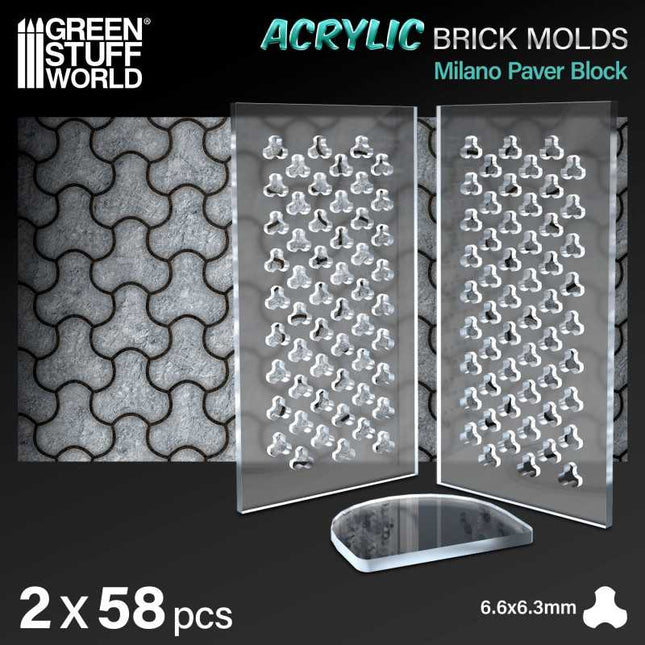
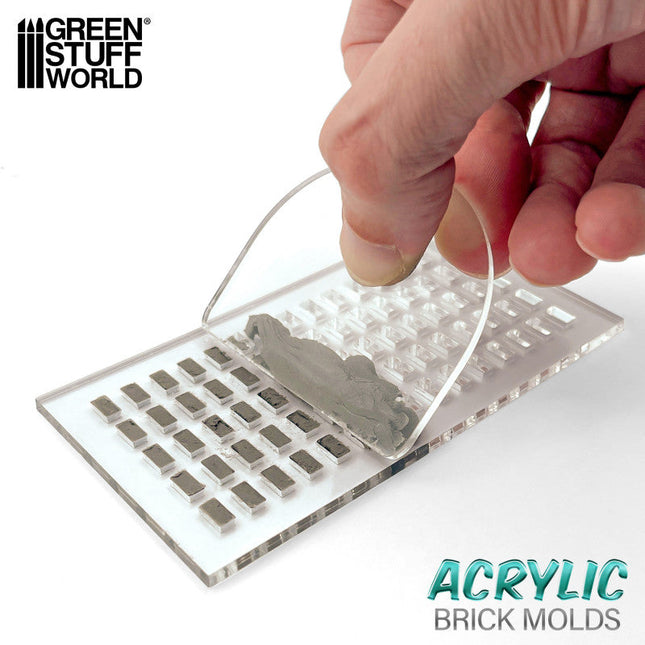
Elevate your dioramas to an unparalleled level of realism with our acrylic molds for modeling regular bricks. These accessories will allow you to create an infinite number of them with precision and consistency, adding authenticity and depth to your creations. They are specifically designed to create miniature regular bricks for use in scale modeling projects. Each model features a variety of patterns and textures that replicate real ones and that modelers will use to shape the air-drying clay.
Our acrylic modeling molds are perfectly complemented by air-drying pastes such as modeling clay, foam clay, and similar products. These options guarantee a faithful and detailed reproduction for your diorama.
Instructions for use:
Using acrylic brick molds is a straightforward process, but it requires some care to ensure you get the best results. Here's a step-by-step guide on how to use these molds:
Prepare the mold: Ensure that your acrylic brick mold is clean and dry. Make sure it's free of any debris or dust.
Cover one side of the mold to hold the pieces. You can do this process with baking paper, wet oven paper, mylar plastic, or even airbrush masking tape.
Place the mold on a flat surface: Find a flat and stable surface where you can work comfortably. Place the mold with the paper side down to prevent sticking.
Add air-drying clay: Take a ball of air-drying clay and place it on the mold. Use your fingers to gently press and work the clay into the cavities of the mold. Make sure you fill each brick cavity completely. You may need to adjust the amount of clay to achieve your desired brick size and thickness.
Level the surface: Use the included plastic spatula or the edge of another mold to drag/scrape across the surface of the mold, skimming off any excess clay. This will ensure that the surface is even and smooth.
Let it dry: Allow the clay to dry completely. The air-drying paste has a small degree of shrinkage as it dries, which will help the pieces release from the mold.
Remove the paper: Once the clay is completely dry, carefully peel off the paper tape from the back of the mold. This will help release the hobby bricks.
Remove the pieces: Use a blunt stick (like the reverse end of a brush) to gently push out the individual bricks from the mold. Be careful not to apply too much pressure, as you don't want to damage the delicate acrylic mold.
Smooth the edges: To give your bricks a more realistic look and get rid of any sharp edges, gently rub small amounts of them together between the palms of your hands. This will soften the edges and make the bricks look more like real bricks.
Use the bricks: You can now use the air-dried clay bricks for your crafting or construction project. We recommend gluing the pieces with PVA glue or an acrylic sealer such as decoupe product (like ModPodge) to secure the pieces.
Remember to handle the acrylic mold with care, as it's not as flexible as rubber or silicon molds and can break if bent.
With our methacrylate molds, your dioramas will come to life with authentic and captivating details - unleash your creativity and build sets that tell stories of their own! Take your projects to the next level of excellence with this essential accessory for lovers of high-quality dioramas.
Quantity: 2x pack
Scale: 1:35 (1:48-1:32)
The thickness of the pieces: 3 mm
Brick size: 2.85 x 5.7 mm
Mould size: 6 x 11 cm
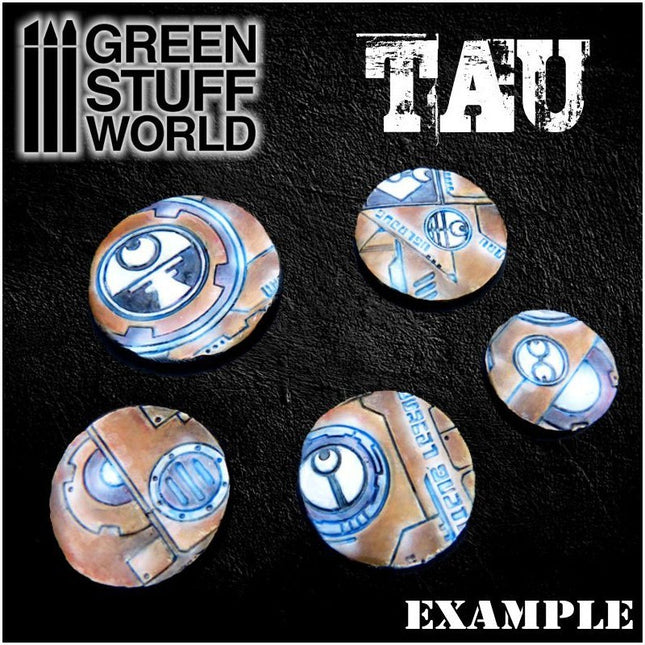
Figuur roller T'au of Tau Empire
Roller voorzien van een basisfiguur waarmee een continu herhaald patroon op klei en plamuren kan worden gedrukt. Gemaakt van helder PMMA-plastic met verbazingwekkende antikleefeigenschappen. Niet giftig. Ze zijn er in verschillende texturen die u kunt kopen op basis van uw specifieke behoeften.Lengte: 14'50 cm (5'5 inches)Diameter: 2'5cm (1 inch)GEBRUIK INSTRUCTIES:1e - Meng de epoxyhars / klei / polymer klei tot een egaal plakkaat2e - Zorg voor een optimaal resultaat voor een glad en egaal oppervlak zodat het patroon goed zal overkomen. Gebruik desnoods een deegroller, fles of ander glad rond voorwerp. 3e - Afhankelijk van het type plamuur / klei is het raadzaam om de figuurroller nat te maken om vastzitten te voorkomen.4e - Verplaats de figuurroller langzaam en oefen gelijkmatige druk uit op alle punten voor een gelijkmatige afdruk op de klei, epoxy kneedhars of ander materiaal5e - Haal overtollig klei weg met een scherp mes. Het wordt aanbevolen om dit te doen als het eenmaal is opgedroogd om vervormingen in de stopverf / klei te voorkomen.Materialen:Er zijn veel verschillende kleien of epoxyhars op de markt en ze kunnen allemaal worden voorzien van een afdruk met de roller. Gebruik verschillende druk bij de verschillende materialen.Gewoonlijk zijn polymeerklei (Fimo of Sculpey-type) vrij eenvoudig om met deze Rolling Pins te bewerken, omdat ze een gemakkelijke correctie van fouten toelaten voordat ze worden gebakken. Wil je de structuur overbrengen op een basis, gebruik dan een MDF basis. Dit omdat je de polymeerklei direct op een MDF-basis kunt zetten en alles in de oven, inclusief de basis, kunt plaatsen. De droogtijd van deze klei is ongeveer 15 minuten bij 150ºC. MDF hout laat wel een lichte geur achter zoals bij geroosterd brood, maar maak je geen zorgen dat het niet zal branden!
In het geval van epoxy basis zoals GreenStuff zijn er verschillende technieken die vergelijkbare resultaten opleveren. Het goede is: je hoeft ze niet te bakken, alleen te laten drogen en daarna kun je ze direct verwerken. Met Green Stuff, dat bijzonder kleverig is, is het het beste om de roller of de klei enigszins te bevochtigen voor je de figuur roller erover heen walst. U kunt ook de kleverigheid verminderen door talkpoeder toe te passen of door een oliebasis als Vaseline te gebruiken.Andere epoxy klei zoals de Milliput putty, bijvoorbeeld, zijn ook geschikt, maar we zouden niet aanraden om ze veel nat te maken. Als het mengsel te plakkerig is, is het beter om door te gaan met kneden totdat de plakkerigheid verdwenen is.
Voor dit soort epoxyplamuren is het erg belangrijk om de deegrollen na gebruik goed te reinigen.Schoonmaak instructies:Gebruik na het werken met de deegroller een penseel met harde haren en voldoende water om eventuele resten op de deegroller te verwijderen, indien nodig.
Om de veiligheid te garanderen, moeten kinderen nauwlettend worden gecontroleerd door een verantwoordelijke volwassene.
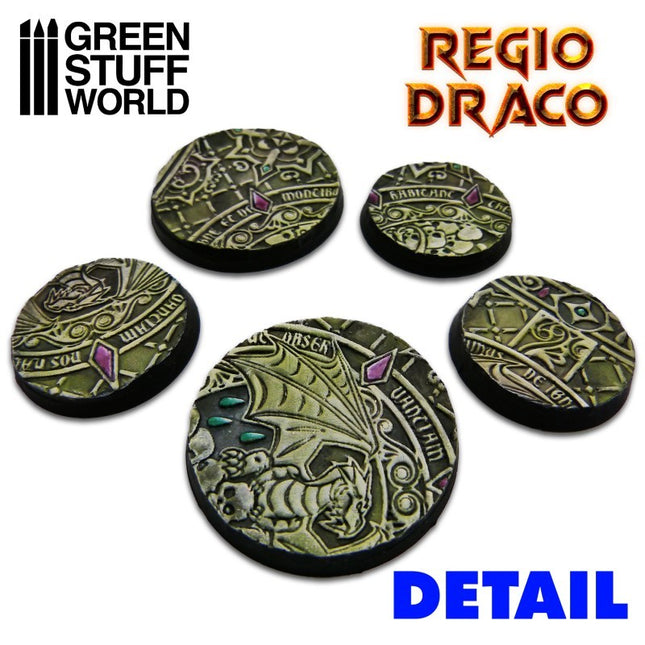
Rolling pin Regio Draco - Figuur roller Draken
Roller voorzien van een basisfiguur waarmee een continu herhaald patroon op klei en plamuren kan worden gedrukt. Gemaakt van helder PMMA-plastic met verbazingwekkende antikleefeigenschappen. Niet giftig. Ze zijn er in verschillende texturen die u kunt kopen op basis van uw specifieke behoeften.Lengte: 14'50 cm (5'5 inches)Diameter: 2'5cm (1 inch)Aanbevolen schaal: 1/35-1/43-1/48-1/76 of Warhammer scale
GEBRUIK INSTRUCTIES1e - Meng de epoxyhars / klei / polymer klei tot een egaal plakkaat2e - Zorg voor een optimaal resultaat voor een glad en egaal oppervlak zodat het patroon goed zal overkomen. Gebruik desnoods een deegroller, fles of ander glad rond voorwerp. 3e - Afhankelijk van het type plamuur / klei is het raadzaam om de figuurroller nat te maken om vastzitten te voorkomen.4e - Verplaats de figuurroller langzaam en oefen gelijkmatige druk uit op alle punten voor een gelijkmatige afdruk op de klei, epoxy kneedhars of ander materiaal5e - Haal overtollig klei weg met een scherp mes. Het wordt aanbevolen om dit te doen als het eenmaal is opgedroogd om vervormingen in de stopverf / klei te voorkomen.Materialen:Er zijn veel verschillende kleien of epoxyhars op de markt en ze kunnen allemaal worden voorzien van een afdruk met de roller. Gebruik verschillende druk bij de verschillende materialen.Gewoonlijk zijn polymeerklei (Fimo of Sculpey-type) vrij eenvoudig om met deze Rolling Pins te bewerken, omdat ze een gemakkelijke correctie van fouten toelaten voordat ze worden gebakken. Wil je de structuur overbrengen op een basis, gebruik dan een MDF basis. Dit omdat je de polymeerklei direct op een MDF-basis kunt zetten en alles in de oven, inclusief de basis, kunt plaatsen. De droogtijd van deze klei is ongeveer 15 minuten bij 150ºC. MDF hout laat wel een lichte geur achter zoals bij geroosterd brood, maar maak je geen zorgen dat het zal branden!
Wil je alleen een prachtig pad, veranda, straat of iets anders maken dan kun je dit natuurlijk op een platte plaat drogen in de oven.In het geval van epoxy basis zoals GreenStuff zijn er verschillende technieken die vergelijkbare resultaten opleveren. Het goede is: je hoeft ze niet te bakken, alleen te laten drogen en daarna kun je ze direct verwerken. Met Green Stuff, dat bijzonder kleverig is, is het het beste om de roller of de klei enigszins te bevochtigen voor je de figuur roller erover heen walst. U kunt ook de kleverigheid verminderen door talkpoeder toe te passen of door een oliebasis als Vaseline te gebruiken.Andere epoxy klei zoals de Milliput putty, bijvoorbeeld, zijn ook geschikt, maar we zouden niet aanraden om ze veel nat te maken. Als het mengsel te plakkerig is, is het beter om door te gaan met kneden totdat de plakkerigheid verdwenen is.
Voor dit soort epoxyplamuren is het erg belangrijk om de rollen na gebruik goed te reinigen.Schoonmaak instructies:Gebruik na het werken met de roller een penseel met harde haren en voldoende water om eventuele resten op de roller te verwijderen, indien nodig.
Om de veiligheid te garanderen, moeten kinderen nauwlettend worden gecontroleerd door een verantwoordelijke volwassene.
#regio #draco #draken #dragon #idoneth #deepkin #greenstuffworld #rollingpin
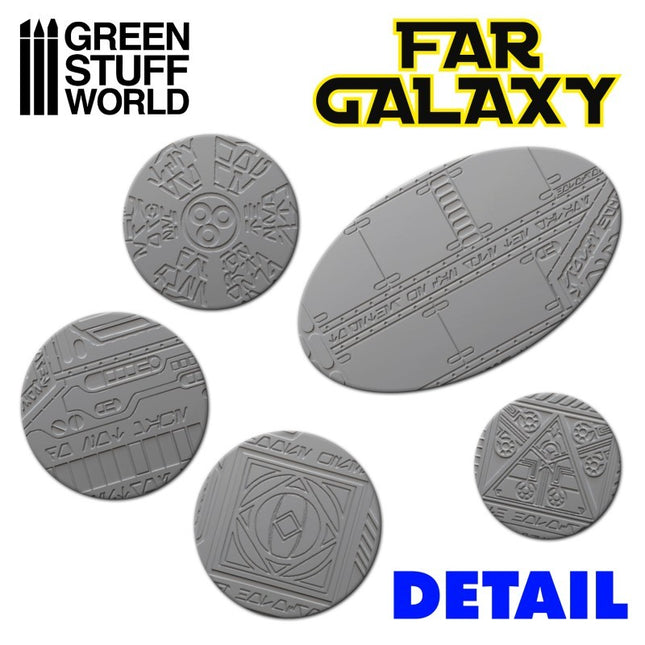
Figuur roller Far GalaxyRoller voorzien van een basisfiguur waarmee een continu herhaald patroon op klei en plamuren kan worden gedrukt. Gemaakt van helder PMMA-plastic met verbazingwekkende antikleefeigenschappen. Niet giftig. Ze zijn er in verschillende texturen die u kunt kopen op basis van uw specifieke behoeften.Lengte: 14,50 cm (5'5 inches)Diameter: 2,5cm (1 inch)
Patroon varieert met verschillende steensoorten, motieven (fleur de lis) en een filigree / rasters
GEBRUIK INSTRUCTIES:1e - Meng de epoxyhars / klei / polymer klei tot een egaal plakkaat2e - Zorg voor een optimaal resultaat voor een glad en egaal oppervlak zodat het patroon goed zal overkomen. Gebruik desnoods een deegroller, fles of ander glad rond voorwerp. 3e - Afhankelijk van het type plamuur / klei is het raadzaam om de figuurroller nat te maken om vastzitten te voorkomen.4e - Verplaats de figuurroller langzaam en oefen gelijkmatige druk uit op alle punten voor een gelijkmatige afdruk op de klei, epoxy kneedhars of ander materiaal5e - Haal overtollig klei weg met een scherp mes. Het wordt aanbevolen om dit te doen als het eenmaal is opgedroogd om vervormingen in de stopverf / klei te voorkomen.Materialen:Er zijn veel verschillende kleien of epoxyhars op de markt en ze kunnen allemaal worden voorzien van een afdruk met de roller. Gebruik verschillende druk bij de verschillende materialen.Gewoonlijk zijn polymeerklei (Fimo of Sculpey-type) vrij eenvoudig om met deze Rolling Pins te bewerken, omdat ze een gemakkelijke correctie van fouten toelaten voordat ze worden gebakken. Wil je de structuur overbrengen op een basis, gebruik dan een MDF basis. Dit omdat je de polymeerklei direct op een MDF-basis kunt zetten en alles in de oven, inclusief de basis, kunt plaatsen. De droogtijd van deze klei is ongeveer 15 minuten bij 150ºC. MDF hout laat wel een lichte geur achter zoals bij geroosterd brood, maar maak je geen zorgen dat het zal branden!
In het geval van epoxy basis zoals GreenStuff zijn er verschillende technieken die vergelijkbare resultaten opleveren. Het goede is: je hoeft ze niet te bakken, alleen te laten drogen en daarna kun je ze direct verwerken. Met Green Stuff, dat bijzonder kleverig is, is het het beste om de roller of de klei enigszins te bevochtigen voor je de figuur roller erover heen walst. U kunt ook de kleverigheid verminderen door talkpoeder toe te passen of door een oliebasis als Vaseline te gebruiken.Andere epoxy klei zoals de Milliput putty, bijvoorbeeld, zijn ook geschikt, maar we zouden niet aanraden om ze veel nat te maken. Als het mengsel te plakkerig is, is het beter om door te gaan met kneden totdat de plakkerigheid verdwenen is.
Voor dit soort epoxyplamuren is het erg belangrijk om de deegrollen na gebruik goed te reinigen.Schoonmaak instructies:Gebruik na het werken met de roller een penseel met harde haren (of een scratch brush) en voldoende water om eventuele resten op de roller te verwijderen, indien nodig.
Om de veiligheid te garanderen, moeten kinderen nauwlettend worden gecontroleerd door een verantwoordelijke volwassene.
#greenstuffworld #rolling #pin #far #galaxy