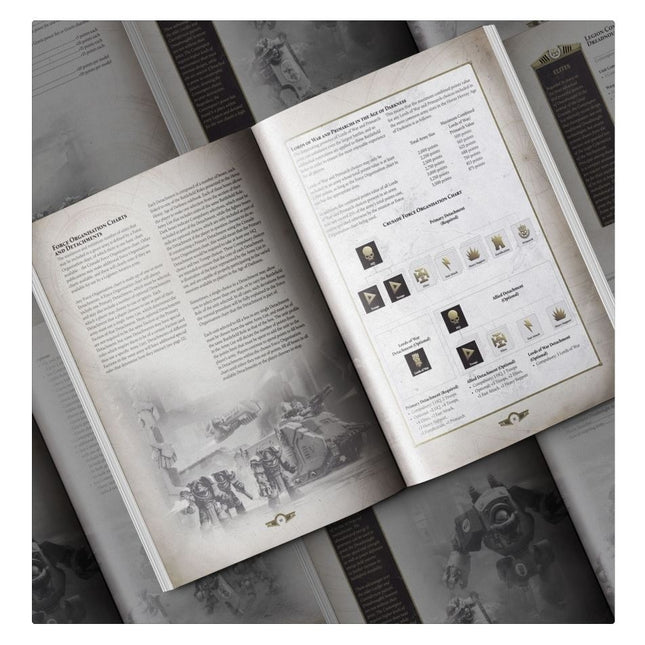
The Space Marine Legions of the 31st Millenium field a diverse and formidable range of genetically-enhanced warriors and advanced war machines, superior to any other military force in the galaxy. As an Age of Darkness falls across the stars and the fires of rebellion rage out of control, the armies that were used to forge the Imperium turn upon each other in an apocalyptic civil war – the Horus Heresy. Of the eighteen Space Marine Legions, only half remain loyal to their oaths. Heroes without equal, these Space Marines rally to defend the Emperor and all he has strived to build. In the turmoil of the Horus Heresy, the Loyalist armies stand firm against a tide of corruption and betrayal, waging bitter war against their former brothers – those that have forsworn their oaths and turned upon the Imperium. By the courage and might of these steadfast warriors will the fate of the Imperium, and that of humanity itself, be decided. This book is an essential guide for anyone who wants to command a Loyalist Legiones Astartes force in Warhammer: The Horus Heresy. It contains all of the rules you need to field every unit and formation available to Loyalist forces, from core units and weapons shared by every Space Marine Legion to specialist rules for each of the Loyalist Legions – including Rites of War, unique wargear, signature units, and their legendary Primarchs. Inside this 344-page hardback book, you'll find: – Rules and unit profiles covering every unit, weapon, and piece of wargear available to the Loyalist Legiones Astartes in Warhammer: The Horus Heresy – Legion-specific special rules, Warlord Traits, Reactions, Rites of War, wargear, unit profiles, and unique characters for each of the Loyalist Legions: the Dark Angels, White Scars, Space Wolves, Imperial Fists, Blood Angels, Iron Hands, Ultramarines, Salamanders, and Raven Guard – Profiles for each of the Loyalist Primarchs: Lion El’Johnson, Jaghatai Khan, Leman Russ, Rogal Dorn, Sanguinius, Ferrus Manus, Roboute Guilliman, Vulkan, and Corvus Corax – A visual showcase for each Loyalist Legion, containing heraldry markings, colour schemes for infantry and vehicles, and a small gallery of stunning miniatures photography In order to use the contents of this book, you will require a copy of the Warhammer: The Horus Heresy – Age of Darkness Rulebook.
#loyalist #legiones #astartes #age #darkness #horus #heresy #warhammer #games #workshop
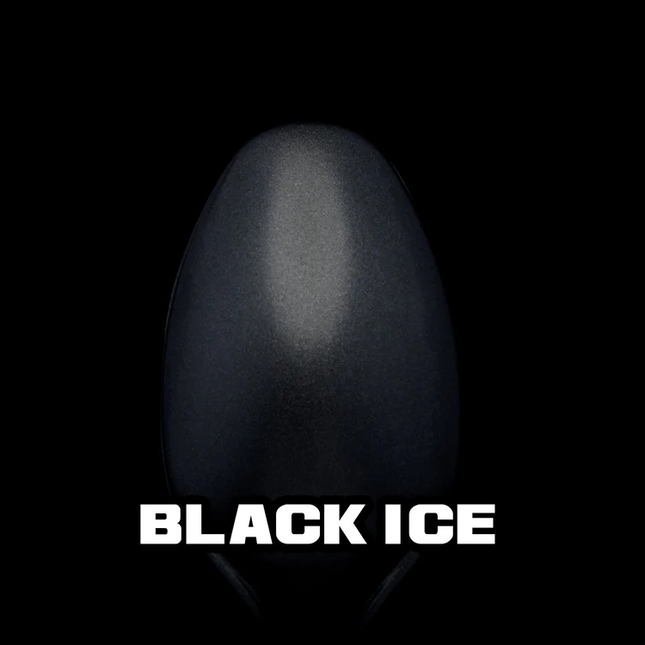
Black ICE can be deadly to an intruder net running in cyberspace. So be careful as you may not see it coming.
This is an all black metallic paint with just a hint of silver. Perfect for hiding out in dark corners.
Note: Black Ice needs to be used over a very dark undercoat, preferably black, in order to be at its best.
PAINT TYPE: METALLIC
TONE: SHADOW
RECOMMENDED BASECOAT: BLACK
SIZE: 20 ML BOTTLE
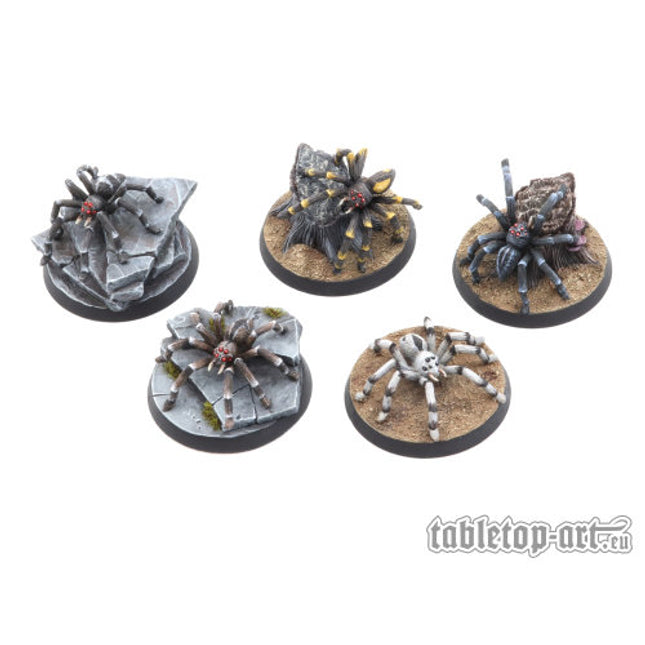
The set contains 5x giant spiders made of white metal. The spiders are made from one piece and does not need to be assembled. The legs can be bent carefully, which allows you to create many different poses. The spiders fits perfectly on 40mm round bases. No Bases included. Scale: 28-30mm
"Sometimes I doubt your commitment to Sparkle Motion."
Made with actual silver, Sparkle Motion will blind you with its brilliance. Give it your full commitment.
Paint Type: Metallic
Tone: midrange
Recommended Primer: black
Size: 20 ml bottle
#turbo #dork #metallic #20ml #sparkle #motion
I'm on a diet.
When seafoam goes metallic. Perfect for down where it's wetter.
Paint Type: Metallic
Tone: midrange
Recommended Primer: black
Size: 20 ml bottle
#turbo #dork #metallic #20ml #sea #food
Will he ever know if there is life on Mars?
This paint is a rusty, red-orange color, perfect for all of your Martians.
Paint Type: Metallic
Tone: midrange
Recommended Primer: black
Size: 20 ml bottle
#turbo #dork #metallic #20ml #life #on #mars
"All day and all night and everything he sees is just blue."
Da Ba Dee is blue. Like, REALLY blue. Like, can it be more Blue? I don't think so.
Paint Type: Metallic
Tone: midrange
Recommended Primer: black
Size: 20 ml bottle
#turbo #dork #metallic #20ml #dabadee
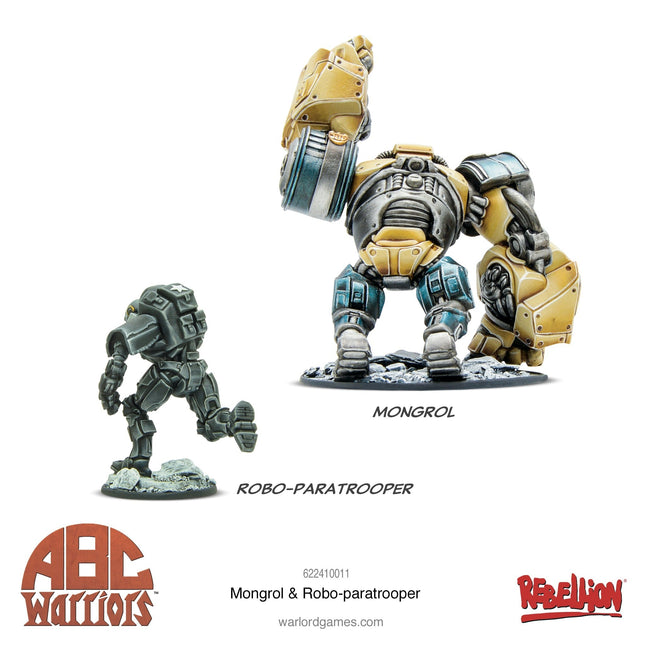
An ABC robo paratrooper leader, Mongrol was the lone survivor of a botched drop over Vilnius in Volga. After the battle, his head was salvaged by Lara, the daughter of rebel robotsmiths, and he was rebuilt using a mishmash of robot parts. However, Lara was killed by the Volgans before she could fully activate him. During torture by Volkhan, Mongrol was inadvertently reactivated, but reduced to an almost bestial state. His infamous battle cry “Mongrol Smush!” is a prelude to a devastating assault with his massive power paws.
Contains two Warlord Resin ABC Warriors miniatures: Mongrol and a Robo-paratrooper, plastic bases, character card and auxiliary card.
#abcwarriors #mongrol #robo #paratrooper
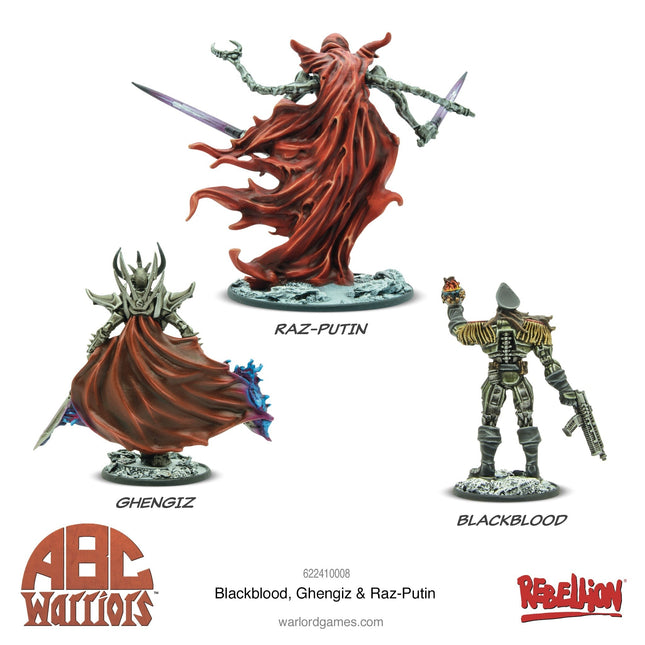
The Volgan war criminal General Blackblood is a sadistic killer with a penchant for drinking the oil of fallen ABC Warriors. Reprogrammed and recruited into the ABC Warriors, Blackblood's inherent treachery would not be suppressed for long and he escaped to join Volkhan at the first chance.
A Volgan experiment to rival Deadlock’s Knight Martial, Raz-Putin is reputed to be even more advanced in the mystic arts than his ABC Warrior counterpart.
A product of the same assembly line as the first Volgan war droid ‘Old Horny’, Ghengiz wields two energised blades capable of projecting energy bolts.
Contains three Warlord Resin Volgan miniatures: General Blackblood, Ghengiz & Raz-Putin, characters cards and plastic bases.
#abcwarriors #blackblood #ghengiz #raz-putin
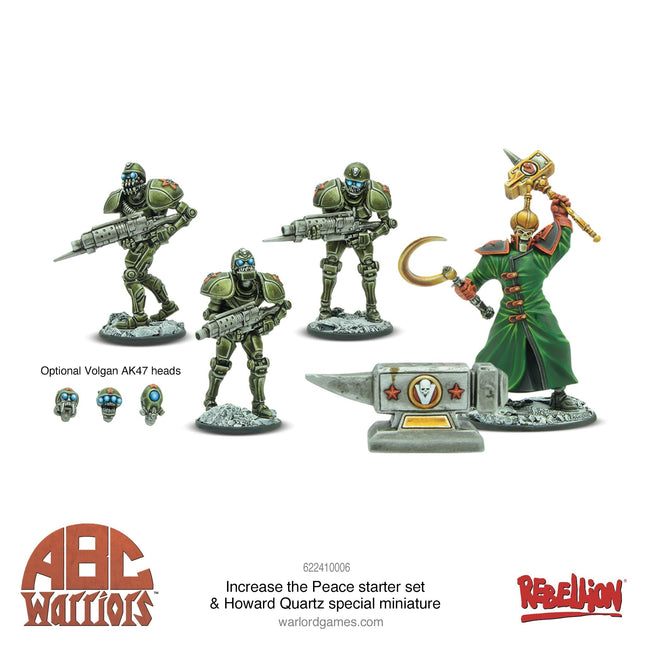
ABC Warriors: Increase the Peace is a skirmish tabletop miniatures game for two or more players based on the legendary 2000 AD comic series ABC Warriors: The Volgan War written by Pat Mills and lavishly illustrated by Clint Langley. Supreme military robots, created for a conflict that ended centuries ago, the ABC Warriors are built to endure warfare in all its deadly forms – atomic, bacterial and chemical.
This starter set contains scenery, tokens, Tarot cards, character & auxiliary cards and all the rules you need to play, including rules for combat missions, an immersive campaign system and profile lists to create your forces as you take control of the ABC Warriors or their Volgan counterparts. Will Volkhan, Ikon of Ikons obliterate all in his path or will the ABC Warriors, led by Hammerstein, succeed in standing firm during the chaos of the Volgan War?
ABC Warriors: Increase the Peace starter set contains:
124-page softback rulebook
Quickstart scenario booklet
36-card Tarot deck
4x Character & Auxiliary cards
Warlord Resin miniatures:
Sergeant Hammerstein
3x Hammerstein Mk Is
Volkhan
3x Volgan AK47s
Plastic bases
Volkhan's altar MDF scenery
Graffiti decal sheet
Plastic activation chips
Tokens & objective markers
2000 AD dice and six-sided spot dice
Increase the Peace also includes an exclusive Warlord Resin miniature of 'Mr Ten Per Cent’ himself, Howard Quartz! At one time human, Quartz was the CEO of Quartz Industries and drove forward the production of the first war droids despite them struggling to tell friend from foe. A terrorist incident involving a rogue Hammerstein resulted in the destruction of 90% of Quartz’s body, and he had himself reconstructed as a robot-cyborg in order to continue his rapacious business practices for centuries to come.
#ABCwarriors #starter #set #increase #peace
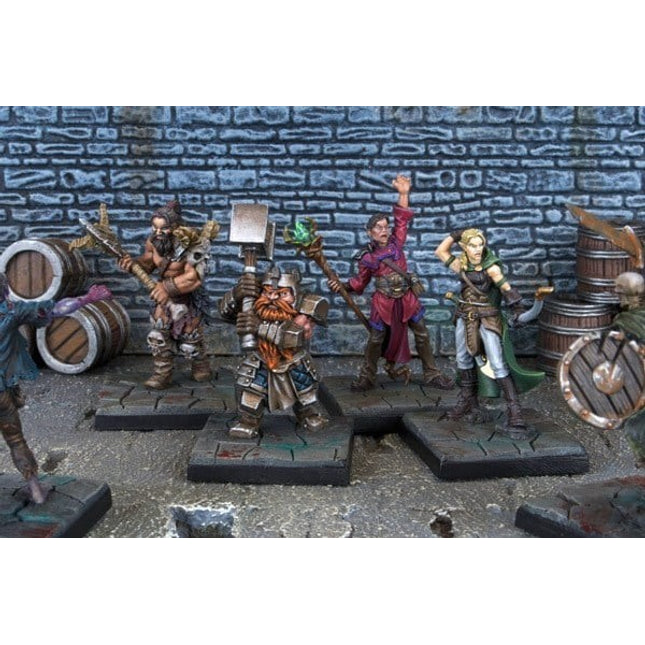
Dungeon Saga: The Dwarf King’s Quest is the Classic Dungeon Crawler of Swords and Sorcery. Embark on a fantasy adventure for up to 5 players in the Dungeon Saga board game! With highly detailed game-pieces and learn-as-you-play rules, this set contains everything you need to transform your table-top into a magical world of heroes and monsters.
The story begins...
Deep beneath the ruins of the dwarfen city of Dolgarth, the evil necromancer Mortibris has uncovered an ancient magical book: the Tome of Valandor. With this powerful artefact, Mortibris has the ability to bring the land to its knees. Are you brave enough to try and stop Mortibris and his army of the undead?
Heroes unite...
Take your pick from one of four courageous adventurers. Will you choose from the powerful Barbarian, the stalwart Dwarf, deadly Elf Archer or apprentice wizard? Each has their own strengths and abilities, but you’ll have to work together to overcome Mortibris.
An ancient evil...
The ruins of Dolgarth are full of terrible monsters, from shambling zombies to terrifying Banshees. One player takes on the role of the Overlord, who must do whatever it takes to stop the heroes from achieving their goal. Using the special Overlord Cards, the evil player can summon minions, trigger special events and generally vex the efforts of the adventurers.
Legends will be born...
Play through a campaign of 10 inter-linked scenarios, with plenty of twists and turns along the way. Each hero has the opportunity to level up and become even more powerful – and they’ll need all the help they can get, as they face Mortibris’ most horrifying creations.
And it will go on...
If you survive the Halls of Dolgarth, Dungeon Saga has a number of expansions featuring new missions, new heroes and, of course, new monsters!
The Dwarf King?s Quest Core Game is packaged in a box designed to look like an ancient magical artefact. It includes:
All of the rules to play Dungeon Saga:
8-Page Step-by-step Quick Start guide
24-Page Dungeon Saga Rulebook 32-Page Dungeon Saga Quest Book
26 Battle-ready Coloured Plastic Miniatures (no assembly required) Orlaf the Barbarian Rordin the Dwarf Fighter Madriga the Elven Ranger Danor the Human Wizard Mortibris the Necromancer Elshara the Elven Banshee Grund the Undead Dwarf King Hoggar the Undead Zombie Troll Shaman 4 Skeleton Warriors in two different poses 4 Zombies in two different poses 2 Skeleton Archers 2 Basilean Armoured Zombies 2 Ghosts 2 Dwarf Revenants 2 Zombie Trolls
A Fully Interactive 3D Dungeon:
33 double-sided Dungeon Room and Corridor Tiles made of thick card.
50 clear plastic clips to hold your dungeon together
10 plastic Dungeon Doors: 6 Small Doors 2 Small Portcullises 2 Double Doors
22 pieces of plastic Dungeon furniture, including: 4 Treasure Chests with Lids 4 Barrels 2 Tables 1 Bookcase 1 Sorcerer's Cabinet 1 Well 1 Lectern with Book 1 Throne 1 Tomb 1 Weapon Rack
Everything you need to play:
8 double-sided Character Cards for your heroes and villains
1 Overlord Panel for the Necromancer player
6 Bone-coloured Overlord dice
6 Blue-coloured Hero Dice
22 Overlord Command Cards
9 Minor Spell Cards
12 Major Spell Cards
27 Magic Item Cards
8 Ability Cards
1 Long Range Ruler
1 Short Range Ruler
24 Wound Counters
4 Hero Counters
24 Piles of Bones
6 Weak Point Counters
1 Cave In Counters
3 Petty Magic Spell Effect Counters
1 Geomancy Spell Effect Counter
1 Sorcery Spell Effect Counter
4 Necromancy Spell Effect Counters
1 You are in my Power Counter
16 Experience Counters
1 Banshee Heart in 4 Pieces
15 Door Counters
#dungeon #saga #dwarf #king #quest #king's #crawler #dungeon #saga
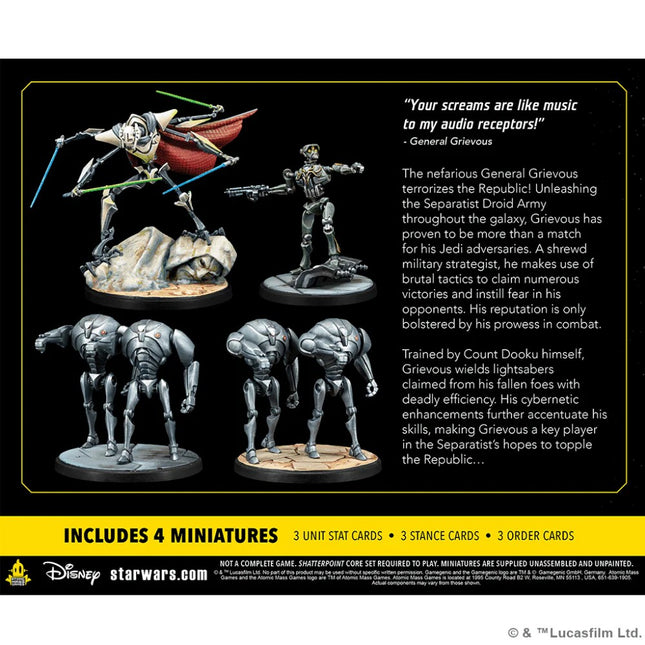
The nefarious General Grievous terrorizes the Republic! Unleashing the Separatist Droid Army throughout the galaxy, Grievous has proven to be more than a match for his Jedi adversaries. A shrewd military strategist, he makes use of brutal tactics to claim numerous victories and instill fear in his opponents. This pack adds a new squad of General Grievous, Kraken, and two B2 Battle Droids to Star Wars: Shatterpoint that players can play right away or use alongside other characters to create their own custom squad. In addition to the beautifully sculpted miniatures of all four characters, players will also find all the stat, order, and stance cards they need to bring these characters to life on the tabletop.
Contents:
4 miniatures
character cards
Ages: 14+
Comes unassembled and unpainted!
#shatterpoint #star #wars #appetite #destruction #general #grievous #squad
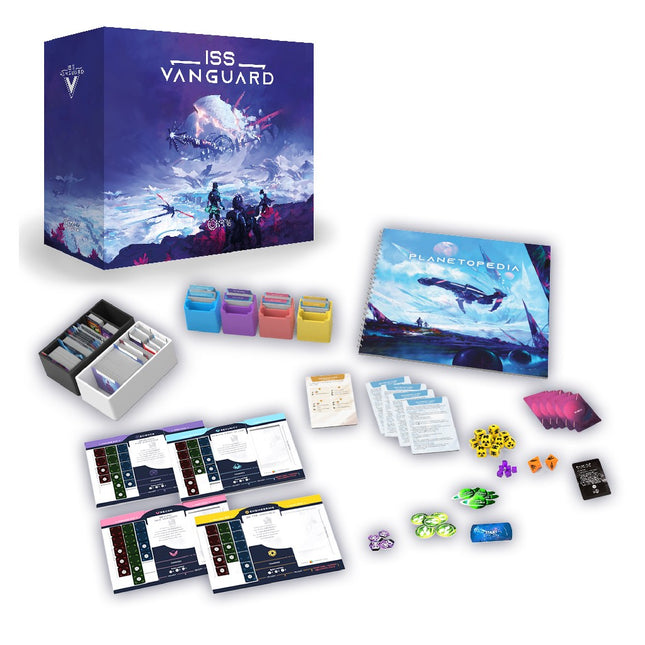
ISS Vanguard is a 1 to 4 player co-operative Board Game that can be played as a long campaign or in one-off missions. It brings players into an epic Sci-Fi adventure as they helm the first ship able to traverse deep space. Controlling four sections of the ISS Vanguard: security, recon, science, and engineering, player will develop new technologies, recruit crew members, and launch landing parties on multiple unique planets. As they do, their adventure will change to reflect their choices and they unravel the mystery at the center of their explorations. ISS Vanguard’s campaign features a unique story written by Krzysztof Piskorski (Tainted Grail) and is full of hard choices, twists, and branching storylines.
EPIC SCI-FI ADVENTURE GAME: ISS Vanguard is a cooperative board game that offers countless adventures on vivid alien worlds and distant star systems. Immerse yourself in an amazing adventure among the stars as you lead the first human galactic exploration effort.
STRATEGY BOARD GAME: Players control four Sections (Security, Recon, Science and Engineering) onboard the ship. Gameplay is divided into two main parts - planetary exploration, where players land on colorful boards that represent alien worlds, and ship management, where players use the Ship Book to upgrade ISS Vanguard, recruit new Crewmembers, conduct research, produce new equipment or landers, and more.
COOPERATIVE GAME FOR GAME NIGHT: The game comes with over 100 different Crew members, each with unique characteristics. What will you do for the sake of your mission's success? What role will your ship play in the galaxy? Can you solve the mystery of the eons-old starmap embeeded in human DNA? The bridge is yours - take command!
HIGHLY VARIABLE SPACE EXPLORATION GAME: You can experience this game either as a replayable, long, cooperative campaign with epic stories, dynamic gameplay, and difficult choices - or as a single Operations - standalone missions that take a single game session.
NUMBER OF PLAYERS AND RECOMMENDED PLAYER AGE: This thrilling sci-fi exploration game is made for 1 to 4 players and is suitable for ages 14 and older. Average playtime is between 90 to 120 minutes.
Publisher
Awaken Realms
Product Type
Thematic Games
Minimum Recommended Age
13
Average Play Time
2 Hours
Players (Minimum)
1
Players (Maximum)
4
Genres
Science Fiction | Space Exploration | Adventure | Cooperative Game
#ISS #vanguard #awaken #realms #co-op #space #science #fiction
The continent of Trudvang is one of diverse landscapes and a myriad of races inhabiting it. From island archipelagos filled with elves to vast icy plains that only the hardiest ice giants call home to deep forests infested with dangerous trolls, there’s adventure aplenty to be had.
In Trudvang Legends, players take on the role of heroes looking to make their mark in the world. As they adventure through different quests, they will leave an everlasting mark on the world. Helping one race might grant boons from them later on, but it could leave another vulnerable to attack. Player’s decisions matter and they will have to juggle responsibility as they move through their heroic career. In the end, the world will be forever changed, but will it be for the better?
Game Specifications
Playing time: 60-75min (eerste keer spelen is 120min)
Min-max players: 1-4 players
Suggested age: 14+
Steeped in epic Nordic and Celtic myths and sagas, Trudvang Legends places players in the roles of legendary heroes who make their mark on a dynamic, everchanging fantasy world.The game — based on the Swedish RPG, Trudvang Chronicles — thrusts players into a cycle of epic sagas in which their achievements change not only the world itself, but the very rules by which gods, peoples and nature interact. They will quest through an interwoven series of adventure books, and the results of their choices will echo through history: changing the relationships between sovereign nations, usurping kings, creating new waygates, or even locking and unlocking parts of the map.Change in Trudvang Legends manifests physically as parts of the board actually change, making the actions of previous hero generations affect future sagas. However, the changes are only as permanent as long as history remembers them, which makes the game endlessly replayable, and even playing the same adventure book repeatedly will have a completely different feeling because the world itself has changed. Heroes, following a path of destiny, will even become historical fixtures as they become kings, guildmasters, or even gods!Contents: 35 Plastic Figures, 4 Colored Counter Bases, 4 Hero Dashboards, 4 Rune Bags, 1 Map Board, 1 Adventure Board, 1 Points of Interest Board, 10 Double-Sided Adventure Sheets, 378 Cards, 267 Tokens, 1 Rulebook,and 1 Book of Sagas.
#trudvang #legends #cmon #cooperative #coop
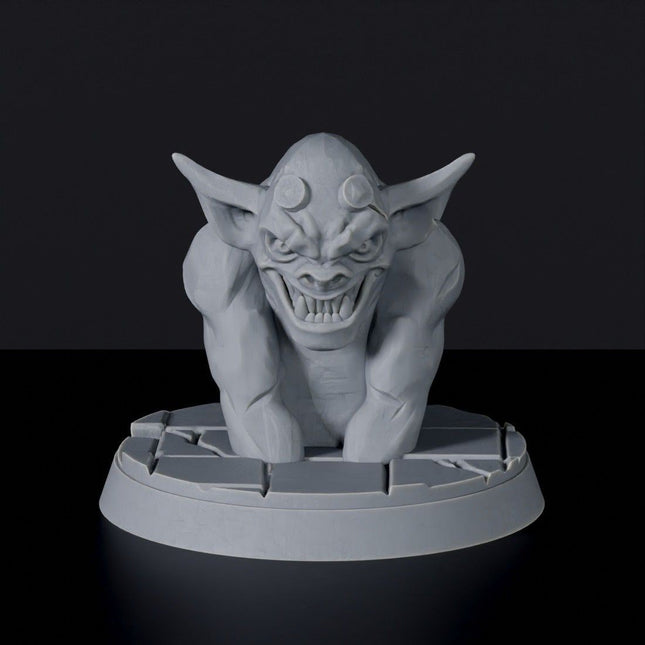
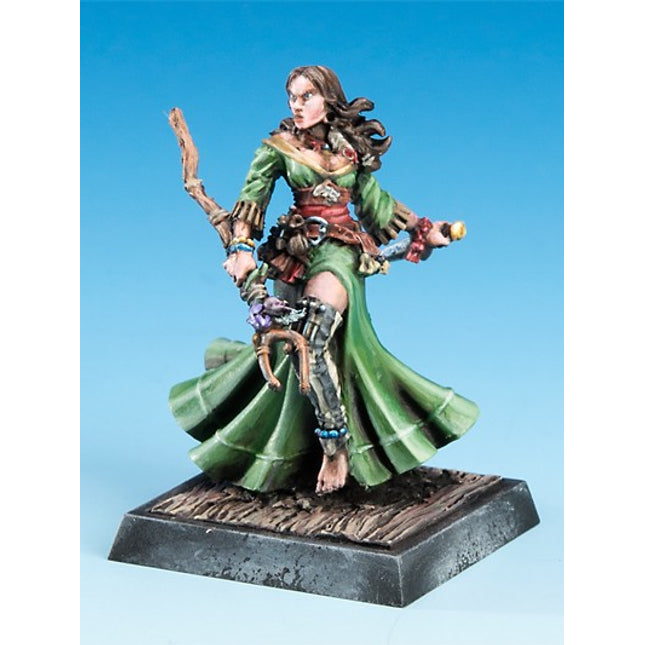
This set is dedicated for Bloodfields tabletop wargame.
32 mm Models:
Stone Gargoyles x4
Mystic Base x4
Build your army and battle with friends.Check out the free rules on www.bloodfields.net
All our miniatures are supplied unpainted and some require assembly.The painted examples are for inspiration only.
WARNING: This is not a toy! Recommended for ages 14 and over. May be harmful if chewed or swallowed.
#stone #gargoyles #vampire #hunters #bloodfields #titan #forge #steamforge #city
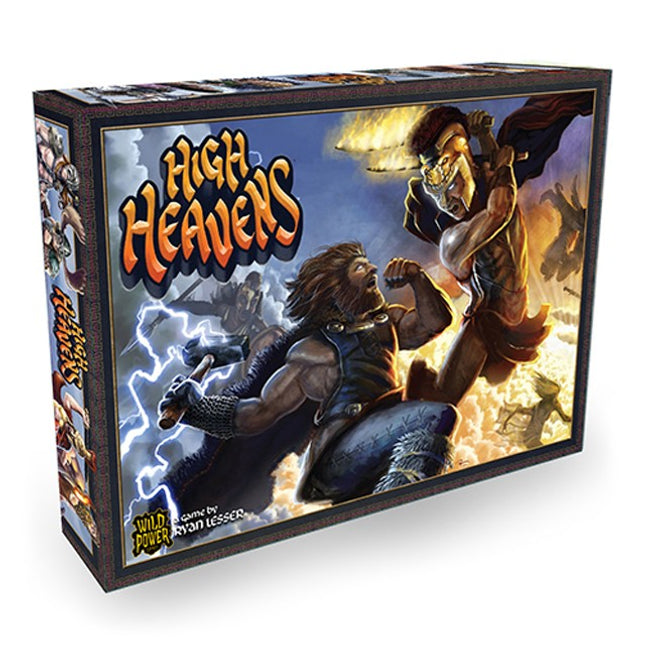
Players claim victory by vanquishing the enemy pantheon or destroying the opponent’s home base!Innovative RingChip System allows players to see. at a glance, how healthy and powered-up their gods are, without having to keep track with paper, pencil, dice or tokens. No two games are alike thanks to card draw, miniature placement, emergent combos and shifting strategies.
Fast, Aggressive style
High Heavens is meant to be played aggressively. The god cards bring unique characters and abilities to the board while Divine Power cards can be rewarding or devastating, and have immediate effects. Players must come to the table ready to rumble!
Innovative RingChip system
At the core of High Heavens is the RingChip system. Taking a cue from his years developing video games, Ryan seeks to bring easy-to-use interfaces from digital games to the table, and RingChips do just that.
At a glance, players can tell how healthy, powerful or buffed the gods are without having to keep track with paper, pencil, dice or tokens.
What is in the box?
Each copy of High Heavens includes:
12 Norse god miniatures
12 Greek god miniatures
100 stacking, color RingChips
1 seamless, soft, neoprene "board"
24 Pantheon cards
24 Divine Power cards
2 Homebase chits
3 Action Tokens
Rules
(Miniature figures come unpainted in the box)
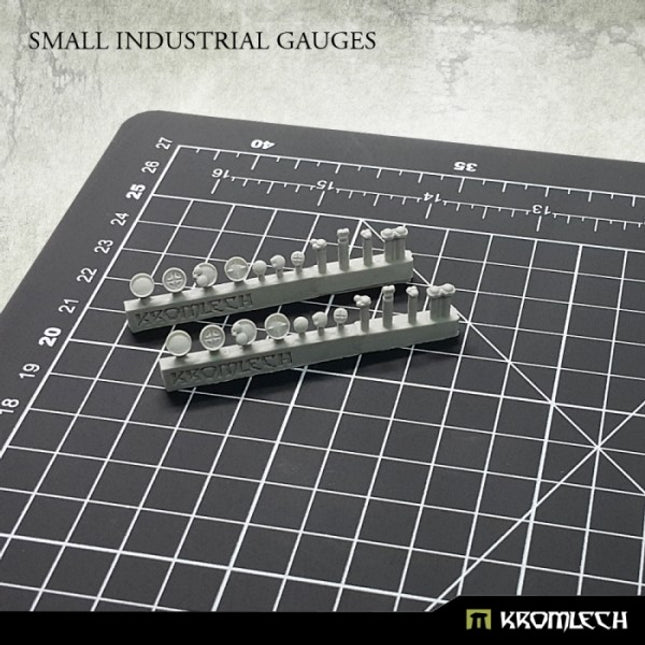
This set contains 22 high quality resin Small Industrial Gauges that can be used to decorate miniatures, bases or scenery. Designed to fit 28mm heroic scale.
Our products are intended for experienced modellers and may require trimming, bending and fitting.
All parts are cast from highest quality resin. Supplied unpainted. May require assembly. We recommend washing all parts before assembly (tap water with mild detergent) and using superglue or other cyanoacrylate adhesive. An accelerator may also be useful in some cases.
#small #gauges #meters #industrial #kromlech
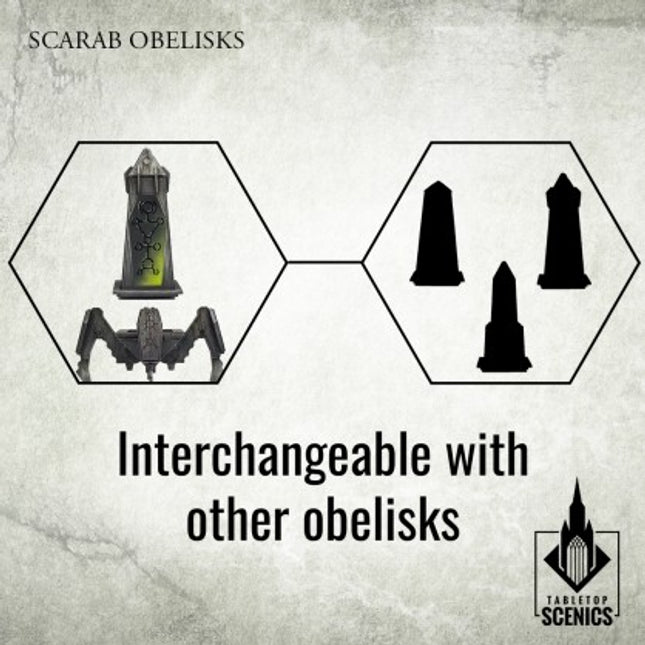
Nekropolis: Immortal City release This set contains parts to assemble two Royal Obelisks, symbols of Immortal Legions eternal rule. Each set of Obelisks (Royal, Energy and Scarab) is interchangeable - you can mix the top and bottom parts to suit your aesthetic! Dimensions: Height: 7.5" / 19cm Width: 5.5" / 14 cm Length: 5.5" / 14 cm Please note, some orders containing HDF structures may be split into a number of parcels. This product is made of high-density fibreboard (HDF). Includes full-color assembly instructions. Supplied unassembled and unpainted. Please note that orc model seen in picture is not part of this set.
Set sails and ready for boarding!
Content Tin-Miniatures:
Rubio, Leader
Lieutnant Krud, Specialist
Pirate and Cuchillo, Deckhands
Hire Fee: 270 Doubloons
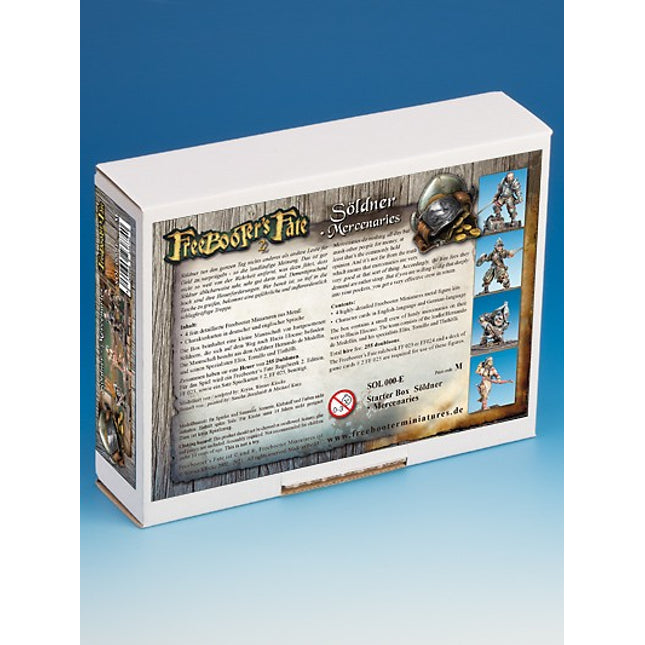
The miniatures comes with character cards for Freebooter’s Fate in English and German language.
They are supplied as unpainted kits and require assembly.
#free #booters #fate #2 #Pirates #starter #box
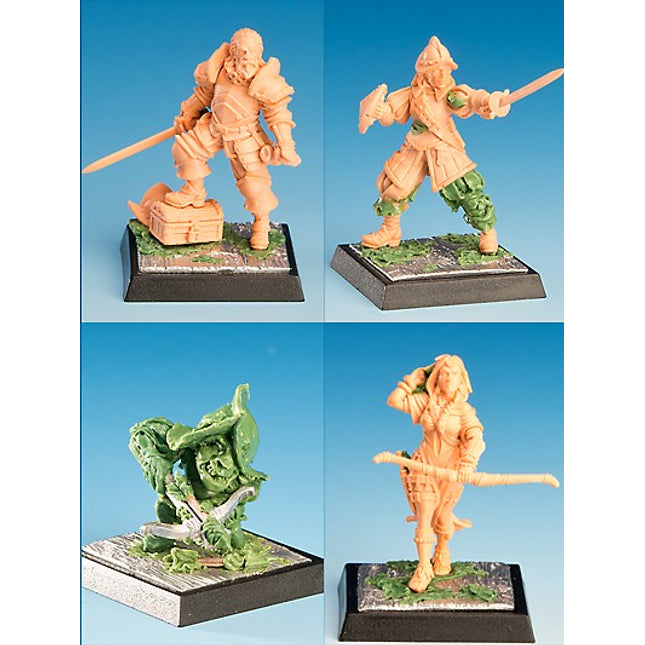
The new mercenaries are a tough troop of Conqustadors on their way to the New World, to Hacia Elocaso. They are distinguished by the diversity of their skills and the flexibility that comes with it. The characters from this box can be used as a mercenary crew or as mercenaries in other crews.
Content:
SOL 033 Hernando, Leader (75 Doubloons)
SOL 034 Elita, Specialist (65 Doubloons)
SOL 035 Tornillo, Specialist (50 Doubloons)
SOL 036, Tlahtolli Specialistin (65 Doubloons)
Total hiring fee: 255 Doubloons as a Mercenary crew
Quickstart rules in German and English language included.
The miniatures come with the character cards with all the game values required for Freebooter’s Fate.
It is supplied as an unpainted kit and requires assembly.
This Starter Box will save you more than 20% compared to the individual prices.
The characters can be hired by the following crews:
Hernando: Brotherhood, Debonn, Imperial Armada
Elita: Amazons, Brotherhood, Goblins, Debonn, Pirates
Tornillo: Goblins, Imerial Armada, Cult
Tlahtolli: Amazons, Cult, Pirates
#free #booters #fate #2 #Mercenary #starter #box
Sophia and Héler, together with a Maudit and Asqueroso’s Fugoso, want to make the Cult in Longfall strong again against the shadows. Sophia is a special leader, because she can’t invoce loas. Héler takes over this part very skillfully instead. New Deckhands complements the two – a Maudit with cursed throwing axes prepares the opponents for the invocation by Héler and as soon as the hot-blooded Fugoso gets involved, at the latest then every opponent takes tear!
Content:
MYS 030 Sophia, Leader (80 Doubloons)
MYS 031 Héler le Lutte, Specialist (65 Doubloons)
MYS 032-A Maudit, Deckhand (40 Doubloons)
MYS 032-B Asquerosos Fugoso, Deckhand (50 Doubloons)
Total hiring fee: 235 Doubloons
Quickstart rules in German and English language included.
The miniatures come with the character cards with all the game values required for Freebooter’s Fate.
It is supplied as an unpainted kit and requires assembly.
This Starter Box will save you more than 20% compared to the individual prices.
#free #booters #fate #2 #cult #starter #box
Nobody knows who leads the Brotherhood and how they organize themselves. They live in a world of darkness and reach out for the light.
Content:
ASS 005 Master Assassin, Leader
ASS 003 Bonaccia, Specialist
ASS 007 Coscritti and Harlequin, Deckhands
Hire Fee: 285 Doubloons
This box contains starter rules in English and German.
The miniatures come with character cards for Freebooter’s Fate.
They are supplied as unpainted kits and require assembly.
This Starter Box will save you more than 20% compared to the individual prices.
#free #booters #fate #2 #brotherhood #starter #box
Dry brush paint
Dry brushing is a popular technique used in the scale modeling and wargaming community for creating a variety of effects. This technique involves using brushes with a small amount of paint to selectively highlight raised areas of a model, terrain piece, or miniature figure.
Dry brush paints are specifically designed and are thicker than traditional ones and have a higher pigment concentration, allowing the user to layer gradually to build up the desired effect and therefore making them ideal for creating a more subtle effect. They have a unique texture and consistency, which can help to create specific effects such as rust, weathering, or stone texture.
It is important to use a good quality, flat or round brush with flexible bristles. This will help to create the desired effect and ensure that the paint is applied evenly and without damaging their bristles. The brush should be loaded with a small amount of paint, and the excess should be removed before applying it to the model or terrain piece. This will help to prevent clumping and ensure that the paint is applied smoothly.
These paints are a great option for those who are new to the dry brushing technique, which can be used in a variety of applications, from highlighting the details of miniature figures to creating a weathered appearance on vehicles and terrain pieces. It is a versatile technique that can be used on a range of surfaces.
Common uses in modeling for Dry Brush Paints
These paints, in particular, are often used in this Dry Brushing technique. Here are some common uses in modeling:
Highlighting details: They are often used to highlight the details on miniature figures, such as wrinkles in clothing, facial features, and weapons.
Creating weathering effects: They are ideal for creating weathering effects on models, such as rust, dirt, and grime. By lightly dragging a dry paintbrush loaded with paint over the surface of the model, it creates a worn, weathered appearance.
Adding texture: They can be used to add texture to a model's surface. For example, a dry brush with silver can be used to create the appearance of scratches on metal surfaces.
Enhancing contrast: They can also be used to enhance contrast on a model's surface, creating a more visually appealing appearance. This is particularly useful when painting terrain pieces or large models.
Painting scenery: They can be used to paint scenery, such as rocks, trees, and buildings. By using a dry brushing technique, it creates a more realistic appearance with subtle shades and highlights.
Content: 30ml
#dry #brush #paint #greenstuffworld #modeling #courage #mauve
Dry brush paint
Dry brushing is a popular technique used in the scale modeling and wargaming community for creating a variety of effects. This technique involves using brushes with a small amount of paint to selectively highlight raised areas of a model, terrain piece, or miniature figure.
Dry brush paints are specifically designed and are thicker than traditional ones and have a higher pigment concentration, allowing the user to layer gradually to build up the desired effect and therefore making them ideal for creating a more subtle effect. They have a unique texture and consistency, which can help to create specific effects such as rust, weathering, or stone texture.
It is important to use a good quality, flat or round brush with flexible bristles. This will help to create the desired effect and ensure that the paint is applied evenly and without damaging their bristles. The brush should be loaded with a small amount of paint, and the excess should be removed before applying it to the model or terrain piece. This will help to prevent clumping and ensure that the paint is applied smoothly.
These paints are a great option for those who are new to the dry brushing technique, which can be used in a variety of applications, from highlighting the details of miniature figures to creating a weathered appearance on vehicles and terrain pieces. It is a versatile technique that can be used on a range of surfaces.
Common uses in modeling for Dry Brush Paints
These paints, in particular, are often used in this Dry Brushing technique. Here are some common uses in modeling:
Highlighting details: They are often used to highlight the details on miniature figures, such as wrinkles in clothing, facial features, and weapons.
Creating weathering effects: They are ideal for creating weathering effects on models, such as rust, dirt, and grime. By lightly dragging a dry paintbrush loaded with paint over the surface of the model, it creates a worn, weathered appearance.
Adding texture: They can be used to add texture to a model's surface. For example, a dry brush with silver can be used to create the appearance of scratches on metal surfaces.
Enhancing contrast: They can also be used to enhance contrast on a model's surface, creating a more visually appealing appearance. This is particularly useful when painting terrain pieces or large models.
Painting scenery: They can be used to paint scenery, such as rocks, trees, and buildings. By using a dry brushing technique, it creates a more realistic appearance with subtle shades and highlights.
Content: 30ml
#dry #brush #paint #greenstuffworld #modeling #ultramarine #touch
Dry brush paint
Dry brushing is a popular technique used in the scale modeling and wargaming community for creating a variety of effects. This technique involves using brushes with a small amount of paint to selectively highlight raised areas of a model, terrain piece, or miniature figure.
Dry brush paints are specifically designed and are thicker than traditional ones and have a higher pigment concentration, allowing the user to layer gradually to build up the desired effect and therefore making them ideal for creating a more subtle effect. They have a unique texture and consistency, which can help to create specific effects such as rust, weathering, or stone texture.
It is important to use a good quality, flat or round brush with flexible bristles. This will help to create the desired effect and ensure that the paint is applied evenly and without damaging their bristles. The brush should be loaded with a small amount of paint, and the excess should be removed before applying it to the model or terrain piece. This will help to prevent clumping and ensure that the paint is applied smoothly.
These paints are a great option for those who are new to the dry brushing technique, which can be used in a variety of applications, from highlighting the details of miniature figures to creating a weathered appearance on vehicles and terrain pieces. It is a versatile technique that can be used on a range of surfaces.
Common uses in modeling for Dry Brush Paints
These paints, in particular, are often used in this Dry Brushing technique. Here are some common uses in modeling:
Highlighting details: They are often used to highlight the details on miniature figures, such as wrinkles in clothing, facial features, and weapons.
Creating weathering effects: They are ideal for creating weathering effects on models, such as rust, dirt, and grime. By lightly dragging a dry paintbrush loaded with paint over the surface of the model, it creates a worn, weathered appearance.
Adding texture: They can be used to add texture to a model's surface. For example, a dry brush with silver can be used to create the appearance of scratches on metal surfaces.
Enhancing contrast: They can also be used to enhance contrast on a model's surface, creating a more visually appealing appearance. This is particularly useful when painting terrain pieces or large models.
Painting scenery: They can be used to paint scenery, such as rocks, trees, and buildings. By using a dry brushing technique, it creates a more realistic appearance with subtle shades and highlights.
Content: 30ml
#dry #brush #paint #greenstuffworld #modeling #red #bark
Dry brush paint
Dry brushing is a popular technique used in the scale modeling and wargaming community for creating a variety of effects. This technique involves using brushes with a small amount of paint to selectively highlight raised areas of a model, terrain piece, or miniature figure.
Dry brush paints are specifically designed and are thicker than traditional ones and have a higher pigment concentration, allowing the user to layer gradually to build up the desired effect and therefore making them ideal for creating a more subtle effect. They have a unique texture and consistency, which can help to create specific effects such as rust, weathering, or stone texture.
It is important to use a good quality, flat or round brush with flexible bristles. This will help to create the desired effect and ensure that the paint is applied evenly and without damaging their bristles. The brush should be loaded with a small amount of paint, and the excess should be removed before applying it to the model or terrain piece. This will help to prevent clumping and ensure that the paint is applied smoothly.
These paints are a great option for those who are new to the dry brushing technique, which can be used in a variety of applications, from highlighting the details of miniature figures to creating a weathered appearance on vehicles and terrain pieces. It is a versatile technique that can be used on a range of surfaces.
Common uses in modeling for Dry Brush Paints
These paints, in particular, are often used in this Dry Brushing technique. Here are some common uses in modeling:
Highlighting details: They are often used to highlight the details on miniature figures, such as wrinkles in clothing, facial features, and weapons.
Creating weathering effects: They are ideal for creating weathering effects on models, such as rust, dirt, and grime. By lightly dragging a dry paintbrush loaded with paint over the surface of the model, it creates a worn, weathered appearance.
Adding texture: They can be used to add texture to a model's surface. For example, a dry brush with silver can be used to create the appearance of scratches on metal surfaces.
Enhancing contrast: They can also be used to enhance contrast on a model's surface, creating a more visually appealing appearance. This is particularly useful when painting terrain pieces or large models.
Painting scenery: They can be used to paint scenery, such as rocks, trees, and buildings. By using a dry brushing technique, it creates a more realistic appearance with subtle shades and highlights.
Content: 30ml
#dry #brush #paint #greenstuffworld #modeling #dry #violet
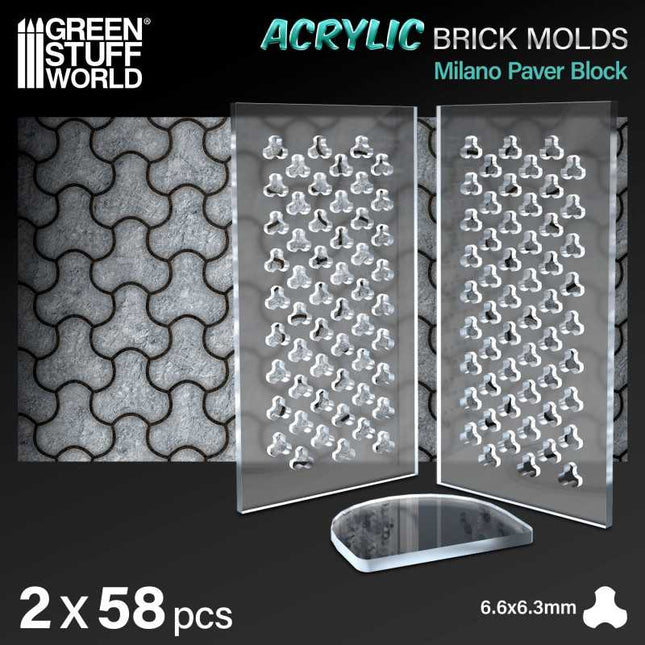
Elevate your dioramas to an unparalleled level of realism with our acrylic molds for modeling regular bricks. These accessories will allow you to create an infinite number of them with precision and consistency, adding authenticity and depth to your creations. They are specifically designed to create miniature regular bricks for use in scale modeling projects. Each model features a variety of patterns and textures that replicate real ones and that modelers will use to shape the air-drying clay.
Our acrylic modeling molds are perfectly complemented by air-drying pastes such as modeling clay, foam clay, and similar products. These options guarantee a faithful and detailed reproduction for your diorama.
Instructions for use:
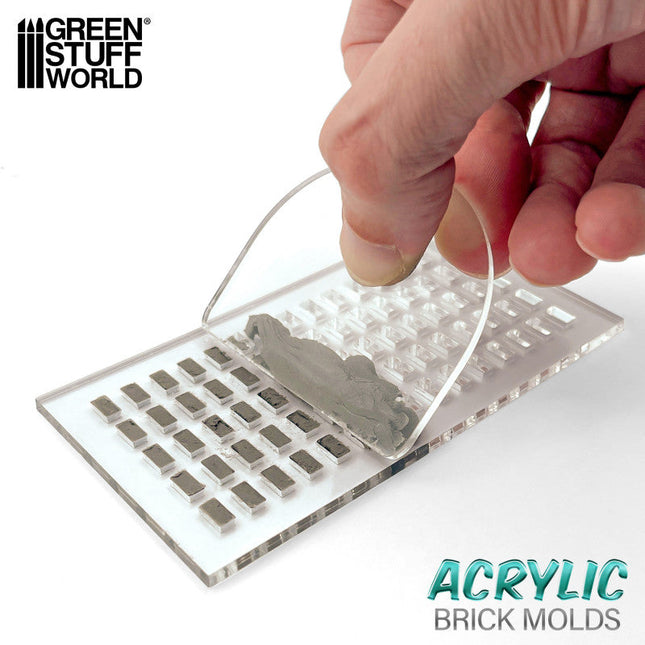
Using acrylic brick molds is a straightforward process, but it requires some care to ensure you get the best results. Here's a step-by-step guide on how to use these molds:
Prepare the mold: Ensure that your acrylic brick mold is clean and dry. Make sure it's free of any debris or dust.
Cover one side of the mold to hold the pieces. You can do this process with baking paper, wet oven paper, mylar plastic, or even airbrush masking tape.
Place the mold on a flat surface: Find a flat and stable surface where you can work comfortably. Place the mold with the paper side down to prevent sticking.
Add air-drying clay: Take a ball of air-drying clay and place it on the mold. Use your fingers to gently press and work the clay into the cavities of the mold. Make sure you fill each brick cavity completely. You may need to adjust the amount of clay to achieve your desired brick size and thickness.
Level the surface: Use the included plastic spatula or the edge of another mold to drag/scrape across the surface of the mold, skimming off any excess clay. This will ensure that the surface is even and smooth.
Let it dry: Allow the clay to dry completely. The air-drying paste has a small degree of shrinkage as it dries, which will help the pieces release from the mold.
Remove the paper: Once the clay is completely dry, carefully peel off the paper tape from the back of the mold. This will help release the hobby bricks.
Remove the pieces: Use a blunt stick (like the reverse end of a brush) to gently push out the individual bricks from the mold. Be careful not to apply too much pressure, as you don't want to damage the delicate acrylic mold.
Smooth the edges: To give your bricks a more realistic look and get rid of any sharp edges, gently rub small amounts of them together between the palms of your hands. This will soften the edges and make the bricks look more like real bricks.
Use the bricks: You can now use the air-dried clay bricks for your crafting or construction project. We recommend gluing the pieces with PVA glue or an acrylic sealer such as decoupe product (like ModPodge) to secure the pieces.
Remember to handle the acrylic mold with care, as it's not as flexible as rubber or silicon molds and can break if bent.
With our methacrylate molds, your dioramas will come to life with authentic and captivating details - unleash your creativity and build sets that tell stories of their own! Take your projects to the next level of excellence with this essential accessory for lovers of high-quality dioramas.
Quantity: 2x pack
Scale: 1:35 (1:48-1:32)
The thickness of the pieces: 3 mm
Brick size: 2.85 x 5.7 mm
Mould size: 6 x 11 cm
Elevate your dioramas to an unparalleled level of realism with our acrylic molds for modeling regular bricks. These accessories will allow you to create an infinite number of them with precision and consistency, adding authenticity and depth to your creations. They are specifically designed to create miniature regular bricks for use in scale modeling projects. Each model features a variety of patterns and textures that replicate real ones and that modelers will use to shape the air-drying clay.
Our acrylic modeling molds are perfectly complemented by air-drying pastes such as modeling clay, foam clay, and similar products. These options guarantee a faithful and detailed reproduction for your diorama.
Instructions for use:
Using acrylic brick molds is a straightforward process, but it requires some care to ensure you get the best results. Here's a step-by-step guide on how to use these molds:
Prepare the mold: Ensure that your acrylic brick mold is clean and dry. Make sure it's free of any debris or dust.
Cover one side of the mold to hold the pieces. You can do this process with baking paper, wet oven paper, mylar plastic, or even airbrush masking tape.
Place the mold on a flat surface: Find a flat and stable surface where you can work comfortably. Place the mold with the paper side down to prevent sticking.
Add air-drying clay: Take a ball of air-drying clay and place it on the mold. Use your fingers to gently press and work the clay into the cavities of the mold. Make sure you fill each brick cavity completely. You may need to adjust the amount of clay to achieve your desired brick size and thickness.
Level the surface: Use the included plastic spatula or the edge of another mold to drag/scrape across the surface of the mold, skimming off any excess clay. This will ensure that the surface is even and smooth.
Let it dry: Allow the clay to dry completely. The air-drying paste has a small degree of shrinkage as it dries, which will help the pieces release from the mold.
Remove the paper: Once the clay is completely dry, carefully peel off the paper tape from the back of the mold. This will help release the hobby bricks.
Remove the pieces: Use a blunt stick (like the reverse end of a brush) to gently push out the individual bricks from the mold. Be careful not to apply too much pressure, as you don't want to damage the delicate acrylic mold.
Smooth the edges: To give your bricks a more realistic look and get rid of any sharp edges, gently rub small amounts of them together between the palms of your hands. This will soften the edges and make the bricks look more like real bricks.
Use the bricks: You can now use the air-dried clay bricks for your crafting or construction project. We recommend gluing the pieces with PVA glue or an acrylic sealer such as decoupe product (like ModPodge) to secure the pieces.
Remember to handle the acrylic mold with care, as it's not as flexible as rubber or silicon molds and can break if bent.
With our methacrylate molds, your dioramas will come to life with authentic and captivating details - unleash your creativity and build sets that tell stories of their own! Take your projects to the next level of excellence with this essential accessory for lovers of high-quality dioramas.
Quantity: 2x pack
Scale: 1:35 (1:48-1:32)
The thickness of the pieces: 3 mm
Brick size: 2.85 x 5.7 mm
Mould size: 6 x 11 cm
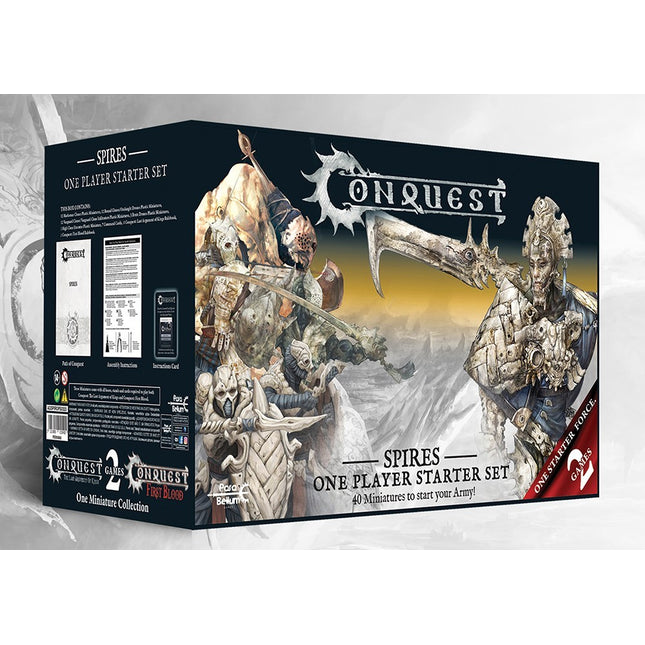
This Spires set is loaded with a complete stand of 12 Bound Clones, Marksman Clones and Vanguard Clones, a set of 3 Brute Drone Brutes, and the High Clone Executor character. Each starter set will a very thorough First Blood army as well as a great beginning set to play a game of Last Argument of Kings. Included in this set are BOTH rulebooks for First Blood II and TLAOK II, along with all assembly instructions, a great path of Conquest guide, and all bases and stands. A great value for players, a substantial discount over the prices if purchased separately. How do the Spires play? Spires are able to field a variety of options, from hordes of drones, to ranks of combat ready clones, and even elite armies composed entirely of war beasts and Avatara suits. Speed is the favored weapon of the Spires, making them faster than their enemies and capable of further leveraging this advantage via Biomancies and Pheromancies which allow them to push their soldiers past their limits, making them stronger, faster, and deadlier, at the cost of their own lives. However, Spire would not waste lives so inefficiently, so they have incredibly powerful healing abilities to ensure that your creations die when you say it is time for them to die. Their battleplans revolve around up trading their units with the opponents by using their Biomancies.Read more about the Spires here - https://www.para-bellum.com/the-spires/
Box Contents
3 Brute Drones
12 Bound Clones / Onslaught Drones
12 Vanguard Clones / Vanguard Infiltrators
12 Marksmen Clones
1 High Clone Executor
37 Infantry Bases and Stands
3 Cavalry Bases and Stands
7 Command Cards
Conquest: The Last Argument of Kings Paperback Rulebook
Conquest: First Blood Paperback Rulebook
Path of Conquest Guide
Assembly Instructions
Product Information
Assembly: Required
Box size: 30.5x17x19.5 cm; 1800gr
Material: Plastic regiments. Plastic Character
Scale: 38mm
#conquest #starterset #spires #one #player #starter #2023