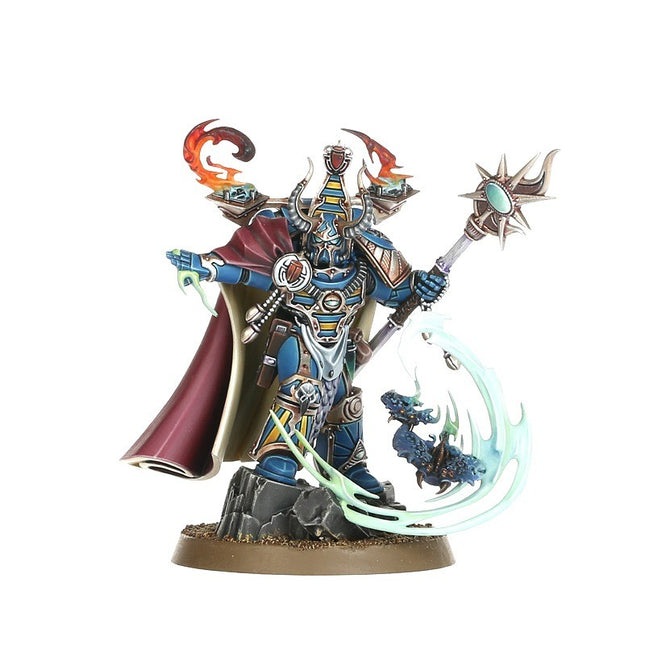
The Thousand Sons advance into battle amidst gouts of kaleidoscopic warpflame and bolts of raw sorcery. The heart of these arcane armies is comprised of Rubricae – implacable warriors who level salvo after salvo against the foe, marching at the command of the mighty Sorcerers and diabolic Infernal Masters who rule their fractured Legion. Around them come shrieking herds of Tzaangor, mutant shock troops armed with cursed blades and dark sorcery. Expand the dominion of Magnus the Red with Combat Patrol: Thousand Sons! This boxed set provides you with all the units you need to get started or build on an existing force. The contents of this set have been specifically chosen to provide you with an ideal Thousand Sons force for Combat Patrol-sized games – approximately 25 Power Level's worth of models – and will also save you money compared to buying the contents individually. This set includes the following multipart plastic models: – 1x Infernal Master – 5x Scarab Occult Terminators – 20x Tzaangors It also includes 4x Tzaangor Upgrade Frames and 1 x Chaos Space Marine Transfer Sheet. All models are supplied with their appropriate bases. These miniatures are supplied unpainted and require assembly – we recommend using Citadel Plastic Glue and Citadel paints.
#combat #patrol #thousand #sons #40K
Scarab Occult Terminators were once the finest psykers in the Thousand Sons Legion, bodyguards to Magnus the Red himself. Reduced to dust along with their brethren, they now possess only an echo of their previous intellect. They stride into battle at the behest of their sorcerous masters, advancing with an eerie, stoic calm; clad in ornate armour, they bear down on the foe in near-silence until their weaponry is unleashed. Then, the sickening sound of khopesh blades and Inferno combi-bolters tearing into flesh rings out, delivering death to those who insult the warriors of Prospero with their resistance.This multi-part plastic kit contains the components necessary to assemble 5 Scarab Occult Terminators, armed with Inferno combi-bolters and khopesh blades. One model can be assembled with an included heavy warpflamer, soulreaper cannon or hellfyre missile rack. One model can be assembled as a Scarab Occult Sorcerer, who can exchange his combi-bolter for an included power sword. Supplied with 5 Citadel 40mm Round bases.
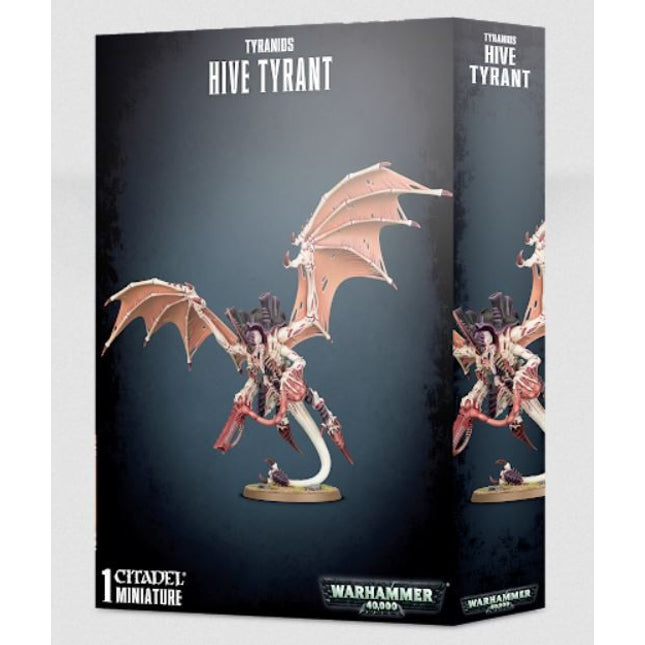
Commanders of the Tyranid swarm, Hive Tyrants are the enactors of the Hive Mind's will. Massively powerful creatures, every part of their body is perfectly created to maim and kill. The Hive Tyrant is an incredibly dynamic model, posed with monstrous, fibrous and ragged wings extended out wide and with only its serpent-like tail touching the ground, as if launching off into flight (or to pounce on its prey). Like other Tyranids, it has a distinctive chitinous shell with chimneys on its back, and a hideous skeletal underbody. The Hive Tyrant – or the Swarmlord, which the kit can alternatively be used to assemble – makes a striking addition to any Tyranid collection. The kit features a massive variety of weapons options, including scything talons, rending claws, boneswords and a lash whip. There are also parts to customise your Hive Tyrant and represent various biomorphs. This multipart plastic boxed set contains 59 components and one Citadel 60mm Round Base, with which to build one Tyranid Hive Tyrant or one Swarmlord.
Primarch of the Ultramarines
A stunning model, and the perfect centrepiece for an Imperial army
Dominates the battlefield with impressive close combat and shooting
This multi-part plastic kit contains the components necessary to assemble Roboute Guilliman, Primarch of the Ultramarines. An impressively-sized model, standing head and shoulders above the Primaris Space Marines, he is a riot of detail – the Armour of Fate that encases his body is covered in beautiful, ornate filigree patterns on every part of the armour, with sculpted aquilæ, purity seals, skulls and Ultramarine Chapter icons on every surface. His winged backpack features an Adeptus Mechanicus maker’s plate and glorious iron halo, with many cables and hoses attaching it to the weaponry it feeds. The Emperor’s Sword, held in his right hand, is a huge blade that burns with righteous fury (and fire), while the Hand of Dominion, the enormous gauntlet on his left, is also capable of unleashing hails of armour piercing gunfire. You have the choice to model Guilliman with his head bare, or with an especially aggressive-looking helmet – both options feature a wreath.This model comes as 44 components, and is supplied with a 60mm Round sculpted base depicting Guilliman standing astride a broken Imperial eagle, flanked by 2 burning torches.
A selection of key World Eaters units, ideal for starting or expanding an army
A Combat Patrol-sized force in a box
Contains 31 multipart plastic miniatures and 400 transfers
Take skulls for the Skull Throne with Combat Patrol: World Eaters! This boxed set provides you with all the units you need to start your army or expand an existing collection. The contents have been chosen to provide you with a ferocious core for any World Eaters force, ideal for Combat Patrol-sized games and will also save you money compared to buying the contents individually.This set includes the following multipart plastic models:– 1x World Eaters Lord on Juggernaut, which can alternatively be built as Lord Invocatus– 10x Jakhals– 20x Khorne Berzerkers– 2x World Eaters Transfer Sheets, each containing 200 transfersAll models are supplied with their appropriate bases. These miniatures are supplied unpainted and require assembly – we recommend using Citadel Plastic Glue and Citadel Colour paints.The terrain used in images on this page is for illustrative purposes only and is not included.
Jakhals are chosen from the strongest, most savage, and bloodthirstiest followers of the World Eaters. Though merely human, these elite cultists seek to emulate the frenzied purity of their gore-crazed masters in any way they can, and dive into combat with wild abandon. Each Jakhal goes to battle strapped with a tank of chemical stimms and tainted blood, which drives them into an unstoppable fury of hacking and slashing with their chain weapons as they strive to earn the favour of their bloody lords.This multipart plastic kit builds 10 Jakhals – human cultists sworn to the service of the World Eaters. Each model is equipped with paired chainblades and a holstered autopistol, and carries a container of sinister chemicals on their back. One of these warriors is a hulking Dishonoured, bigger and more powerful than their comrades, who can instead be armed with a spiked skullsmasher mace. The kit includes components to arm one Jakhal with a two-handed mauler chainblade, equip another with a skull-strung Jakhal icon, and build a Jakhal Pack Leader with a grisly trophy rack. You'll also find loads of cosmetic build options for both Jakhals and Dishonoured, including a variety of interchangeable heads, weapons, and arms to mix things up across your whole army.This kit comprises 96 plastic components, and is supplied with a Citadel 40mm Round Base and 10x Citadel 28.5mm Round Bases. Also included is a World Eaters Transfer Sheet, with 200 transfers featuring Khornate symbols, runic tattoos, eight-pointed stars, skulls, and variations on the World Eaters Legion icon. These miniatures are supplied unpainted and require assembly – we recommend using Citadel Plastic Glue and Citadel Colour paints.
#world #eaters #jakhals #warhammer #40k
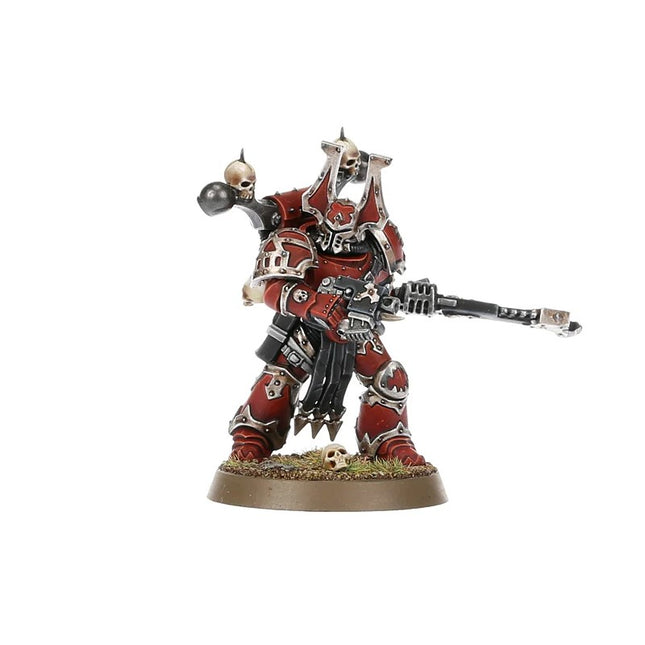
Khorne Berzerkers relish their role as the Blood God’s sacred destroyers, and their fanaticism is feared throughout the galaxy. The warp-fuelled rage of these superlative warriors drives them into a murderous frenzy of killing movement. Those who face them in battle are shredded under a rain of furious blows from revving chain weapons, each strike powerful enough to shear clean through limbs, lop off heads, and shatter heavy armour plating.This multipart plastic kit builds 10 Khorne Berzerkers – transhuman battering rams implanted with rage-inducing Butcher's Nails. Each of these warriors wields a Berzerker chainblade – which covers a variety of chainaxes and chainswords – alongside a bolt pistol. The kit includes components to arm up to two Berzerkers with massive two-handed eviscerators, another two with plasma pistols, and add a skull-topped Berzerker icon to your squad. You can also build a Berzerker Champion, who comes with extra head and pauldron options and can be armed with a plasma pistol of his own.You'll find loads of interchangeable build options in this box – including power packs, shoulder pads with sculpted designs, and 26 unique heads split between crested helmets or bare faces – to help ensure that no two Berzerkers in your World Eaters warband look quite the same.This kit comprises 141 plastic components, and is supplied with 10x Citadel 32mm Round Bases. Also included is a World Eaters Transfer Sheet, with 200 transfers featuring Khornate symbols, runic tattoos, eight-pointed stars, skulls, and variations on the World Eaters Legion icon. These miniatures are supplied unpainted and require assembly – we recommend using Citadel Plastic Glue and Citadel Colour paints.
#world #eaters #khorne #berserkers #warhammer #40k
Mutated butchering Elites for your World Eaters army
Builds three Exalted Eightbound or Eightbound, deadly warriors warped by a daemonic octet
Carve through armour with chainfists, eviscerators, and plenty of build options
This multipart plastic kit builds three Exalted Eightbound – monstrously mutated fiends fielded by the World Eaters. These daemonic warriors resemble a foul evolution of Khorne Berzerkers, from their swollen muscles to their warped biomechanical armour. Each of the Exalted Eightbound wields a grinding chainfist fused to their body, with a massive eviscerator chain weapon held in their other hand. You can also build an Eightbound Champion, who can instead be armed with a pair of mutated chainfists, or a two-handed heavy chainglaive.The kit is loaded with interchangeable and cosmetic components, including optional spikes, different designs for chest plates, shoulder pads, and power packs, and the option to build your Exalted Eightbound with bare torsos. There's enough variety to make each Exalted Eightbound pack unique, and fill your bits box with extras. This kit can alternatively build three Eightbound, a less mutated squad of daemonic World Eaters.This kit comprises 88 plastic components and is supplied with 3x Citadel 40mm Round Bases. Also included is a World Eaters Transfer Sheet, with 200 transfers featuring Khornate symbols, runic tattoos, eight-pointed stars, skulls, and variations on the World Eaters Legion icon. These miniatures are supplied unpainted and require assembly – we recommend using Citadel Plastic Glue and Citadel Colour paints.
Clear Acrylic 40mm Bases - TRANSPARENT
See where you miniature stands on the board by this acrylic transparant base. Compatible with any wargame or board game.
Each pack contains 10 x 40mm round clear acrylic bases.
#clear #acrylic #bases #transparant #40mm#greenstuffworld
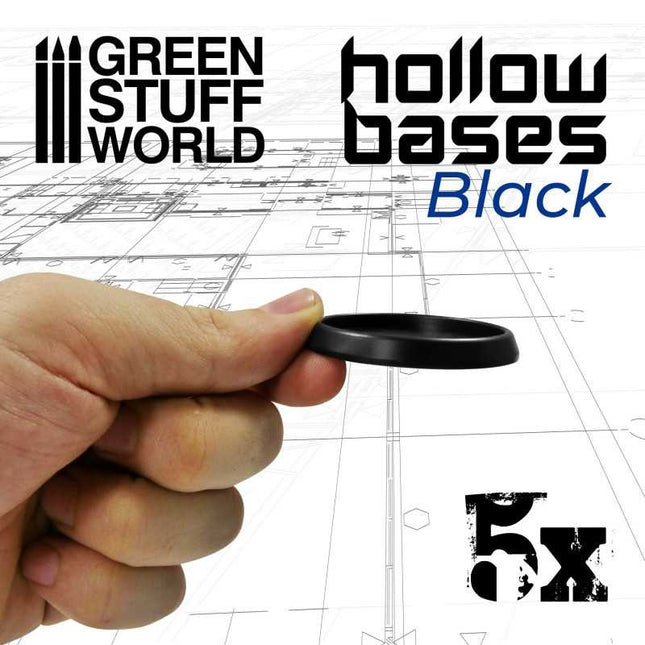
Hollow Plastic Bases - BLACK 40mm
Plastic bases bevelled and hollowed out on the inside to create water or swamp effects, or even to sink minis and recreate the effect of being in the water or swamp. Compatible with any wargame or board game.
Each pack contains 10st 40mm round hollow black plastic bases.
#hollow #bases #zwart #40mm#greenstuffworld #black
Clear Acrylic 50mm Bases - TRANSPARENT
See where you miniature stands on the board by this acrylic transparant base. Compatible with any wargame or board game.
Each pack contains 5 x 40mm round clear acrylic bases.
#clear #acrylic #bases #transparant #40mm#greenstuffworld
Hollow Plastic Bases - BLACK 50mm
Plastic bases bevelled and hollowed out on the inside to create water or swamp effects, or even to sink minis and recreate the effect of being in the water or swamp. Compatible with any wargame or board game.
Each pack contains 10st 40mm round hollow black plastic bases.
#hollow #bases #zwart #50mm#greenstuffworld #black
New ways to play your favorite masters!
With Master Titles, you can now choose which version of your favorite Master will lead your crew. Each title will alter how your Master and crew plays on the battlefield!Malifaux models are 32mm 'heroic' scale miniature made of high-quality plastic. Will require some preparation and assembly.
Faction: Guild / Resurrectionists / Outcasts
Keyword: Tormented, Journalist
Contents:
Jack Daw, Ensouled
Auguste Hart
Nellie Cochrane, Voice of Disorder
A Witch in Time Troupe Box 3 Spirit miniatures made in fine quality resin.
Contains:
1 x Antonia the Noonday Witch Miniature and Stat Card1 x Zorya the Dawn Witch Miniature and Stat Card1 x Danica the Dusk Witch Miniature and Stat Card
Zie stat cards in afbeeldingen over hun abilities
#Leshavult #troupe #moonstone #spirit #witch #time #zorya #antonia #danica
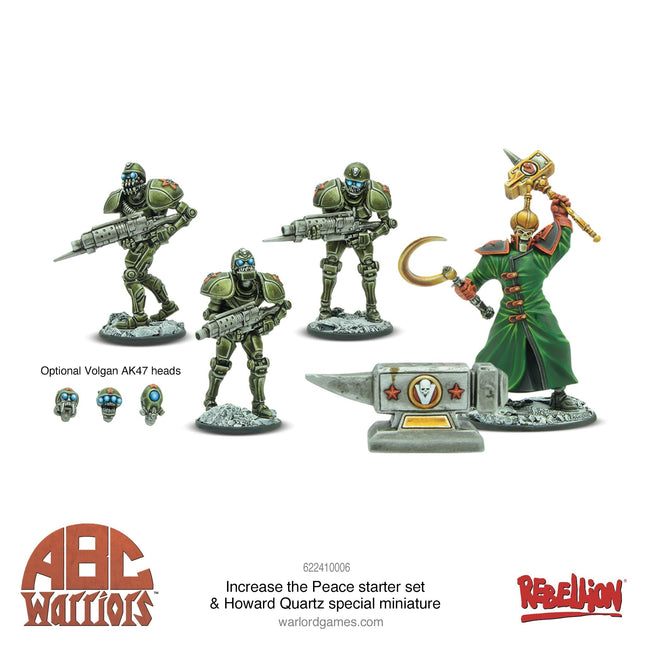
ABC Warriors: Increase the Peace is a skirmish tabletop miniatures game for two or more players based on the legendary 2000 AD comic series ABC Warriors: The Volgan War written by Pat Mills and lavishly illustrated by Clint Langley. Supreme military robots, created for a conflict that ended centuries ago, the ABC Warriors are built to endure warfare in all its deadly forms – atomic, bacterial and chemical.
This starter set contains scenery, tokens, Tarot cards, character & auxiliary cards and all the rules you need to play, including rules for combat missions, an immersive campaign system and profile lists to create your forces as you take control of the ABC Warriors or their Volgan counterparts. Will Volkhan, Ikon of Ikons obliterate all in his path or will the ABC Warriors, led by Hammerstein, succeed in standing firm during the chaos of the Volgan War?
ABC Warriors: Increase the Peace starter set contains:
124-page softback rulebook
Quickstart scenario booklet
36-card Tarot deck
4x Character & Auxiliary cards
Warlord Resin miniatures:
Sergeant Hammerstein
3x Hammerstein Mk Is
Volkhan
3x Volgan AK47s
Plastic bases
Volkhan's altar MDF scenery
Graffiti decal sheet
Plastic activation chips
Tokens & objective markers
2000 AD dice and six-sided spot dice
Increase the Peace also includes an exclusive Warlord Resin miniature of 'Mr Ten Per Cent’ himself, Howard Quartz! At one time human, Quartz was the CEO of Quartz Industries and drove forward the production of the first war droids despite them struggling to tell friend from foe. A terrorist incident involving a rogue Hammerstein resulted in the destruction of 90% of Quartz’s body, and he had himself reconstructed as a robot-cyborg in order to continue his rapacious business practices for centuries to come.
#ABCwarriors #starter #set #increase #peace
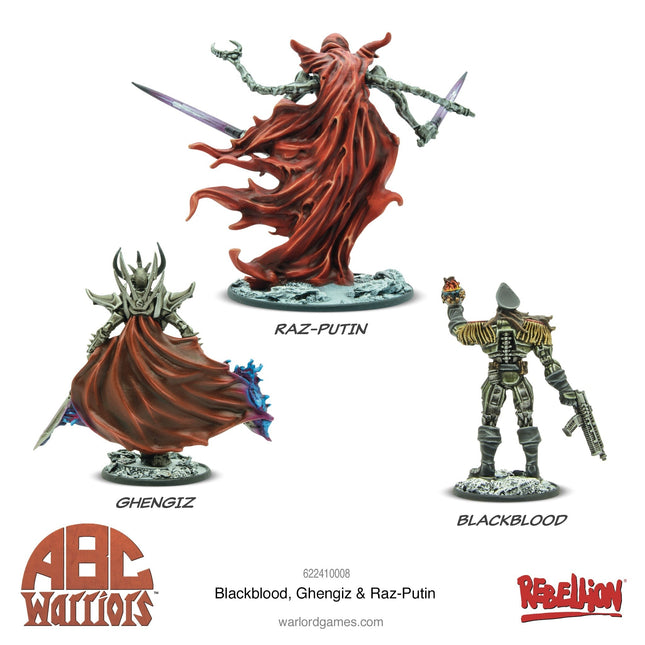
The Volgan war criminal General Blackblood is a sadistic killer with a penchant for drinking the oil of fallen ABC Warriors. Reprogrammed and recruited into the ABC Warriors, Blackblood's inherent treachery would not be suppressed for long and he escaped to join Volkhan at the first chance.
A Volgan experiment to rival Deadlock’s Knight Martial, Raz-Putin is reputed to be even more advanced in the mystic arts than his ABC Warrior counterpart.
A product of the same assembly line as the first Volgan war droid ‘Old Horny’, Ghengiz wields two energised blades capable of projecting energy bolts.
Contains three Warlord Resin Volgan miniatures: General Blackblood, Ghengiz & Raz-Putin, characters cards and plastic bases.
#abcwarriors #blackblood #ghengiz #raz-putin
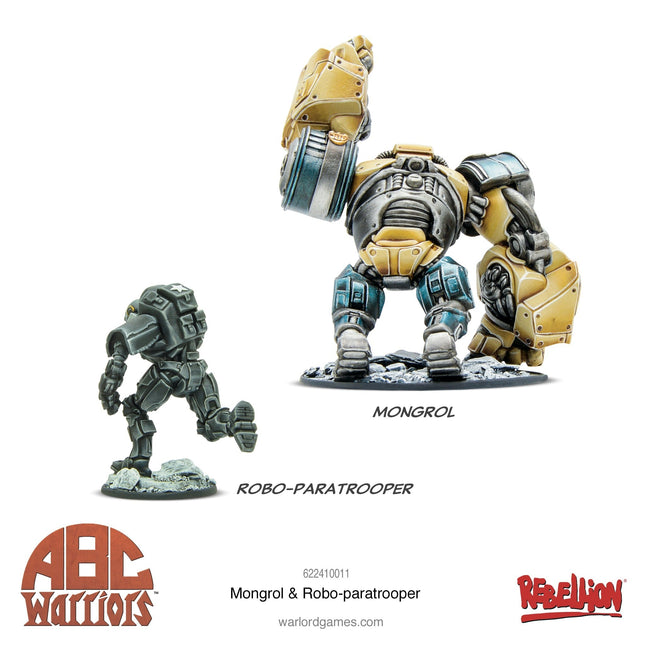
An ABC robo paratrooper leader, Mongrol was the lone survivor of a botched drop over Vilnius in Volga. After the battle, his head was salvaged by Lara, the daughter of rebel robotsmiths, and he was rebuilt using a mishmash of robot parts. However, Lara was killed by the Volgans before she could fully activate him. During torture by Volkhan, Mongrol was inadvertently reactivated, but reduced to an almost bestial state. His infamous battle cry “Mongrol Smush!” is a prelude to a devastating assault with his massive power paws.
Contains two Warlord Resin ABC Warriors miniatures: Mongrol and a Robo-paratrooper, plastic bases, character card and auxiliary card.
#abcwarriors #mongrol #robo #paratrooper
ABS Plasticard A4 size - Thickness 0,16 mm
Plasticard sheets made of ABS plastic (Acrylonitrile butadiene styrene) known as Plasticard. The generic term plasticard refers to a genre of plastics widely used in modeling. ABS plastic is the one used to make LEGO pieces.
This plastic has very attractive physical properties for modeling since despite its strength and durability it is very easy to work. It can be bought either in sheets of different thicknesses, smooth or textured, or in the form of profiles with very diverse shapes. The ideal glue for ABS plastics is cyanoacrylate. The PVA glue can also be used, but it takes much longer to dry.
ABS plasticard also has thermoplastic properties, which allows to alter its shape by using diverse sources of heat.
Plain Plasticard sheets in A4 size
This set contains 5 A4-sheets (20x30cm)
*** This is a printable plastic, but only with INK-JET printers. Do not use LaserJet printers.
#abs #plasticard #A4 #0.16mm #greenstuffworld
ABS Plasticard A4 size - Thickness 0,25 mm
Plasticard sheets made of ABS plastic (Acrylonitrile butadiene styrene) known as Plasticard. The generic term plasticard refers to a genre of plastics widely used in modeling. ABS plastic is the one used to make LEGO pieces.
This plastic has very attractive physical properties for modeling since despite its strength and durability it is very easy to work. It can be bought either in sheets of different thicknesses, smooth or textured, or in the form of profiles with very diverse shapes. The ideal glue for ABS plastics is cyanoacrylate. The PVA glue can also be used, but it takes much longer to dry.
ABS plasticard also has thermoplastic properties, which allows to alter its shape by using diverse sources of heat.
Plain Plasticard sheets in A4 size
This set contains 5 A4-sheets (20x30cm)
#abs #plasticard #A4 #0.25mm #greenstuffworld
ABS Plasticard A4 size - Thickness 0'5 mm
Plasticard sheets made of ABS plastic (Acrylonitrile butadiene styrene) known as Plasticard. The generic term plasticard refers to a genre of plastics widely used in modeling. ABS plastic is the one used to make LEGO pieces.
This plastic has very attractive physical properties for modeling since despite its strength and durability it is very easy to work. It can be bought either in sheets of different thicknesses, smooth or textured, or in the form of profiles with very diverse shapes. The ideal glue for ABS plastics is cyanoacrylate. The PVA glue can also be used, but it takes much longer to dry.
ABS plasticard also has thermoplastic properties, which allows to alter its shape by using diverse sources of heat.
Plain Plasticard sheets in A4 size
This set contains 5 A4-sheets (20x30cm)
#abs #plasticard #A4 #0.5mm #greenstuffworld
ABS Plasticard A4 size - Thickness 1 mm
Plasticard sheets made of ABS plastic (Acrylonitrile butadiene styrene) known as Plasticard. The generic term plasticard refers to a genre of plastics widely used in modeling. ABS plastic is the one used to make LEGO pieces.
This plastic has very attractive physical properties for modeling since despite its strength and durability it is very easy to work. It can be bought either in sheets of different thicknesses, smooth or textured, or in the form of profiles with very diverse shapes. The ideal glue for ABS plastics is cyanoacrylate. The PVA glue can also be used, but it takes much longer to dry.
ABS plasticard also has thermoplastic properties, which allows to alter its shape by using diverse sources of heat.
Plain Plasticard sheets in A4 size
This set contains 5 A4-sheets (20x30cm)
#abs #plasticard #A4 #1mm #greenstuffworld
ABS Plasticard A4 size - Thickness 1.5mm
Plasticard sheets made of ABS plastic (Acrylonitrile butadiene styrene) known as Plasticard. The generic term plasticard refers to a genre of plastics widely used in modeling. ABS plastic is the one used to make LEGO pieces.
This plastic has very attractive physical properties for modeling since despite its strength and durability it is very easy to work. It can be bought either in sheets of different thicknesses, smooth or textured, or in the form of profiles with very diverse shapes. The ideal glue for ABS plastics is cyanoacrylate. The PVA glue can also be used, but it takes much longer to dry.
ABS plasticard also has thermoplastic properties, which allows to alter its shape by using diverse sources of heat.
Plain Plasticard sheets in A4 size
This set contains 3 A4-sheets (20x30cm)
#abs #plasticard #A4 #1.5mm #greenstuffworld
ABS Plasticard A4 size - Thickness 2mm
Plasticard sheets made of ABS plastic (Acrylonitrile butadiene styrene) known as Plasticard. The generic term plasticard refers to a genre of plastics widely used in modeling. ABS plastic is the one used to make LEGO pieces.
This plastic has very attractive physical properties for modeling since despite its strength and durability it is very easy to work. It can be bought either in sheets of different thicknesses, smooth or textured, or in the form of profiles with very diverse shapes. The ideal glue for ABS plastics is cyanoacrylate. The PVA glue can also be used, but it takes much longer to dry.
ABS plasticard also has thermoplastic properties, which allows to alter its shape by using diverse sources of heat.
Plain Plasticard sheets in A4 size
This set contains 3 A4-sheets (20x30cm)
#abs #plasticard #A4 #2mm #greenstuffworld
ABS Plasticard A4 size - Thickness 3mm
Plasticard sheets made of ABS plastic (Acrylonitrile butadiene styrene) known as Plasticard. The generic term plasticard refers to a genre of plastics widely used in modeling. ABS plastic is the one used to make LEGO pieces.
This plastic has very attractive physical properties for modeling since despite its strength and durability it is very easy to work. It can be bought either in sheets of different thicknesses, smooth or textured, or in the form of profiles with very diverse shapes. The ideal glue for ABS plastics is cyanoacrylate. The PVA glue can also be used, but it takes much longer to dry.
ABS plasticard also has thermoplastic properties, which allows to alter its shape by using diverse sources of heat.
Plain Plasticard sheets in A4 size
This set contains 2 A4-sheets (20x30cm)
#abs #plasticard #A4 #3mm #greenstuffworld
The Duncan Rhodes Painting Academy "Two Thin Coats" Paint Range has been created from the ground up with the support of the best paint development chemists in the world. Specifically designed for any level of hobbyist, this paint range is fun for both beginner and seasoned painters. Volume:
15ml Bottle Tip point
Paint system: shadow
Acrylic Color
Acrylic paints with an opaque and smooth matt finish, especially designed for modelling and miniature painting. Formula curated and carefully developed by experienced artists using a new generation of pigments, the Acrylic Color range aims to provide a full spectrum of all basic tones and shades necessary for wargames, vehicles, miniatures and dioramas, as well as colours exclusive to GSW.
Rich in high quality pigments, these colours will leave a fine homogenous layer of fast drying paint, respecting all details on the surface. Perfect for glazes and other techniques, making them adequate for experts and amateurs alike. Designed especially for brush painting, but Acrylic Color paints can be used with an airbrush when slightly diluted with acrylic thinner.
Non-toxic water-based with no latex. Shake well before use. Includes stainless steel mixing ball.
Contains: 17ml.
*This Paint may contain a protective seal, remove before use.
#acrylic #colours #greenstuffworld
Magic, steampunk, monsters, and soldiers collide to make the battlefields of The Other Side action-packed. In order to get you into the action sooner, every model in The Other Side comes preassembled!
The models in The Other Side are 32mm scale with high levels of detail, allowing painters plenty of opportunities to paint their Champions, Squads, and Titans in whatever way they wish.
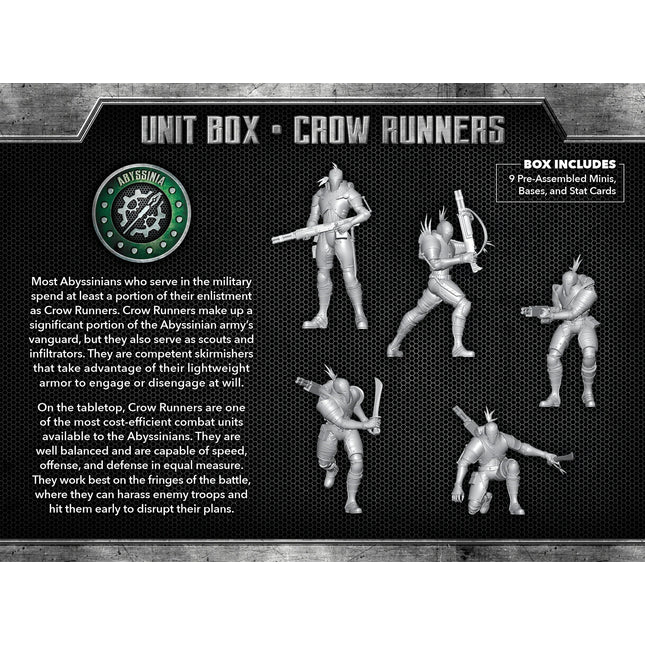
This is a single box containing a single unit for The Other Side, providing a player with additional versatility and options when building a Company in The Other Side. Unit boxes are a player's primary way of expanding their Company.
Contains
Unit : Crow Runners [9 models]
Stat cards
Bases
#abyssinia #unit #box #crow #runners
Magic, steampunk, monsters, and soldiers collide to make the battlefields of The Other Side action-packed. In order to get you into the action sooner, every model in The Other Side comes preassembled!
The models in The Other Side are 32mm scale with high levels of detail, allowing painters plenty of opportunities to paint their Champions, Squads, and Titans in whatever way they wish.
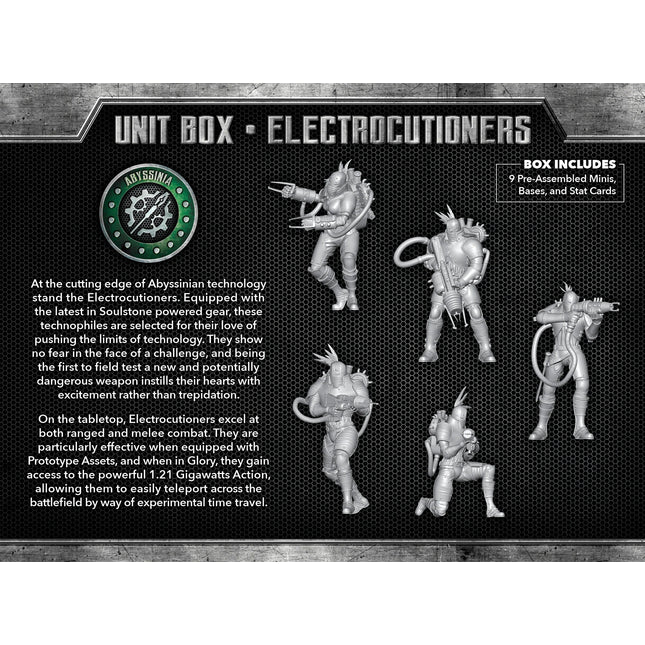
This is a single box containing a single unit for The Other Side, providing a player with additional versatility and options when building a Company in The Other Side. Unit boxes are a player's primary way of expanding their Company.
Contains
Unit : Electrocutioners [9 models]
Stat cards
Bases
#abyssinia #unit #box #Electrocutioners
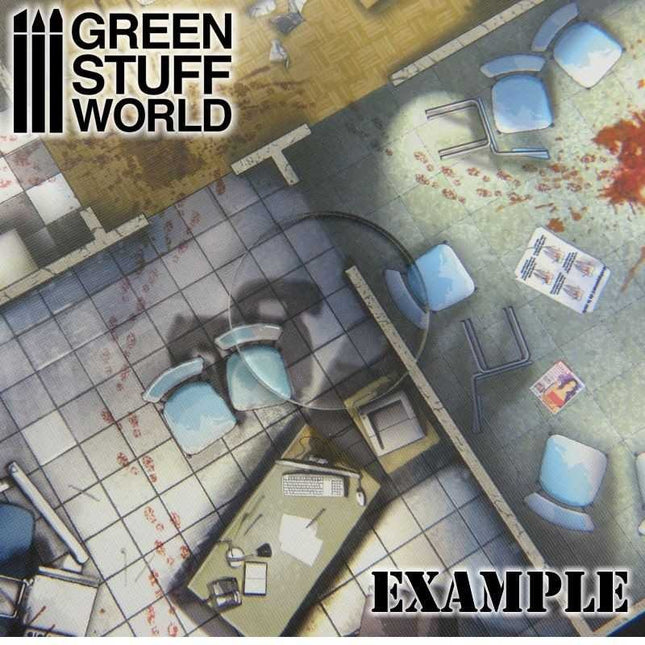
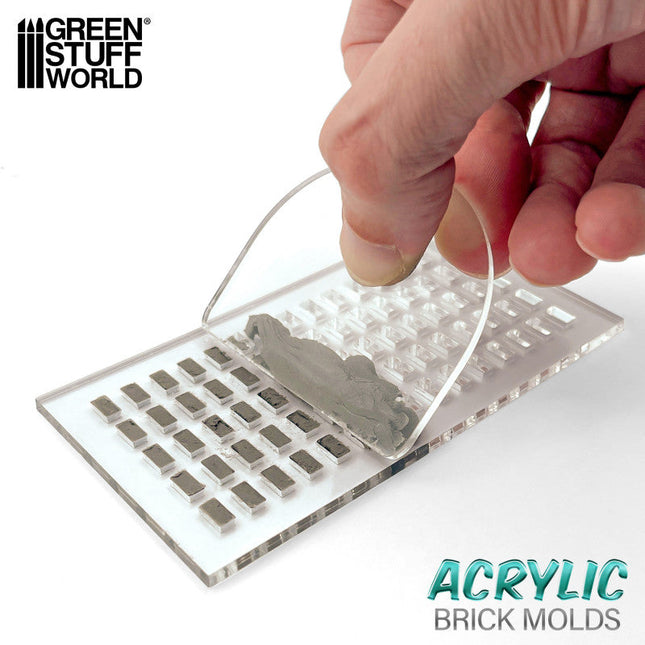
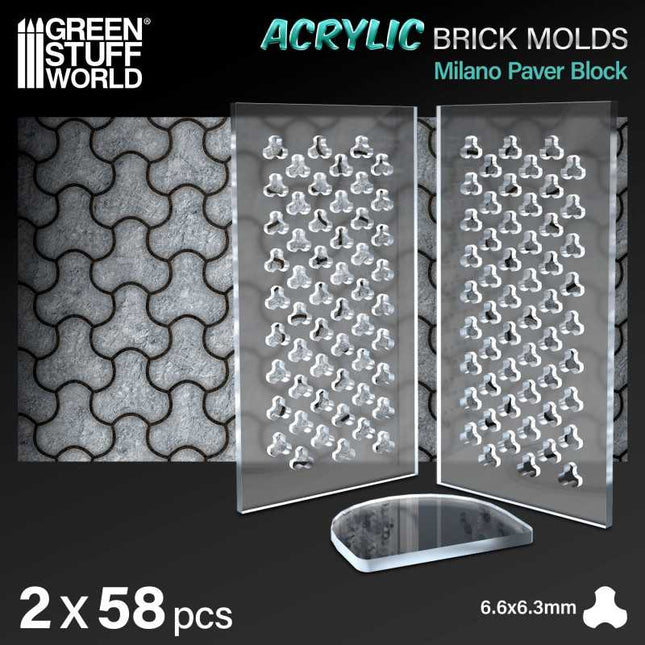
Elevate your dioramas to an unparalleled level of realism with our acrylic molds for modeling regular bricks. These accessories will allow you to create an infinite number of them with precision and consistency, adding authenticity and depth to your creations. They are specifically designed to create miniature regular bricks for use in scale modeling projects. Each model features a variety of patterns and textures that replicate real ones and that modelers will use to shape the air-drying clay.
Our acrylic modeling molds are perfectly complemented by air-drying pastes such as modeling clay, foam clay, and similar products. These options guarantee a faithful and detailed reproduction for your diorama.
Instructions for use:
Using acrylic brick molds is a straightforward process, but it requires some care to ensure you get the best results. Here's a step-by-step guide on how to use these molds:
Prepare the mold: Ensure that your acrylic brick mold is clean and dry. Make sure it's free of any debris or dust.
Cover one side of the mold to hold the pieces. You can do this process with baking paper, wet oven paper, mylar plastic, or even airbrush masking tape.
Place the mold on a flat surface: Find a flat and stable surface where you can work comfortably. Place the mold with the paper side down to prevent sticking.
Add air-drying clay: Take a ball of air-drying clay and place it on the mold. Use your fingers to gently press and work the clay into the cavities of the mold. Make sure you fill each brick cavity completely. You may need to adjust the amount of clay to achieve your desired brick size and thickness.
Level the surface: Use the included plastic spatula or the edge of another mold to drag/scrape across the surface of the mold, skimming off any excess clay. This will ensure that the surface is even and smooth.
Let it dry: Allow the clay to dry completely. The air-drying paste has a small degree of shrinkage as it dries, which will help the pieces release from the mold.
Remove the paper: Once the clay is completely dry, carefully peel off the paper tape from the back of the mold. This will help release the hobby bricks.
Remove the pieces: Use a blunt stick (like the reverse end of a brush) to gently push out the individual bricks from the mold. Be careful not to apply too much pressure, as you don't want to damage the delicate acrylic mold.
Smooth the edges: To give your bricks a more realistic look and get rid of any sharp edges, gently rub small amounts of them together between the palms of your hands. This will soften the edges and make the bricks look more like real bricks.
Use the bricks: You can now use the air-dried clay bricks for your crafting or construction project. We recommend gluing the pieces with PVA glue or an acrylic sealer such as decoupe product (like ModPodge) to secure the pieces.
Remember to handle the acrylic mold with care, as it's not as flexible as rubber or silicon molds and can break if bent.
With our methacrylate molds, your dioramas will come to life with authentic and captivating details - unleash your creativity and build sets that tell stories of their own! Take your projects to the next level of excellence with this essential accessory for lovers of high-quality dioramas.
Quantity: 2x pack
Scale: 1:35 (1:48-1:32)
The thickness of the pieces: 3 mm
Brick size: 2.85 x 5.7 mm
Mould size: 6 x 11 cm