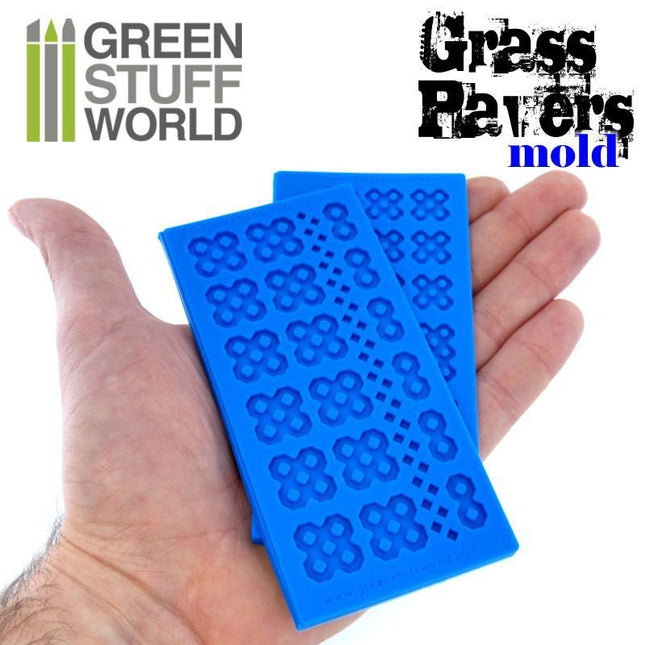
2 soorten Siliconen mallen grasstenen Gemaakt van hoogwaardige voedingswaren siliconen. Makkelijk in gebruik en zo gesneden dat er vele steenvormen in de mallen aanwezig is. Deze mallen zijn hittebestendig en duurzaam. De mallen zijn extra diep om zeer gedetailleerde mooie resultaten te geven voor zowel dimensionaal ontwerp als oppervlaktedruk. Elke mal heeft een groot oppervlak van 2,5x5 inch (6x12cm) en is flexibel voor optimale bruikbaarheid. De mallen werken geweldig met en elk soort materiaal inclusief hars.Met deze flexibele mallen kunt u eindeloze hoeveelheden baksteen en straten te maken die bruikbaar zijn voor de schaal 1:35.Hittebestendig rubber tot 240ºCVoedingswaardeResin-GradeSchaal 1:35 (1:32-1:43)
We raden aan om klei boetseer schrapers te gebruiken om het overtollige kit / klei uit de vormen te verwijderen om beschadigingen te voorkomen Bevat 2 vormen met 4 type stenen. Voeg los static grass 3mm toe na droogtijd om het grasstuk na te bootsen.
What Is Flexi Mold and How Does It Work?
Flexi Mold is an innovative and versatile material designed for the manufacture of 1 or 2-sided reusable molds, offering a sustainable and reusable alternative to traditional silicone molds. It can be melted and reused many times, making it a cost-effective and environmentally friendly option for a variety of applications. It is flexible, food grade, and allows mistakes to be corrected by re-melting and starting over. Because it is biodegradable and contains no petroleum-based components, it is an environmentally friendly option.
To use Flexi Mold, heat it (preferably in a microwave), pour it over the object you want to reproduce, and let it cool. Once solidified, it will capture complex details accurately, making it ideal for artistic, culinary, and part-production purposes.
Flexi Mold is a superior alternative to silicone because it offers several distinct advantages over traditional silicone molds:
Performance: It is reusable, which significantly reduces material costs over time.
Environmental Safety: Being biodegradable and free of harmful chemicals makes it a safer choice for the planet.
Correctable: If a mistake is made, it can be remelted and remolded without wasting material.
Ease of use: Unlike silicone, it requires no mixing or curing agents, simplifying the process.
Food grade: It can be used in the process of culinary elaborations.
Although working with silicone allows for more durable molds, in terms of single-use applications, they are an excellent alternative for most projects because of their reusability and eco-friendly nature.
Important usage advice:
This product should only be heated in microwave-safe containers, such as the product packaging, in which it comes. The use of incompatible containers could melt them and even damage the product generating unsafe handling conditions.
How Many Times Can You Reuse Flexi Mold?
Its reusability and food compatibility are its most significant advantages. Generally, when used correctly and with proper care, Flexi Mold can be reused more than 35 times. In fact, with careful handling, its shelf life could be extended to over 100 times. By avoiding overheating above 82°C (180°F) and filtering out waste after each use, more than 35 cycles can easily be achieved. Users have reported extending their service life to over 100 remelting processes. Filter out debris and particulates to keep it clean and efficient for future use.
The time it takes to cool depends on the size and thickness of the part. Small ones (about 300 ml or 10 ounces) solidify completely in about 2 hours at room temperature. To speed up the process, place it in the refrigerator, where its cooling time can be accelerated. Larger sizes may need more time to solidify completely.
Process of use
Melting: Heat it until it becomes a liquid. To do this, you can use the microwave, always in short heating intervals 10-15 seconds 2-3 times, or a bain-marie. If it is heated all at once in the microwave, it may burn.
Pour: Pour the molten material over your object or into a casting box in which to make your mold.
Cool: Allow it to solidify completely by letting it cool to room temperature or refrigerate it for faster results.
Reuse: When no longer needed, reheat the product to reshape it or create a new one.
How Do You Melt Flexi Mold Safely?
It can be melted either in the microwave or in a bain-marie using the product container.
Microwave method: Use a few seconds of heating intervals to avoid overheating and thus degradation of the product. The usual heating times are as follows, although it is wise to constantly monitor the state of the product as it turns to liquid.
300ml (10 oz.): 1-2 minutes. Select the time in your microwave and stop every 10-15 seconds to check the condition of the Flexi Mold. Continue heating until ready to use.
600ml (20 oz.): 3-5 minutes. Use the technique explained above, with the possibility of extending the intervals a few seconds longer.
1200 ml (40 oz.): 7-10 minutes. In this case, the intervals will be somewhat longer.
The product should be heated in short periods of time of 10-15 seconds, so if we try to save time and heat it for more than 1 minute continuously, the product could burn.
2.- Double boiler or bain-marie method: Place it in a container inside another pot with water. This method keeps the temperature below 100°C (212°F), reducing the risk of burns.
Always stir it during heating to ensure even melting and to avoid overheating your container. Remember to stir it superficially so as not to introduce air and bubbles that will be transferred to the mold, creating imperfections.
What Materials Can Be Cast with Flexi Mold?
Flexi Mold is versatile and works well with many casting materials including:
Gypsum, Acrylic Resin and Plaster: Ideal for decorative items and art projects.
Resins: We recommend using slow curing epoxies or polyurethanes only for small parts to avoid overheating.
Chocolate and sweets: It is food safe, making it perfect for culinary creations. It is certified for food contact, making it ideal for chocolate, fondant and other confectionery projects. Just make sure the material is clean before use.
Candle and soap wax: Cool before pouring hot materials to ensure faster cooling.
It can even be used to shape unique materials such as polymer clay, ensuring smooth, detailed results. Remember, after molding the clay you must bake it, without a mold, to make it resilient and keep its shape.
Precautions when using resin with Flexi Mold
Resin generates heat during curing, so there are several things to keep in mind before using it.
Size: Larger projects tend to produce more heat due to the larger volume of resin that reacts. This is why you should only use it on small projects. Otherwise, the accumulated heat will damage the mold as it could eventually melt it.
Ambient temperature: Ambient temperatures affect the prolongation or reduction of the curing process of these materials.
Resin type: Different resins have different curing characteristics, including the amount of heat they release. Consult the manufacturer's manual for proper cure.
Additives: Additives such as pigments or fillers can affect the curing process.
Cooling: When using these materials, which work with temperature, it is advisable to let them cool completely.
Understanding these factors helps to achieve better results with resin projects.
How Do You Clean and Maintain Flexi Mold?
Cleaning is simple. Use a cool, damp cloth to remove debris, avoiding immersion in hot water, as the material can dissolve in hot water. For molds with embedded particles, remelt it and filter it through a fine mesh or filter to restore its purity.
Store it in a cool, dry place, always protected from extreme temperatures to prevent it from losing properties and deteriorating. It will then be ready for your next project.
What Are the Temperature Guidelines for Using this Reusable Material?
It is reusable and melts at approximately 140°F (60°C) and can withstand temperatures up to 180°F (82°C) during heating. When working with high temperature casting materials, cool the product in the refrigerator for a few minutes before pouring to avoid warping.
Can Flexi Mold Be Used for Two-Part Molds?
Yes, it is ideal for creating two-part molds. Here’s how:
Prepare the Base: Begin by embedding your object halfway into a layer of clay. Shape the clay carefully to cover half of the object, ensuring smooth edges to reduce seam lines and achieve a better fit between the halves.
Set Up the Casting Box: Place the clay and object setup into a cast frame square. Apply a release agent evenly over the exposed surface of the object and the surrounding clay.
Pour the First Half: While the release agent is still wet, pour the melted molding material over the exposed portion of the object. Make sure it fully covers the surface. Allow the material to cool and solidify completely.
Prepare for the Second Half: Once the first half has solidified, carefully remove the clay and apply a release agent to the surface of the solidified part. Chill this first half in the freezer to prevent melting during the second pour.
Pour the Second Half: Reheat the molding material to a temperature between 50°C and 60°C (120°F–135°F). Let it cool slightly until pourable but not too hot. Pour the material over the remaining half of the object and the first half.
Finalize the Mold: Allow the second half to solidify completely. Once cooled, you’ll have it ready for use!
By following these steps, you can create precise molds with minimized seam lines and a seamless fit between the halves.
How Can You Minimize Bubbles in Flexi Mold?
To avoid bubbles:
Pour it slowly and steadily.
Use a vibrating surface to release trapped air.
Paint a thin layer of melted Flexi Mold onto difficult details before pouring.
Seal porous objects to prevent air from escaping during molding.
Is it Safe for Pets or Accidental Ingestion?
It is a non-toxic material made from food-safe ingredients. However, if you incorporate substances like urethanes, plaster, or release agents into the mold-making process, it may no longer be safe for consumption. Always refer to the Material Safety Data Sheet (MSDS) for those additional materials to ensure safety.
Interestingly, some dog owners have reported their pets consuming it, as it seems to attract their curiosity. In all reported cases, the dogs were fine afterward. That said, if your dog shows any unusual behavior or symptoms, it’s best to consult a veterinarian to err on the side of caution.
Warnings before use
Flexi Mold is a partially water-soluble material, so it can dissolve in contact with water. That is why it is not recommended to fill the molds with water-based mixtures (such as acrylic resin, plaster, or plaster, among others) without taking the appropriate measures. To achieve an optimal result with these mixtures, it is absolutely necessary to apply a layer of release agent inside the mold, which will protect it from the humidity of the materials inside. Specifically, from Green Stuff World we recommend the use of sculptor vaseline since our team of experts has proven its effectiveness.
It is important to keep in mind that once Flexi Mold has been mixed with Vaseline, it will no longer be a food-grade product and therefore cannot be reused to create molds in culinary recipes. In addition, it is recommended that vaseline residues be cleaned as much as possible before reuse to avoid premature degradation of the product.
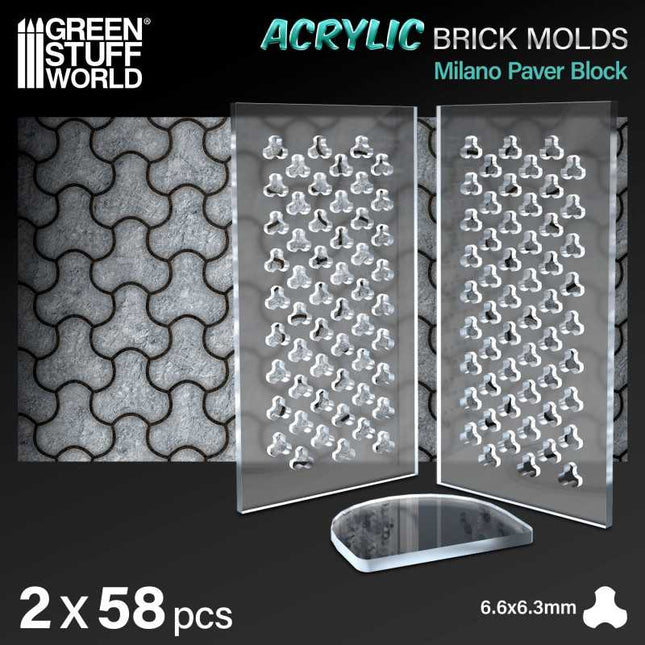
Elevate your dioramas to an unparalleled level of realism with our acrylic molds for modeling regular bricks. These accessories will allow you to create an infinite number of them with precision and consistency, adding authenticity and depth to your creations. They are specifically designed to create miniature regular bricks for use in scale modeling projects. Each model features a variety of patterns and textures that replicate real ones and that modelers will use to shape the air-drying clay.
Our acrylic modeling molds are perfectly complemented by air-drying pastes such as modeling clay, foam clay, and similar products. These options guarantee a faithful and detailed reproduction for your diorama.
Instructions for use:
Using acrylic brick molds is a straightforward process, but it requires some care to ensure you get the best results. Here's a step-by-step guide on how to use these molds:
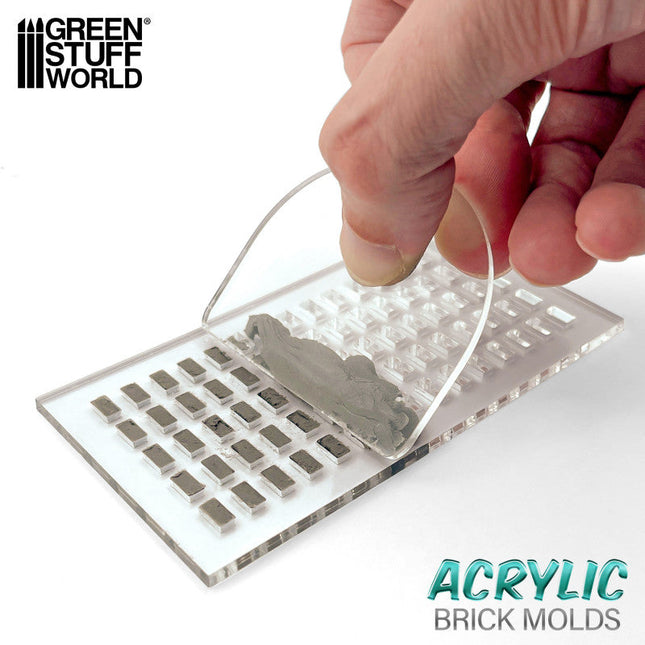
Prepare the mold: Ensure that your acrylic brick mold is clean and dry. Make sure it's free of any debris or dust.
Cover one side of the mold to hold the pieces. You can do this process with baking paper, wet oven paper, mylar plastic, or even airbrush masking tape.
Place the mold on a flat surface: Find a flat and stable surface where you can work comfortably. Place the mold with the paper side down to prevent sticking.
Add air-drying clay: Take a ball of air-drying clay and place it on the mold. Use your fingers to gently press and work the clay into the cavities of the mold. Make sure you fill each brick cavity completely. You may need to adjust the amount of clay to achieve your desired brick size and thickness.
Level the surface: Use the included plastic spatula or the edge of another mold to drag/scrape across the surface of the mold, skimming off any excess clay. This will ensure that the surface is even and smooth.
Let it dry: Allow the clay to dry completely. The air-drying paste has a small degree of shrinkage as it dries, which will help the pieces release from the mold.
Remove the paper: Once the clay is completely dry, carefully peel off the paper tape from the back of the mold. This will help release the hobby bricks.
Remove the pieces: Use a blunt stick (like the reverse end of a brush) to gently push out the individual bricks from the mold. Be careful not to apply too much pressure, as you don't want to damage the delicate acrylic mold.
Smooth the edges: To give your bricks a more realistic look and get rid of any sharp edges, gently rub small amounts of them together between the palms of your hands. This will soften the edges and make the bricks look more like real bricks.
Use the bricks: You can now use the air-dried clay bricks for your crafting or construction project. We recommend gluing the pieces with PVA glue or an acrylic sealer such as decoupe product (like ModPodge) to secure the pieces.
Remember to handle the acrylic mold with care, as it's not as flexible as rubber or silicon molds and can break if bent.
With our methacrylate molds, your dioramas will come to life with authentic and captivating details - unleash your creativity and build sets that tell stories of their own! Take your projects to the next level of excellence with this essential accessory for lovers of high-quality dioramas.
Quantity: 2x pack
Scale: 1:35 (1:48-1:32)
The thickness of the pieces: 3 mm
Brick size: 2.85 x 5.7 mm
Mould size: 6 x 11 cm
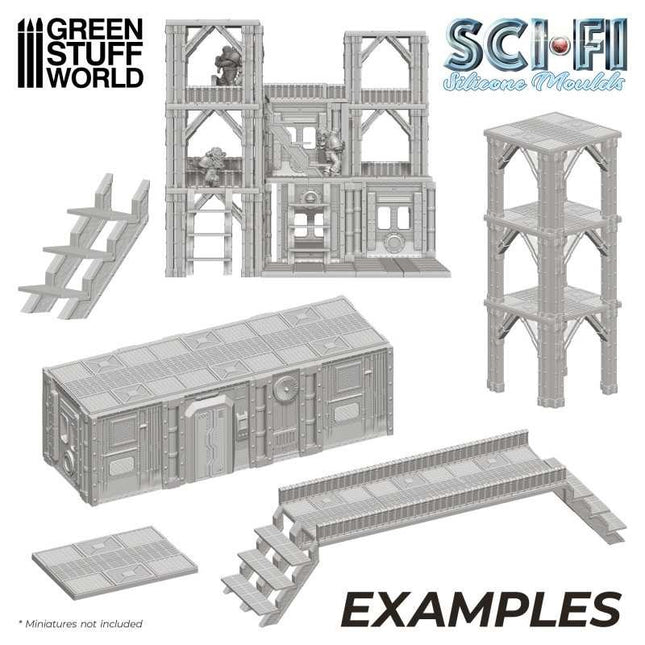
Futuristic silicone molds for modeling and wargaming will allow you to make thousands of unique pieces to decorate your game tables and the bases of your wargame miniatures. This food-grade silicone is known for its flexibility, durability, and ability to reproduce intricate details accurately. With these hobby molds, you can make multiple copies of the same design, which is especially useful for mass-producing game pieces or miniature models.
These are ideal for creating complex shapes and patterns, and they will allow you thousands of unique pieces both to decorate your game tables and the bases of your wargame miniatures, from futuristic city ruins to fantasy buildings such as bunkers and space fortresses. They are flexible and durable, so you can use them to create the perfect scenery for your games.
They are designed to be compatible and complementary with other pieces from the same range of hobby products from Green Stuff World, so you can create extremely detailed items. If you're interested in creating unique pieces for your tabletop tables or wargaming miniatures, this tool will be worth considering.
Acrylic resin is highly recommended to fill them, as well as using scrapers for removing any resin or putty/clay excess without damaging them.
This set consists of 3 molds 6x12cm full of pieces perfect for creating 1/48 scale scenery as well as for traditional and Warhammer wargames, among others.
#mold #mal #sci #fi #futuristic #wargame #scenery #terrain #greenstuffworld
Elevate your dioramas to an unparalleled level of realism with our acrylic molds for modeling regular bricks. These accessories will allow you to create an infinite number of them with precision and consistency, adding authenticity and depth to your creations. They are specifically designed to create miniature regular bricks for use in scale modeling projects. Each model features a variety of patterns and textures that replicate real ones and that modelers will use to shape the air-drying clay.
Our acrylic modeling molds are perfectly complemented by air-drying pastes such as modeling clay, foam clay, and similar products. These options guarantee a faithful and detailed reproduction for your diorama.
Instructions for use:
Using acrylic brick molds is a straightforward process, but it requires some care to ensure you get the best results. Here's a step-by-step guide on how to use these molds:
Prepare the mold: Ensure that your acrylic brick mold is clean and dry. Make sure it's free of any debris or dust.
Cover one side of the mold to hold the pieces. You can do this process with baking paper, wet oven paper, mylar plastic, or even airbrush masking tape.
Place the mold on a flat surface: Find a flat and stable surface where you can work comfortably. Place the mold with the paper side down to prevent sticking.
Add air-drying clay: Take a ball of air-drying clay and place it on the mold. Use your fingers to gently press and work the clay into the cavities of the mold. Make sure you fill each brick cavity completely. You may need to adjust the amount of clay to achieve your desired brick size and thickness.
Level the surface: Use the included plastic spatula or the edge of another mold to drag/scrape across the surface of the mold, skimming off any excess clay. This will ensure that the surface is even and smooth.
Let it dry: Allow the clay to dry completely. The air-drying paste has a small degree of shrinkage as it dries, which will help the pieces release from the mold.
Remove the paper: Once the clay is completely dry, carefully peel off the paper tape from the back of the mold. This will help release the hobby bricks.
Remove the pieces: Use a blunt stick (like the reverse end of a brush) to gently push out the individual bricks from the mold. Be careful not to apply too much pressure, as you don't want to damage the delicate acrylic mold.
Smooth the edges: To give your bricks a more realistic look and get rid of any sharp edges, gently rub small amounts of them together between the palms of your hands. This will soften the edges and make the bricks look more like real bricks.
Use the bricks: You can now use the air-dried clay bricks for your crafting or construction project. We recommend gluing the pieces with PVA glue or an acrylic sealer such as decoupe product (like ModPodge) to secure the pieces.
Remember to handle the acrylic mold with care, as it's not as flexible as rubber or silicon molds and can break if bent.
With our methacrylate molds, your dioramas will come to life with authentic and captivating details - unleash your creativity and build sets that tell stories of their own! Take your projects to the next level of excellence with this essential accessory for lovers of high-quality dioramas.
Quantity: 2x pack
Scale: 1:35 (1:48-1:32)
The thickness of the pieces: 3 mm
Brick size: 2.85 x 5.7 mm
Mould size: 6 x 11 cm