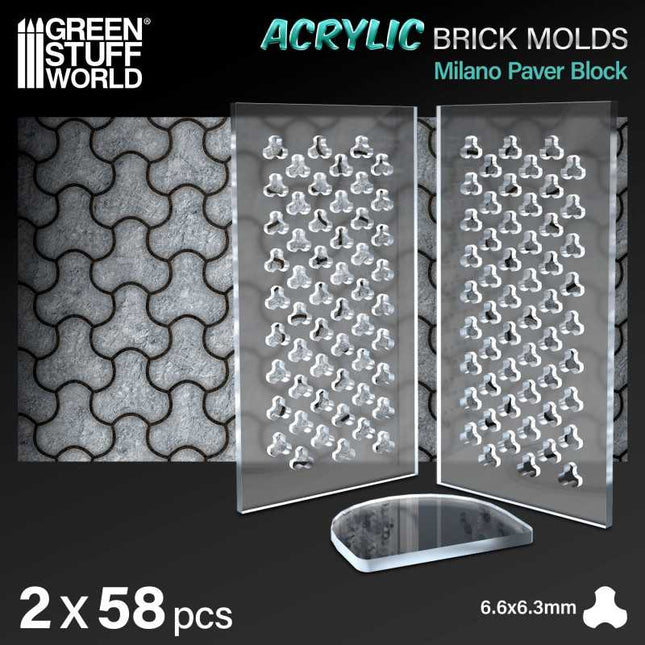
Elevate your dioramas to an unparalleled level of realism with our acrylic molds for modeling regular bricks. These accessories will allow you to create an infinite number of them with precision and consistency, adding authenticity and depth to your creations. They are specifically designed to create miniature regular bricks for use in scale modeling projects. Each model features a variety of patterns and textures that replicate real ones and that modelers will use to shape the air-drying clay.
Our acrylic modeling molds are perfectly complemented by air-drying pastes such as modeling clay, foam clay, and similar products. These options guarantee a faithful and detailed reproduction for your diorama.
Instructions for use:
Using acrylic brick molds is a straightforward process, but it requires some care to ensure you get the best results. Here's a step-by-step guide on how to use these molds:
Prepare the mold: Ensure that your acrylic brick mold is clean and dry. Make sure it's free of any debris or dust.
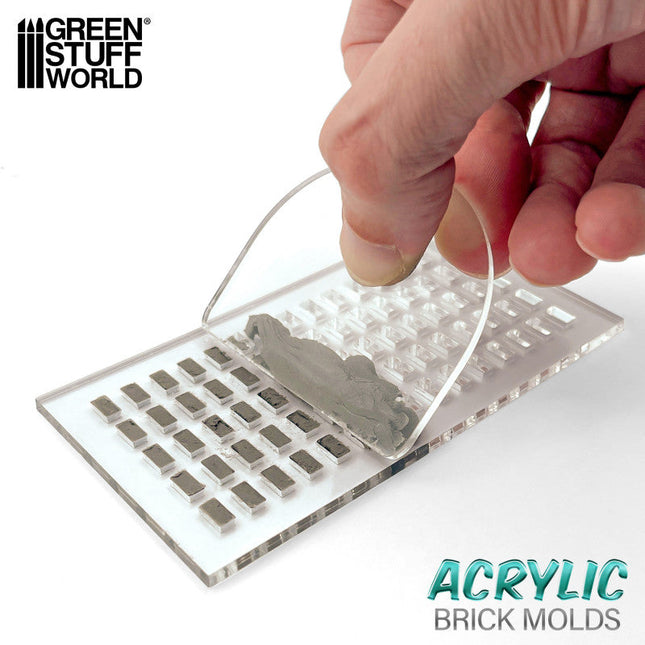
Cover one side of the mold to hold the pieces. You can do this process with baking paper, wet oven paper, mylar plastic, or even airbrush masking tape.
Place the mold on a flat surface: Find a flat and stable surface where you can work comfortably. Place the mold with the paper side down to prevent sticking.
Add air-drying clay: Take a ball of air-drying clay and place it on the mold. Use your fingers to gently press and work the clay into the cavities of the mold. Make sure you fill each brick cavity completely. You may need to adjust the amount of clay to achieve your desired brick size and thickness.
Level the surface: Use the included plastic spatula or the edge of another mold to drag/scrape across the surface of the mold, skimming off any excess clay. This will ensure that the surface is even and smooth.
Let it dry: Allow the clay to dry completely. The air-drying paste has a small degree of shrinkage as it dries, which will help the pieces release from the mold.
Remove the paper: Once the clay is completely dry, carefully peel off the paper tape from the back of the mold. This will help release the hobby bricks.
Remove the pieces: Use a blunt stick (like the reverse end of a brush) to gently push out the individual bricks from the mold. Be careful not to apply too much pressure, as you don't want to damage the delicate acrylic mold.
Smooth the edges: To give your bricks a more realistic look and get rid of any sharp edges, gently rub small amounts of them together between the palms of your hands. This will soften the edges and make the bricks look more like real bricks.
Use the bricks: You can now use the air-dried clay bricks for your crafting or construction project. We recommend gluing the pieces with PVA glue or an acrylic sealer such as decoupe product (like ModPodge) to secure the pieces.
Remember to handle the acrylic mold with care, as it's not as flexible as rubber or silicon molds and can break if bent.
With our methacrylate molds, your dioramas will come to life with authentic and captivating details - unleash your creativity and build sets that tell stories of their own! Take your projects to the next level of excellence with this essential accessory for lovers of high-quality dioramas.
Quantity: 2x pack
Scale: 1:35 (1:48-1:32)
The thickness of the pieces: 3 mm
Brick size: 2.85 x 5.7 mm
Mould size: 6 x 11 cm
Elevate your dioramas to an unparalleled level of realism with our acrylic molds for modeling regular bricks. These accessories will allow you to create an infinite number of them with precision and consistency, adding authenticity and depth to your creations. They are specifically designed to create miniature regular bricks for use in scale modeling projects. Each model features a variety of patterns and textures that replicate real ones and that modelers will use to shape the air-drying clay.
Our acrylic modeling molds are perfectly complemented by air-drying pastes such as modeling clay, foam clay, and similar products. These options guarantee a faithful and detailed reproduction for your diorama.
Instructions for use:
Using acrylic brick molds is a straightforward process, but it requires some care to ensure you get the best results. Here's a step-by-step guide on how to use these molds:
Prepare the mold: Ensure that your acrylic brick mold is clean and dry. Make sure it's free of any debris or dust.
Cover one side of the mold to hold the pieces. You can do this process with baking paper, wet oven paper, mylar plastic, or even airbrush masking tape.
Place the mold on a flat surface: Find a flat and stable surface where you can work comfortably. Place the mold with the paper side down to prevent sticking.
Add air-drying clay: Take a ball of air-drying clay and place it on the mold. Use your fingers to gently press and work the clay into the cavities of the mold. Make sure you fill each brick cavity completely. You may need to adjust the amount of clay to achieve your desired brick size and thickness.
Level the surface: Use the included plastic spatula or the edge of another mold to drag/scrape across the surface of the mold, skimming off any excess clay. This will ensure that the surface is even and smooth.
Let it dry: Allow the clay to dry completely. The air-drying paste has a small degree of shrinkage as it dries, which will help the pieces release from the mold.
Remove the paper: Once the clay is completely dry, carefully peel off the paper tape from the back of the mold. This will help release the hobby bricks.
Remove the pieces: Use a blunt stick (like the reverse end of a brush) to gently push out the individual bricks from the mold. Be careful not to apply too much pressure, as you don't want to damage the delicate acrylic mold.
Smooth the edges: To give your bricks a more realistic look and get rid of any sharp edges, gently rub small amounts of them together between the palms of your hands. This will soften the edges and make the bricks look more like real bricks.
Use the bricks: You can now use the air-dried clay bricks for your crafting or construction project. We recommend gluing the pieces with PVA glue or an acrylic sealer such as decoupe product (like ModPodge) to secure the pieces.
Remember to handle the acrylic mold with care, as it's not as flexible as rubber or silicon molds and can break if bent.
With our methacrylate molds, your dioramas will come to life with authentic and captivating details - unleash your creativity and build sets that tell stories of their own! Take your projects to the next level of excellence with this essential accessory for lovers of high-quality dioramas.
Quantity: 2x pack
Scale: 1:35 (1:48-1:32)
The thickness of the pieces: 3 mm
Brick size: 2.85 x 5.7 mm
Mould size: 6 x 11 cm
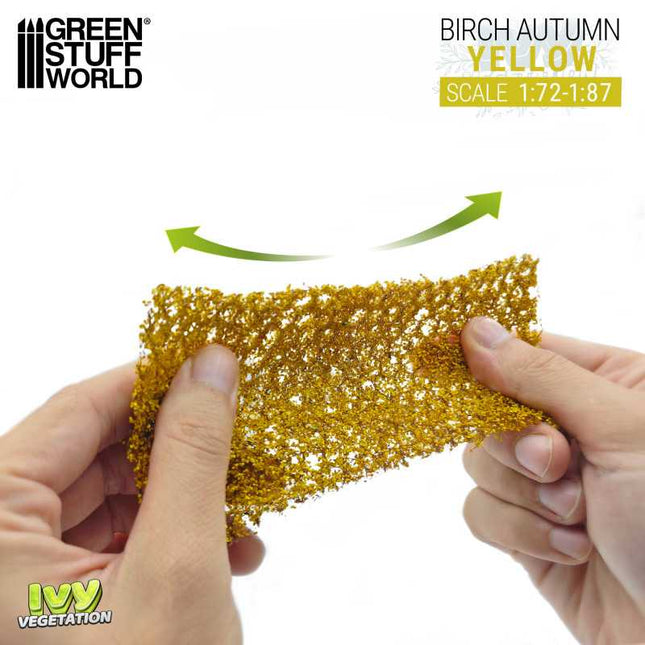
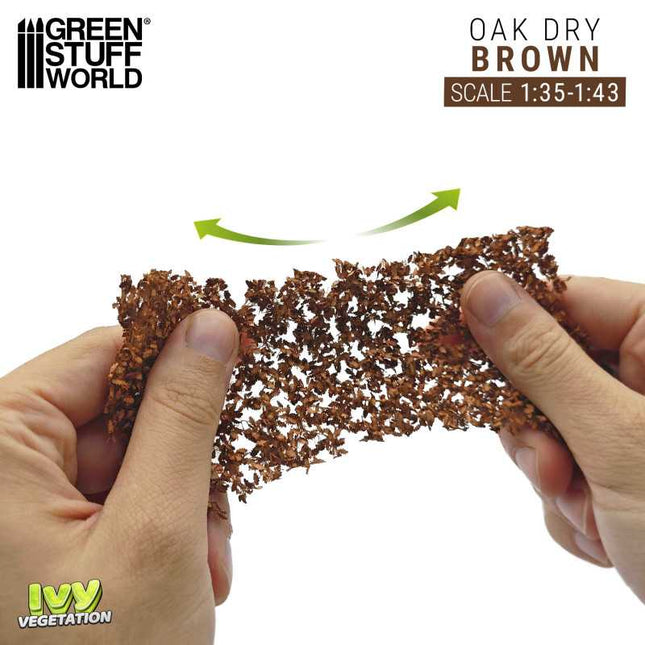
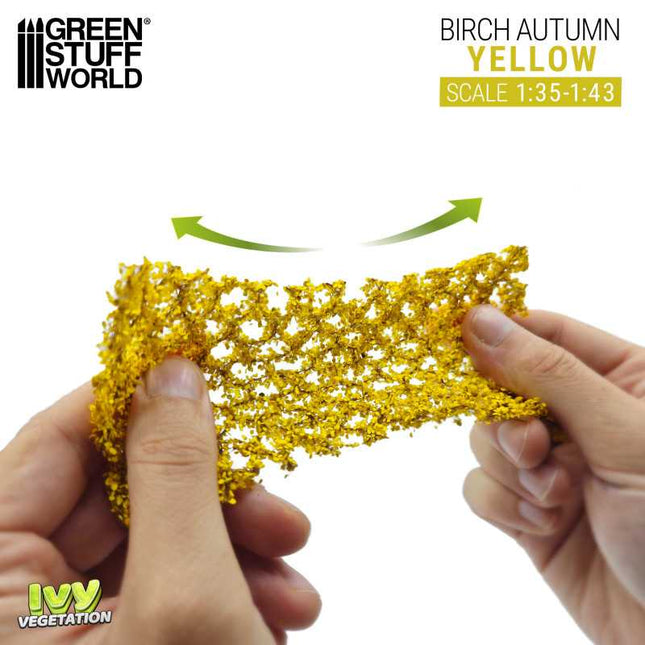
Ivy Foliage vegetation sheets from Green Stuff World are specialized sheets with leaves of different types, colors, and sizes designed to replicate the appearance of vine leaves and the leafiness of a tree on a miniature scale.
At Green Stuff World, we offer a wide selection of miniature basing materials, hobby leaves, vegetation, and many other types of paper plants for you to choose from to suit your project. With our variety of products, you can create scenes, figure and miniature bases, and dioramas quickly and easily, taking realism to a new level.
Don't wait any longer and dive into the world of possibilities that our miniature branch and leaf mats have to offer. Add a touch of nature to your creations with Green Stuff World.
Application and assembly:
If you are going to dress a wall of a building with miniature vines it is much more convenient to use a cyanoacrylate glue and go gluing some of the branches to the surface.
If you are going to make a miniature tree, it is advisable to use PVA glue or Tuft Glue. As there are many qualities of white glue and it is much easier to loosen the weeds from them, we strongly recommend using Tuft Glue for these functions so that it has a long-term hold.
Recommended Scale: 1:72 - 1:87Leaf Type: BirchColor: Yellow Content: 1x Realistic Ivy Foliage in 140x70mm
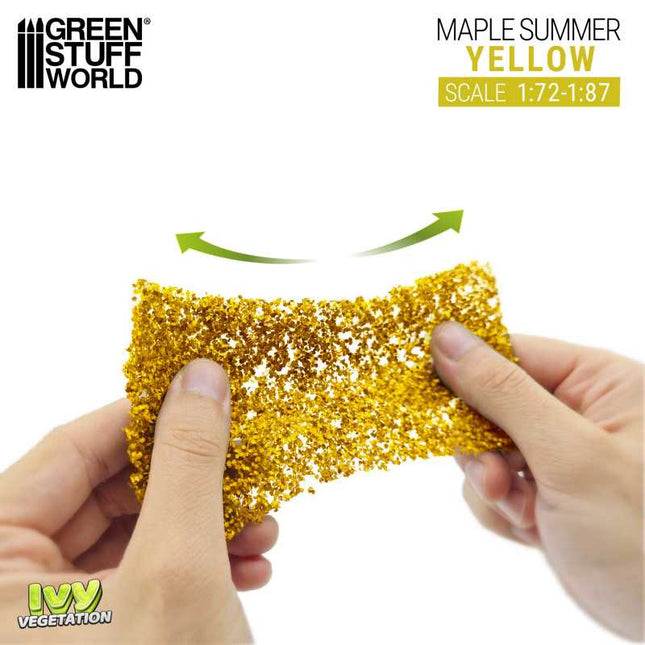
Ivy Foliage vegetation sheets from Green Stuff World are specialized sheets with leaves of different types, colors, and sizes designed to replicate the appearance of vine leaves and the leafiness of a tree on a miniature scale.
At Green Stuff World, we offer a wide selection of miniature basing materials, hobby leaves, vegetation, and many other types of paper plants for you to choose from to suit your project. With our variety of products, you can create scenes, figure and miniature bases, and dioramas quickly and easily, taking realism to a new level.
Don't wait any longer and dive into the world of possibilities that our miniature branch and leaf mats have to offer. Add a touch of nature to your creations with Green Stuff World.
Application and assembly:
If you are going to dress a wall of a building with miniature vines it is much more convenient to use a cyanoacrylate glue and go gluing some of the branches to the surface.
If you are going to make a miniature tree, it is advisable to use PVA glue or Tuft Glue. As there are many qualities of white glue and it is much easier to loosen the weeds from them, we strongly recommend using Tuft Glue for these functions so that it has a long-term hold.
Recommended Scale: 1:72 - 1:87Leaf Type: MapleColor: Yellow Content: 1x Realistic Ivy Foliage in 140x70mm
Ivy Foliage vegetation sheets from Green Stuff World are specialized sheets with leaves of different types, colors, and sizes designed to replicate the appearance of vine leaves and the leafiness of a tree on a miniature scale.
At Green Stuff World, we offer a wide selection of miniature basing materials, hobby leaves, vegetation, and many other types of paper plants for you to choose from to suit your project. With our variety of products, you can create scenes, figure and miniature bases, and dioramas quickly and easily, taking realism to a new level.
Don't wait any longer and dive into the world of possibilities that our miniature branch and leaf mats have to offer. Add a touch of nature to your creations with Green Stuff World.
Application and assembly:
If you are going to dress a wall of a building with miniature vines it is much more convenient to use a cyanoacrylate glue and go gluing some of the branches to the surface.
If you are going to make a miniature tree, it is advisable to use PVA glue or Tuft Glue. As there are many qualities of white glue and it is much easier to loosen the weeds from them, we strongly recommend using Tuft Glue for these functions so that it has a long-term hold.
Recommended Scale: 1:35 - 1:43Leaf Type: OakColor: BrownContent: 1x Realistic Ivy Foliage in 140x70mm
Martian Texture Acrylic Paste 30 ml by Green Stuff World, is an exceptionally versatile product that has become a must-have for modelers, hobbyists, and creative craft enthusiasts. This textured acrylic paint has gained popularity thanks to its ability to transform your bases for miniatures, dioramas, and a wide range of art projects into true masterpieces of realism.
With its rich shade, this texturing paste allows you to perfectly recreate the appearance of martian textures on diorama bases, scenes, or vignettes. High-quality formula and dense consistency allow you to apply it with precision, modeling terrains ranging from arid deserts to lush rural landscapes.
The versatility of this textured paints is further highlighted by its ability to adhere firmly to a variety of surfaces, such as plastic, resin, wood, and more. This makes it an ideal choice for customizing and bringing life to your miniatures, models, and dioramas.
It allows you to texturize and color a surface with a single application in the desired thickness. It dries quickly, which speeds up the work process and allows you to move forward with your project efficiently.
Whether you are creating an epic battle scene, a tranquil rural landscape or detailed scenery for your miniatures, this texturing paste is the perfect tool to add that touch of authenticity that will make your projects stand out. Discover the world of creative possibilities that Green Stuff World Martian Texturing Paste offers you and elevate your crafts and creations to an impressive level of realism.
Dries in 5-30 minutes depending on the thickness of the application. Water-soluble. Tools can be cleaned with water.
Contains 1 bottle of 30ml textured paste
#earth #series #textured #paste #greenstuffworld
Volcanic Earth Effect Texture Acrylic Paste 30ml by Green Stuff World, is an exceptionally versatile product that has become a must-have for modelers, hobbyists, and creative craft enthusiasts. This textured acrylic paint has gained popularity thanks to its ability to transform your bases for miniatures, dioramas, and a wide range of art projects into true masterpieces of realism.
With its rich Volcanic shade, this texturing paste allows you to perfectly recreate the appearance of earth textures on diorama bases, scenes, or vignettes. High-quality formula and dense consistency allow you to apply it with precision, modeling terrains ranging from arid deserts to lush rural landscapes.
The versatility of this textured paints is further highlighted by its ability to adhere firmly to a variety of surfaces, such as plastic, resin, wood, and more. This makes it an ideal choice for customizing and bringing life to your miniatures, models, and dioramas.
It allows you to texturize and color a surface with a single application in the desired thickness. It dries quickly, which speeds up the work process and allows you to move forward with your project efficiently.
Whether you are creating an epic battle scene, a tranquil rural landscape or detailed scenery for your miniatures, this texturing paste is the perfect tool to add that touch of authenticity that will make your projects stand out. Discover the world of creative possibilities that Green Stuff World Volcanic Earth Effect Texturing Paste offers you and elevate your crafts and creations to an impressive level of realism.
Dries in 5-30 minutes depending on the thickness of the application. Water-soluble. Tools can be cleaned with water.
Contains 1 bottle of 30ml textured paste
#earth #series #textured #paste #greenstuffworld
Terracotta Earth Effect Texture Acrylic Paste 30 ml by Green Stuff World, is an exceptionally versatile product that has become a must-have for modelers, hobbyists, and creative craft enthusiasts. This textured acrylic paint has gained popularity thanks to its ability to transform your bases for miniatures, dioramas, and a wide range of art projects into true masterpieces of realism.
With its rich reddish terracotta shade, this texturing paste allows you to perfectly recreate the appearance of earth textures on diorama bases, scenes, or vignettes. High-quality formula and dense consistency allow you to apply it with precision, modeling terrains ranging from arid deserts to lush rural landscapes.
The versatility of this textured paints is further highlighted by its ability to adhere firmly to a variety of surfaces, such as plastic, resin, wood, and more. This makes it an ideal choice for customizing and bringing life to your miniatures, models, and dioramas.
It allows you to texturize and color a surface with a single application in the desired thickness. It dries quickly, which speeds up the work process and allows you to move forward with your project efficiently.
Whether you are creating an epic battle scene, a tranquil rural landscape or detailed scenery for your miniatures, this texturing paste is the perfect tool to add that touch of authenticity that will make your projects stand out. Discover the world of creative possibilities that Green Stuff World Terracotta Earth Effect Texturing Paste offers you and elevate your crafts and creations to an impressive level of realism.
Dries in 5-30 minutes depending on the thickness of the application. Water-soluble. Tools can be cleaned with water.
Contains 1 bottle of 30ml textured paste
#earth #series #textured #paste #greenstuffworld
Ivy Foliage vegetation sheets from Green Stuff World are specialized sheets with leaves of different types, colors, and sizes designed to replicate the appearance of vine leaves and the leafiness of a tree on a miniature scale.
At Green Stuff World, we offer a wide selection of miniature basing materials, hobby leaves, vegetation, and many other types of paper plants for you to choose from to suit your project. With our variety of products, you can create scenes, figure and miniature bases, and dioramas quickly and easily, taking realism to a new level.
Don't wait any longer and dive into the world of possibilities that our miniature branch and leaf mats have to offer. Add a touch of nature to your creations with Green Stuff World.
Application and assembly:
If you are going to dress a wall of a building with miniature vines it is much more convenient to use a cyanoacrylate glue and go gluing some of the branches to the surface.
If you are going to make a miniature tree, it is advisable to use PVA glue or Tuft Glue. As there are many qualities of white glue and it is much easier to loosen the weeds from them, we strongly recommend using Tuft Glue for these functions so that it has a long-term hold.
Recommended Scale: 1:35 - 1:43Leaf Type: BirchColor: Yellow Content: 1x Realistic Ivy Foliage in 140x70mm
Range of extra opaque acrylic colors, including white opaque for model making and handicrafts.
This range is a specially developed line of paints designed for hobby modeling and miniature painting including 24 unsaturated opaque colors in pigmentation but with a high coverage capacity.
They are not transparent or see-through and when applied to a surface, they cover what's underneath, hiding any previous layers or simply using fewer coats, most of the time just one coat. They are thicker and have a high pigment concentration, which makes them excellent for achieving solid and vibrant color coverage. They are commonly used in crafts, and hobbies like model painting, to create rich and creative finishes.
Use them as a base paint to start your projects, or in those places where high coverage is necessary. Complement them with other model paints or inks to add saturation and color intensity. Dilute it with water or acrylic thinner to be able to use it with an airbrush.
This range is sold in dropper bottles with a metal agitator ball that will allow you a quick mixing. This type of dropper bottle, with the help of its nozzle, will also extend a lot of its shelf life by practically isolating contact with air.
Content: 1x 17ml
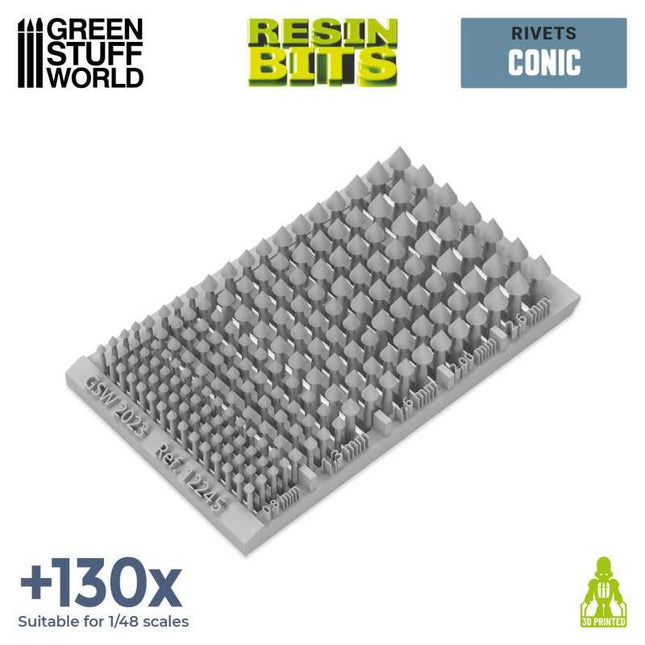
Hobby Micro Rivets - Conical
In the realm of modeling and miniatures, Hobby Micro Rivets and miniature metal fasteners play a vital role in simulating the appearance of connections and joints. These small raised elements, commonly found on a variety of objects like AFVs, civilian vehicles, aircraft, and structures, enhance the level of detail and realism in models.
By replicating the look of actually fastened joints, Hobby Micro Rivets bring authenticity to models, and their representation can vary depending on scale, materials used, and the modeler's personal preferences. Hobby Micro Rivets are particularly popular for converting Gunpla, Gundams, and futuristic robots, as they add intricate details to these imaginative creations.
Notably, even in the Warhammer 40,000 universe, Orks have recognized the value of a tiny metal rivet in their construction projects. The Orks rely on their unique technological abilities driven by the "Waaagh!" energy, a belief system where collective faith in something's efficacy makes it work. This enables the Orks to create functional machinery and structures despite their primitive designs.
The use of these miniature fasteners aligns with the Orks' construction approach, as they often repurpose salvaged materials, resulting in rugged-looking structures. Adding an extra layer of stability and reinforcement, these bolts fortify the joints, allowing Ork structures to endure the violent demands of warfare.
The application of a rivet in modeling and miniatures encompasses several purposes:
Visual intricacy: They visually represent the bolts found in real-life objects, enhancing the model's complexity and realism.
Authenticity: Their inclusion contributes to a more accurate representation of the subject being modeled.
You can create your own rivets and nuts with our silicone mould with any kind of putties and resins.
For hobbyists seeking to enhance their projects, a set of 3D-printed slotted hexagon miniature fasteners, including various shapes and sizes, is now available. Crafted with precision using high-quality resin, these elements allow modelers to add intricate details to their kits, bringing them to life.
Each set of rivets offers over 130 meticulously crafted bolts, enabling modelers to add precise and refined embellishments to their creations. With these hobby micro bolts at hand, you can elevate your modeling experience, immersing yourself in the art of miniature construction.
This product comes unpainted and is ideal for 25-28-35 mm miniatures (1:76, 1:48, 1:35).
This is a 3D-Printed Set that contains more than 130x
#resin #3d #printed #conical #rivets #small #greenstuffworld
Dry brush paint
Dry brushing is a popular technique used in the scale modeling and wargaming community for creating a variety of effects. This technique involves using brushes with a small amount of paint to selectively highlight raised areas of a model, terrain piece, or miniature figure.
Dry brush paints are specifically designed and are thicker than traditional ones and have a higher pigment concentration, allowing the user to layer gradually to build up the desired effect and therefore making them ideal for creating a more subtle effect. They have a unique texture and consistency, which can help to create specific effects such as rust, weathering, or stone texture.
It is important to use a good quality, flat or round brush with flexible bristles. This will help to create the desired effect and ensure that the paint is applied evenly and without damaging their bristles. The brush should be loaded with a small amount of paint, and the excess should be removed before applying it to the model or terrain piece. This will help to prevent clumping and ensure that the paint is applied smoothly.
These paints are a great option for those who are new to the dry brushing technique, which can be used in a variety of applications, from highlighting the details of miniature figures to creating a weathered appearance on vehicles and terrain pieces. It is a versatile technique that can be used on a range of surfaces.
Common uses in modeling for Dry Brush Paints
These paints, in particular, are often used in this Dry Brushing technique. Here are some common uses in modeling:
Highlighting details: They are often used to highlight the details on miniature figures, such as wrinkles in clothing, facial features, and weapons.
Creating weathering effects: They are ideal for creating weathering effects on models, such as rust, dirt, and grime. By lightly dragging a dry paintbrush loaded with paint over the surface of the model, it creates a worn, weathered appearance.
Adding texture: They can be used to add texture to a model's surface. For example, a dry brush with silver can be used to create the appearance of scratches on metal surfaces.
Enhancing contrast: They can also be used to enhance contrast on a model's surface, creating a more visually appealing appearance. This is particularly useful when painting terrain pieces or large models.
Painting scenery: They can be used to paint scenery, such as rocks, trees, and buildings. By using a dry brushing technique, it creates a more realistic appearance with subtle shades and highlights.
Content: 30ml
#dry #brush #paint #greenstuffworld #modeling #courage #mauve
Dry brush paint
Dry brushing is a popular technique used in the scale modeling and wargaming community for creating a variety of effects. This technique involves using brushes with a small amount of paint to selectively highlight raised areas of a model, terrain piece, or miniature figure.
Dry brush paints are specifically designed and are thicker than traditional ones and have a higher pigment concentration, allowing the user to layer gradually to build up the desired effect and therefore making them ideal for creating a more subtle effect. They have a unique texture and consistency, which can help to create specific effects such as rust, weathering, or stone texture.
It is important to use a good quality, flat or round brush with flexible bristles. This will help to create the desired effect and ensure that the paint is applied evenly and without damaging their bristles. The brush should be loaded with a small amount of paint, and the excess should be removed before applying it to the model or terrain piece. This will help to prevent clumping and ensure that the paint is applied smoothly.
These paints are a great option for those who are new to the dry brushing technique, which can be used in a variety of applications, from highlighting the details of miniature figures to creating a weathered appearance on vehicles and terrain pieces. It is a versatile technique that can be used on a range of surfaces.
Common uses in modeling for Dry Brush Paints
These paints, in particular, are often used in this Dry Brushing technique. Here are some common uses in modeling:
Highlighting details: They are often used to highlight the details on miniature figures, such as wrinkles in clothing, facial features, and weapons.
Creating weathering effects: They are ideal for creating weathering effects on models, such as rust, dirt, and grime. By lightly dragging a dry paintbrush loaded with paint over the surface of the model, it creates a worn, weathered appearance.
Adding texture: They can be used to add texture to a model's surface. For example, a dry brush with silver can be used to create the appearance of scratches on metal surfaces.
Enhancing contrast: They can also be used to enhance contrast on a model's surface, creating a more visually appealing appearance. This is particularly useful when painting terrain pieces or large models.
Painting scenery: They can be used to paint scenery, such as rocks, trees, and buildings. By using a dry brushing technique, it creates a more realistic appearance with subtle shades and highlights.
Content: 30ml
#dry #brush #paint #greenstuffworld #modeling #ultramarine #touch
Dry brush paint
Dry brushing is a popular technique used in the scale modeling and wargaming community for creating a variety of effects. This technique involves using brushes with a small amount of paint to selectively highlight raised areas of a model, terrain piece, or miniature figure.
Dry brush paints are specifically designed and are thicker than traditional ones and have a higher pigment concentration, allowing the user to layer gradually to build up the desired effect and therefore making them ideal for creating a more subtle effect. They have a unique texture and consistency, which can help to create specific effects such as rust, weathering, or stone texture.
It is important to use a good quality, flat or round brush with flexible bristles. This will help to create the desired effect and ensure that the paint is applied evenly and without damaging their bristles. The brush should be loaded with a small amount of paint, and the excess should be removed before applying it to the model or terrain piece. This will help to prevent clumping and ensure that the paint is applied smoothly.
These paints are a great option for those who are new to the dry brushing technique, which can be used in a variety of applications, from highlighting the details of miniature figures to creating a weathered appearance on vehicles and terrain pieces. It is a versatile technique that can be used on a range of surfaces.
Common uses in modeling for Dry Brush Paints
These paints, in particular, are often used in this Dry Brushing technique. Here are some common uses in modeling:
Highlighting details: They are often used to highlight the details on miniature figures, such as wrinkles in clothing, facial features, and weapons.
Creating weathering effects: They are ideal for creating weathering effects on models, such as rust, dirt, and grime. By lightly dragging a dry paintbrush loaded with paint over the surface of the model, it creates a worn, weathered appearance.
Adding texture: They can be used to add texture to a model's surface. For example, a dry brush with silver can be used to create the appearance of scratches on metal surfaces.
Enhancing contrast: They can also be used to enhance contrast on a model's surface, creating a more visually appealing appearance. This is particularly useful when painting terrain pieces or large models.
Painting scenery: They can be used to paint scenery, such as rocks, trees, and buildings. By using a dry brushing technique, it creates a more realistic appearance with subtle shades and highlights.
Content: 30ml
#dry #brush #paint #greenstuffworld #modeling #red #bark
Dry brush paint
Dry brushing is a popular technique used in the scale modeling and wargaming community for creating a variety of effects. This technique involves using brushes with a small amount of paint to selectively highlight raised areas of a model, terrain piece, or miniature figure.
Dry brush paints are specifically designed and are thicker than traditional ones and have a higher pigment concentration, allowing the user to layer gradually to build up the desired effect and therefore making them ideal for creating a more subtle effect. They have a unique texture and consistency, which can help to create specific effects such as rust, weathering, or stone texture.
It is important to use a good quality, flat or round brush with flexible bristles. This will help to create the desired effect and ensure that the paint is applied evenly and without damaging their bristles. The brush should be loaded with a small amount of paint, and the excess should be removed before applying it to the model or terrain piece. This will help to prevent clumping and ensure that the paint is applied smoothly.
These paints are a great option for those who are new to the dry brushing technique, which can be used in a variety of applications, from highlighting the details of miniature figures to creating a weathered appearance on vehicles and terrain pieces. It is a versatile technique that can be used on a range of surfaces.
Common uses in modeling for Dry Brush Paints
These paints, in particular, are often used in this Dry Brushing technique. Here are some common uses in modeling:
Highlighting details: They are often used to highlight the details on miniature figures, such as wrinkles in clothing, facial features, and weapons.
Creating weathering effects: They are ideal for creating weathering effects on models, such as rust, dirt, and grime. By lightly dragging a dry paintbrush loaded with paint over the surface of the model, it creates a worn, weathered appearance.
Adding texture: They can be used to add texture to a model's surface. For example, a dry brush with silver can be used to create the appearance of scratches on metal surfaces.
Enhancing contrast: They can also be used to enhance contrast on a model's surface, creating a more visually appealing appearance. This is particularly useful when painting terrain pieces or large models.
Painting scenery: They can be used to paint scenery, such as rocks, trees, and buildings. By using a dry brushing technique, it creates a more realistic appearance with subtle shades and highlights.
Content: 30ml
#dry #brush #paint #greenstuffworld #modeling #dry #violet
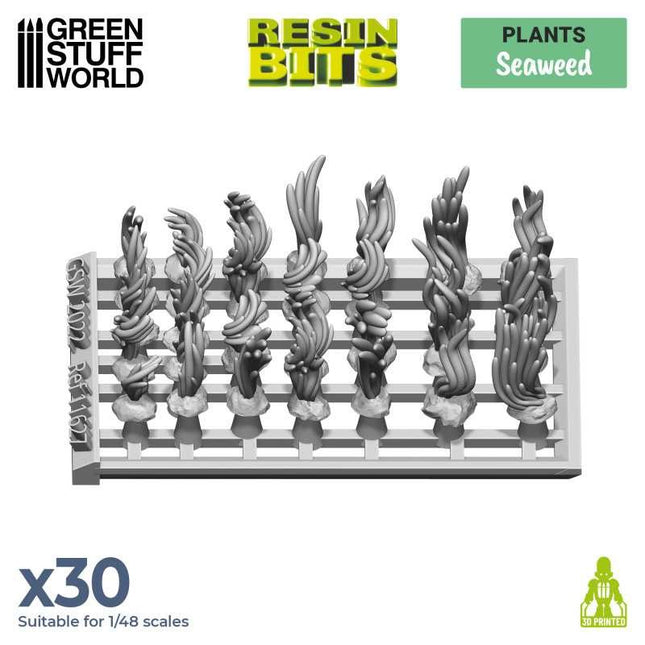
3D printed set
Set of high quality resin seaweed. Carefully designed to imitate real species and come in different shapes and sizes to suit all needs and scales. Ideal for dioramas and scenery.
This product comes unpainted and is perfect for 1:48.
Contains: x30
3D geprint hoogkwaliteit resin
Set van 30 zeewier perfect voor schaal 1:48. Ontwerp is zo gemaakt dat er allerlei variaties groen mee kunnen worden gemaakt op je base, scenery of terrain.
Inhoud: 30stuks
Schaal 1:48
#resin #3d #printed #grass #clumps #gras #zee #zeewier #seaweed #greenstuffworld #vegetatie
Deze ink heeft veel pigment en is een verf met zowel aquarel als acrylverf functies. Normaal moet je acryl verf verdunnen om goed te vloeien, deze verf vloeit in plooien, kieren, kleine gaatjes, en andere reliefpunten. Hierdoor krijg je diepte zonder veel werk. Zeer heldere kleuren door de hoge graad aan pigment, duidelijke dekking.
Met een kwast of airbrush aanbrengen. De verf droogt dekkend op (dus niet als een wash ink als aquarelverf) op oppervlakten maar gaat zich vooral hechten in groeven, hoeken, diepte, gaatjes, oneffenheden etc. Een bijzondere goede kwaliteit verf. Elk flesje heeft 17ml inhoud. Verdund of onverdund gebruiken op allerlei soorten ondergrond. Eventueel bij teveel verdund gebruik kan er nog een laag aangebracht worden. Droogt mat op. Kan gemengd worden met andere acrylverf.
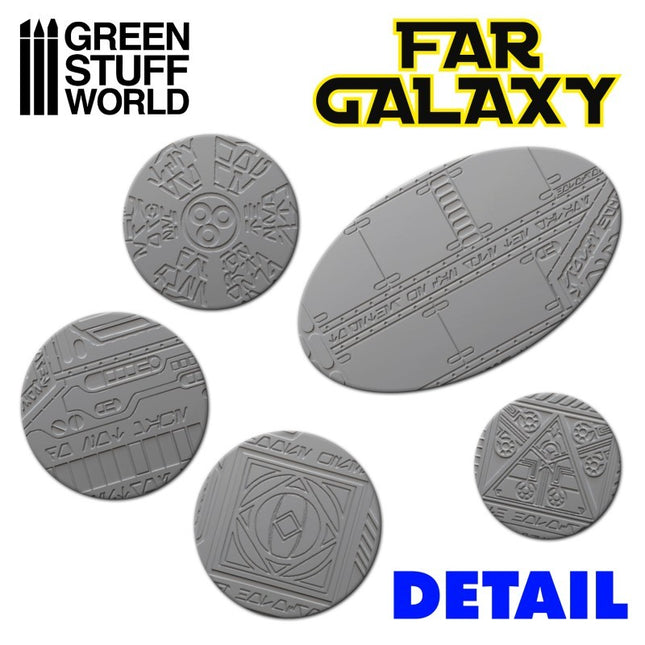
Figuur roller Far GalaxyRoller voorzien van een basisfiguur waarmee een continu herhaald patroon op klei en plamuren kan worden gedrukt. Gemaakt van helder PMMA-plastic met verbazingwekkende antikleefeigenschappen. Niet giftig. Ze zijn er in verschillende texturen die u kunt kopen op basis van uw specifieke behoeften.Lengte: 14,50 cm (5'5 inches)Diameter: 2,5cm (1 inch)
Patroon varieert met verschillende steensoorten, motieven (fleur de lis) en een filigree / rasters
GEBRUIK INSTRUCTIES:1e - Meng de epoxyhars / klei / polymer klei tot een egaal plakkaat2e - Zorg voor een optimaal resultaat voor een glad en egaal oppervlak zodat het patroon goed zal overkomen. Gebruik desnoods een deegroller, fles of ander glad rond voorwerp. 3e - Afhankelijk van het type plamuur / klei is het raadzaam om de figuurroller nat te maken om vastzitten te voorkomen.4e - Verplaats de figuurroller langzaam en oefen gelijkmatige druk uit op alle punten voor een gelijkmatige afdruk op de klei, epoxy kneedhars of ander materiaal5e - Haal overtollig klei weg met een scherp mes. Het wordt aanbevolen om dit te doen als het eenmaal is opgedroogd om vervormingen in de stopverf / klei te voorkomen.Materialen:Er zijn veel verschillende kleien of epoxyhars op de markt en ze kunnen allemaal worden voorzien van een afdruk met de roller. Gebruik verschillende druk bij de verschillende materialen.Gewoonlijk zijn polymeerklei (Fimo of Sculpey-type) vrij eenvoudig om met deze Rolling Pins te bewerken, omdat ze een gemakkelijke correctie van fouten toelaten voordat ze worden gebakken. Wil je de structuur overbrengen op een basis, gebruik dan een MDF basis. Dit omdat je de polymeerklei direct op een MDF-basis kunt zetten en alles in de oven, inclusief de basis, kunt plaatsen. De droogtijd van deze klei is ongeveer 15 minuten bij 150ºC. MDF hout laat wel een lichte geur achter zoals bij geroosterd brood, maar maak je geen zorgen dat het zal branden!
In het geval van epoxy basis zoals GreenStuff zijn er verschillende technieken die vergelijkbare resultaten opleveren. Het goede is: je hoeft ze niet te bakken, alleen te laten drogen en daarna kun je ze direct verwerken. Met Green Stuff, dat bijzonder kleverig is, is het het beste om de roller of de klei enigszins te bevochtigen voor je de figuur roller erover heen walst. U kunt ook de kleverigheid verminderen door talkpoeder toe te passen of door een oliebasis als Vaseline te gebruiken.Andere epoxy klei zoals de Milliput putty, bijvoorbeeld, zijn ook geschikt, maar we zouden niet aanraden om ze veel nat te maken. Als het mengsel te plakkerig is, is het beter om door te gaan met kneden totdat de plakkerigheid verdwenen is.
Voor dit soort epoxyplamuren is het erg belangrijk om de deegrollen na gebruik goed te reinigen.Schoonmaak instructies:Gebruik na het werken met de roller een penseel met harde haren (of een scratch brush) en voldoende water om eventuele resten op de roller te verwijderen, indien nodig.
Om de veiligheid te garanderen, moeten kinderen nauwlettend worden gecontroleerd door een verantwoordelijke volwassene.
#greenstuffworld #rolling #pin #far #galaxy
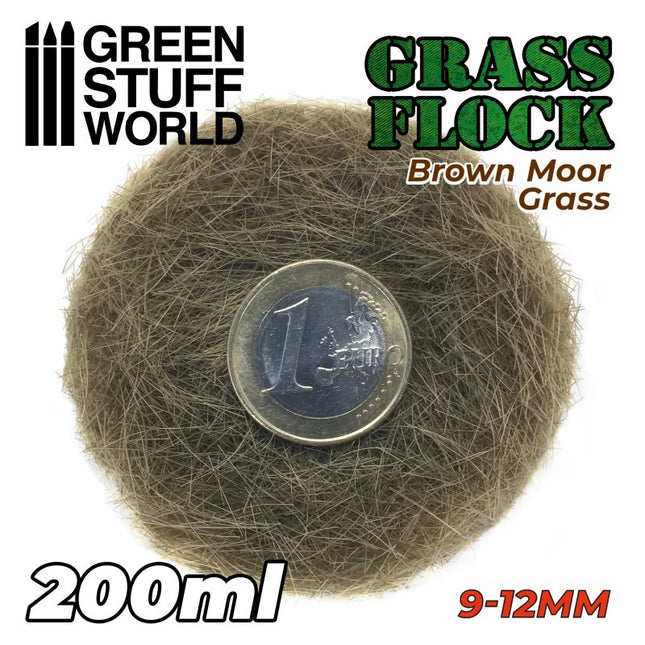
Statisch Gras
Green Stuff World's statisch gras heeft een realistisch kleur en is van de hoogste kwaliteit. Speciaal ontwikkeld om de bases van je miniaturen mee te bewerken, voor scenery of terrein. Gebruik witte PVA lijm, green stuff world tufts lijm of een statisch geladen apparaatje (flock box bijv) om de sprietjes omhoog te krijgen.
Dit statisch gras is verpakt in handige potjes van 200ml zodat je je werkplek netjes kan houden, gras niet overal heen ontsnapt etc. De hoeveelheid is voldoende om de voeten van 1 of 2 fracties te kietelen dan wel een een dubbele A4 met een flinke laag te voorzien.
Grasspriet hoogte: 9-12 mm
Kleur: brown moor
Static Grass
Green Stuff World's static grass is realistic and of high quality. Designed to decorate the bases of your miniatures or for scenography and terrain building. It is recommended to apply with white glue.
The static grass flock is packaged in closed plastic boxes of great capacity to facilitate their use. This amount will allow you to easily decorate one or more armies and create dozens of sets and bases.
Content: 200 ml
brown moor
#static #grass #flock #greenstuffworld #200ml #brown #moor
Statisch Gras
Green Stuff World's statisch gras heeft een realistisch kleur en is van de hoogste kwaliteit. Speciaal ontwikkeld om de bases van je miniaturen mee te bewerken, voor scenery of terrein. Gebruik witte PVA lijm, green stuff world tufts lijm of een statisch geladen apparaatje (flock box bijv) om de sprietjes omhoog te krijgen.
Dit statisch gras is verpakt in handige potjes van 200ml zodat je je werkplek netjes kan houden, gras niet overal heen ontsnapt etc. De hoeveelheid is voldoende om de voeten van 1 of 2 fracties te kietelen dan wel een een dubbele A4 met een flinke laag te voorzien.
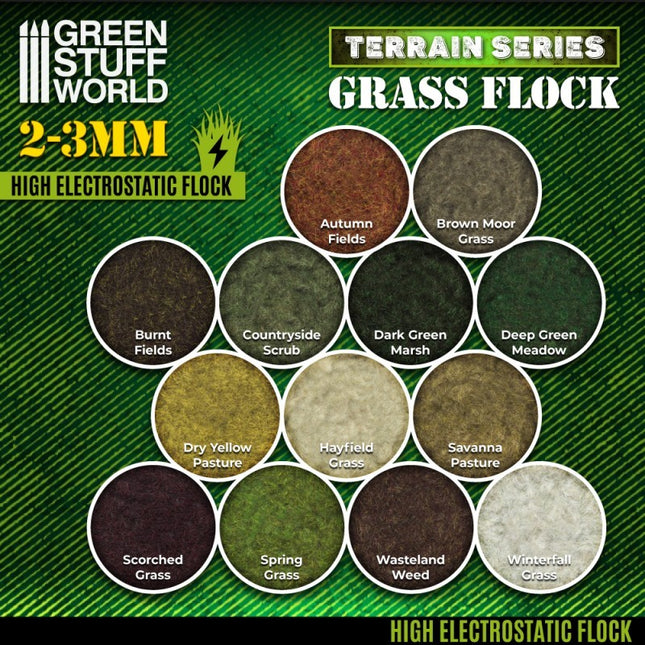
Grasspriet hoogte: 2-3 mm
Kleur: hayfield grass
Static Grass
Green Stuff World's static grass is realistic and of high quality. Designed to decorate the bases of your miniatures or for scenography and terrain building. It is recommended to apply with white glue.
The static grass flock is packaged in closed plastic boxes of great capacity to facilitate their use. This amount will allow you to easily decorate one or more armies and create dozens of sets and bases.
Content: 200 ml
Hayfield grass
#static #grass #flock #greenstuffworld #200ml #hayfield #grass
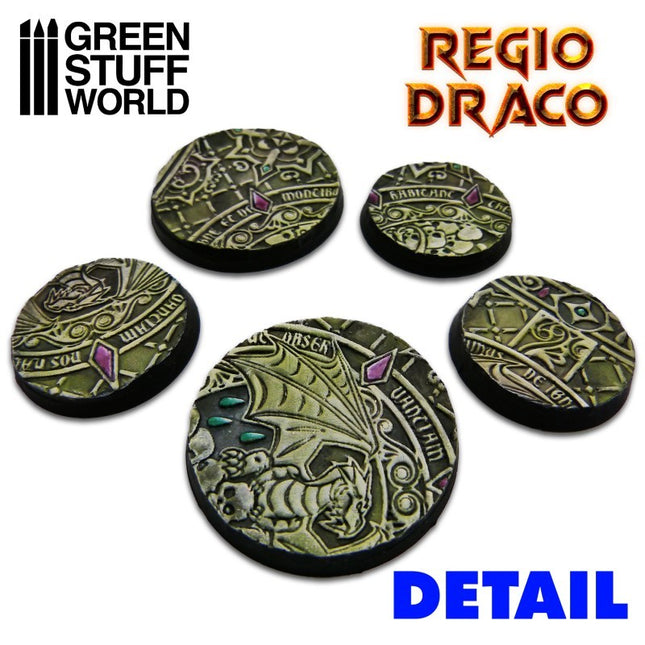
Rolling pin Regio Draco - Figuur roller Draken
Roller voorzien van een basisfiguur waarmee een continu herhaald patroon op klei en plamuren kan worden gedrukt. Gemaakt van helder PMMA-plastic met verbazingwekkende antikleefeigenschappen. Niet giftig. Ze zijn er in verschillende texturen die u kunt kopen op basis van uw specifieke behoeften.Lengte: 14'50 cm (5'5 inches)Diameter: 2'5cm (1 inch)Aanbevolen schaal: 1/35-1/43-1/48-1/76 of Warhammer scale
GEBRUIK INSTRUCTIES1e - Meng de epoxyhars / klei / polymer klei tot een egaal plakkaat2e - Zorg voor een optimaal resultaat voor een glad en egaal oppervlak zodat het patroon goed zal overkomen. Gebruik desnoods een deegroller, fles of ander glad rond voorwerp. 3e - Afhankelijk van het type plamuur / klei is het raadzaam om de figuurroller nat te maken om vastzitten te voorkomen.4e - Verplaats de figuurroller langzaam en oefen gelijkmatige druk uit op alle punten voor een gelijkmatige afdruk op de klei, epoxy kneedhars of ander materiaal5e - Haal overtollig klei weg met een scherp mes. Het wordt aanbevolen om dit te doen als het eenmaal is opgedroogd om vervormingen in de stopverf / klei te voorkomen.Materialen:Er zijn veel verschillende kleien of epoxyhars op de markt en ze kunnen allemaal worden voorzien van een afdruk met de roller. Gebruik verschillende druk bij de verschillende materialen.Gewoonlijk zijn polymeerklei (Fimo of Sculpey-type) vrij eenvoudig om met deze Rolling Pins te bewerken, omdat ze een gemakkelijke correctie van fouten toelaten voordat ze worden gebakken. Wil je de structuur overbrengen op een basis, gebruik dan een MDF basis. Dit omdat je de polymeerklei direct op een MDF-basis kunt zetten en alles in de oven, inclusief de basis, kunt plaatsen. De droogtijd van deze klei is ongeveer 15 minuten bij 150ºC. MDF hout laat wel een lichte geur achter zoals bij geroosterd brood, maar maak je geen zorgen dat het zal branden!
Wil je alleen een prachtig pad, veranda, straat of iets anders maken dan kun je dit natuurlijk op een platte plaat drogen in de oven.In het geval van epoxy basis zoals GreenStuff zijn er verschillende technieken die vergelijkbare resultaten opleveren. Het goede is: je hoeft ze niet te bakken, alleen te laten drogen en daarna kun je ze direct verwerken. Met Green Stuff, dat bijzonder kleverig is, is het het beste om de roller of de klei enigszins te bevochtigen voor je de figuur roller erover heen walst. U kunt ook de kleverigheid verminderen door talkpoeder toe te passen of door een oliebasis als Vaseline te gebruiken.Andere epoxy klei zoals de Milliput putty, bijvoorbeeld, zijn ook geschikt, maar we zouden niet aanraden om ze veel nat te maken. Als het mengsel te plakkerig is, is het beter om door te gaan met kneden totdat de plakkerigheid verdwenen is.
Voor dit soort epoxyplamuren is het erg belangrijk om de rollen na gebruik goed te reinigen.Schoonmaak instructies:Gebruik na het werken met de roller een penseel met harde haren en voldoende water om eventuele resten op de roller te verwijderen, indien nodig.
Om de veiligheid te garanderen, moeten kinderen nauwlettend worden gecontroleerd door een verantwoordelijke volwassene.
#regio #draco #draken #dragon #idoneth #deepkin #greenstuffworld #rollingpin
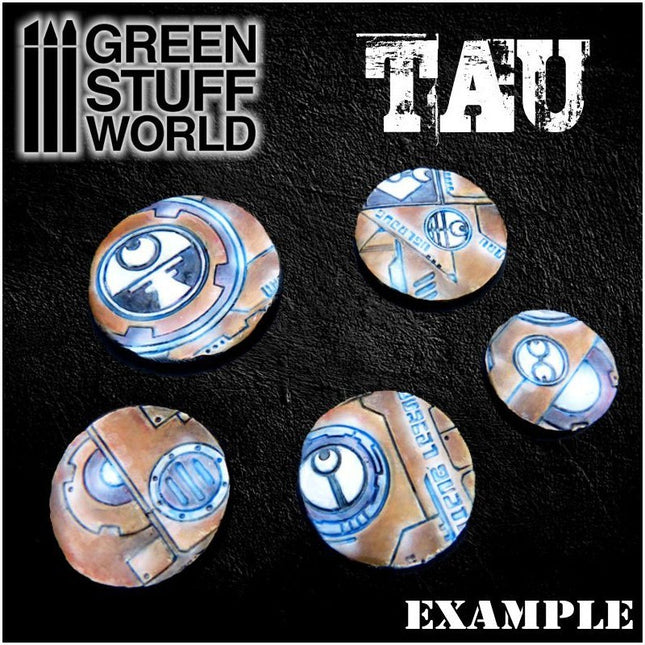
Figuur roller T'au of Tau Empire
Roller voorzien van een basisfiguur waarmee een continu herhaald patroon op klei en plamuren kan worden gedrukt. Gemaakt van helder PMMA-plastic met verbazingwekkende antikleefeigenschappen. Niet giftig. Ze zijn er in verschillende texturen die u kunt kopen op basis van uw specifieke behoeften.Lengte: 14'50 cm (5'5 inches)Diameter: 2'5cm (1 inch)GEBRUIK INSTRUCTIES:1e - Meng de epoxyhars / klei / polymer klei tot een egaal plakkaat2e - Zorg voor een optimaal resultaat voor een glad en egaal oppervlak zodat het patroon goed zal overkomen. Gebruik desnoods een deegroller, fles of ander glad rond voorwerp. 3e - Afhankelijk van het type plamuur / klei is het raadzaam om de figuurroller nat te maken om vastzitten te voorkomen.4e - Verplaats de figuurroller langzaam en oefen gelijkmatige druk uit op alle punten voor een gelijkmatige afdruk op de klei, epoxy kneedhars of ander materiaal5e - Haal overtollig klei weg met een scherp mes. Het wordt aanbevolen om dit te doen als het eenmaal is opgedroogd om vervormingen in de stopverf / klei te voorkomen.Materialen:Er zijn veel verschillende kleien of epoxyhars op de markt en ze kunnen allemaal worden voorzien van een afdruk met de roller. Gebruik verschillende druk bij de verschillende materialen.Gewoonlijk zijn polymeerklei (Fimo of Sculpey-type) vrij eenvoudig om met deze Rolling Pins te bewerken, omdat ze een gemakkelijke correctie van fouten toelaten voordat ze worden gebakken. Wil je de structuur overbrengen op een basis, gebruik dan een MDF basis. Dit omdat je de polymeerklei direct op een MDF-basis kunt zetten en alles in de oven, inclusief de basis, kunt plaatsen. De droogtijd van deze klei is ongeveer 15 minuten bij 150ºC. MDF hout laat wel een lichte geur achter zoals bij geroosterd brood, maar maak je geen zorgen dat het niet zal branden!
In het geval van epoxy basis zoals GreenStuff zijn er verschillende technieken die vergelijkbare resultaten opleveren. Het goede is: je hoeft ze niet te bakken, alleen te laten drogen en daarna kun je ze direct verwerken. Met Green Stuff, dat bijzonder kleverig is, is het het beste om de roller of de klei enigszins te bevochtigen voor je de figuur roller erover heen walst. U kunt ook de kleverigheid verminderen door talkpoeder toe te passen of door een oliebasis als Vaseline te gebruiken.Andere epoxy klei zoals de Milliput putty, bijvoorbeeld, zijn ook geschikt, maar we zouden niet aanraden om ze veel nat te maken. Als het mengsel te plakkerig is, is het beter om door te gaan met kneden totdat de plakkerigheid verdwenen is.
Voor dit soort epoxyplamuren is het erg belangrijk om de deegrollen na gebruik goed te reinigen.Schoonmaak instructies:Gebruik na het werken met de deegroller een penseel met harde haren en voldoende water om eventuele resten op de deegroller te verwijderen, indien nodig.
Om de veiligheid te garanderen, moeten kinderen nauwlettend worden gecontroleerd door een verantwoordelijke volwassene.